When the holiday season arrives, so does the call for all things that glitter and shine. It’s a time for celebration, for joy, and for fashion that feels just as festive as the occasion.

Sequins are the undisputed champions of holiday glamour. They catch the light, turn heads, and instantly elevate any outfit from simple to showstopping. But wearing them can sometimes feel intimidating. How much is too much? Can you wear sparkles during the day?
This guide is here to answer those questions and inspire you. We’ve gathered 38 distinct and stylish ways to incorporate sequins into your wardrobe, from the most subtle shimmer to the boldest, most artistic statements. Better yet, we’ll show you how to create these stunning looks yourself with easy, step-by-step DIY instructions.
1. The Celestial Sheer Embellished Gown

This gown presents a truly breathtaking statement. A sheer, form-fitting silhouette provides a delicate canvas for the intricate beadwork. Dark and silver sequins form mesmerizing starburst patterns that cascade down the length of the dress, creating a look reminiscent of a clear winter’s night sky.
The high neckline and long sleeves offer a sophisticated balance to the sheer fabric. This design choice ensures elegance remains at the forefront. It’s a garment crafted for significant holiday galas and formal events where making a memorable entrance is key. The craftsmanship speaks for itself, offering sparkle from every angle.
DIY Starry Night Dress Instructions
Let’s make a dress with a similar starry vibe. It’s super easy and fun!
What You’ll Need:
- A plain, simple dress (black, navy, or nude color works great!)
- Fabric glue (the kind that dries clear)
- Silver and black loose sequins
- A piece of chalk or a fabric pencil that will wash off
- Cardboard big enough to fit inside the dress
- A picture of a simple star to look at
Step-by-Step Guide:
- Get Your Station Ready: First, lay some old newspapers on a table or the floor. Slide the piece of cardboard inside your dress. This is important because it will stop the glue from sticking the front and back of the dress together!
- Draw Your Stars: Using your chalk or fabric pencil, lightly draw some star shapes onto your dress. You can draw big ones, small ones, or a mix of both. Don’t worry about making them look exactly the same.
- Time to Glue: Squeeze a thin line of fabric glue directly onto the chalk lines of ONE star. It’s best to work on one star at a time so the glue doesn’t dry too fast.
- Add Your Sequins: Now for the fun part! Carefully place your silver and black sequins onto the glue. You can make a pattern or mix them up for extra sparkle. You can use your fingers or a pair of tweezers to place them.
- Repeat and Dry: Keep going until all your chalk stars are covered in sparkly sequins. Once you are done, leave the dress lying flat in a safe place to dry completely. This might take a few hours or even overnight. Read the instructions on your glue bottle.
- The Final Shake: When the glue is totally dry, pick up the dress and give it a very gentle shake to remove any loose sequins that didn’t stick. Your amazing Starry Night Dress is now ready to wear!
2. The Minimalist Sequin Tunic

For a touch of understated glamour, this grey tunic is a superb choice. It combines comfort with a subtle sparkle, proving that sequins don’t always have to be loud. The beauty lies in its simplicity and the artful scatter of sequins.
A cascade of dark, shimmering discs adorns the shoulder and a gentle curve near the hem. This restrained approach to embellishment makes the tunic versatile. You can pair it with sleek trousers for a polished, contemporary holiday outfit that is both comfortable and chic.
DIY Subtle Sparkle Tunic Instructions
Ready to add a little sparkle to a comfy tunic? Let’s get started!
What You’ll Need:
- A plain sweater or tunic (gray, black, or any solid color)
- Fabric glue that dries clear
- A handful of sequins (any color you like!)
- A piece of chalk or a washable fabric marker
- Cardboard to place inside the tunic
Step-by-Step Guide:
- Prep Your Tunic: Put the cardboard inside your tunic. This will keep the front and back from getting glued together.
- Plan Your Sparkle: Use your chalk to draw a curved line on one shoulder and another curved line near the bottom hem on the opposite side. This is where your sequins will go.
- Start Gluing: Squeeze a small dot of glue inside your chalked area.
- Place a Sequin: Put one sequin on top of the dot of glue. Press it down gently.
- Create a Cluster: Keep adding dots of glue and sequins inside the area you drew on the shoulder. You can place them close together or a little spread out.
- Decorate the Hem: Do the same thing for the curved line you drew near the bottom.
- Let It Dry: Let your tunic lie flat for several hours until the glue is completely dry. Then, your new sparkly top is ready!
3. The Vibrant Color-Block Sequin Coat

Step out and turn heads with this brilliantly bold sequin coat. This piece is a celebration of color, featuring large blocks of vibrant, shimmering sequins. Bright pink, orange, blue, and green come together in a joyful patchwork design that feels both playful and high-fashion.
This coat is the entire outfit. You can throw it on over the simplest black dress or pants and instantly have a festive, high-impact look. The relaxed fit ensures you stay comfortable while shining bright at any holiday gathering. It’s a wonderful way to showcase a fun-loving personality.
DIY Colorful Sequin Block Coat Instructions
Let’s make a super fun coat that looks like it’s made of colorful, sparkly blocks!
What You’ll Need:
- A simple, plain coat
- Sequin fabric in a few different bright colors (you can find this at a craft store)
- Fabric glue
- Sharp scissors
- A ruler and chalk
Step-by-Step Guide:
- Plan Your Blocks: Lay your coat flat. Use your ruler and chalk to draw big squares and rectangles on it. Think about where you want each color to go.
- Cut Your Sparkles: Take your first color of sequin fabric. Carefully cut out a square or rectangle shape that matches one of the shapes you drew on the coat.
- Glue It On: Spread a thin layer of fabric glue on the back of the sequin fabric piece.
- Stick It Down: Carefully press the sequin fabric piece onto the matching chalk shape on your coat. Smooth it down with your hands.
- Keep Going: Continue cutting and gluing your different colored sequin fabric pieces until you’ve covered all your chalk shapes.
- Dry Time: Let the coat lie flat for a full day to make sure all the glue is completely dry before you wear your amazing new creation.
4. The Futuristic Iridescent Mini Dress

This dress is a masterpiece of modern design. It features a structured, powerful silhouette with sharp shoulders and a form-fitting body. The sequins themselves are iridescent, shifting from deep purple to electric blue and green with every movement, creating a mesmerizing, liquid-like effect.
Adding to its futuristic feel is a molded, metallic bust piece and bold zipper detailing. This is not just a dress; it’s a piece of wearable art. It’s designed for the fashion-forward individual looking to make a bold and unforgettable statement at a New Year’s Eve party or a high-energy holiday event.
DIY Cosmic Shimmer Dress Instructions
This one looks tricky, but we can make a simpler version that’s still out of this world!
What You’ll Need:
- A plain, long-sleeved black mini dress
- A piece of iridescent or color-changing sequin fabric
- Fabric glue
- Scissors
- Black electrical tape or thin black duct tape
Step-by-Step Guide:
- Create the Front Panel: Cut a piece of your iridescent sequin fabric that is large enough to cover the front of your dress from the chest to the bottom.
- Attach the Panel: Lay the dress flat. Spread fabric glue on the back of your sequin panel and carefully press it onto the front of the dress. Let it dry for a bit.
- Add the “Armor” Lines: Once the fabric is stuck on, use the black tape to create the cool lines you see on the original dress. You can add lines down the sides and under the chest to get a similar look. Press the tape down firmly.
- Let it Set: Give the glue more time to dry completely. Your cosmic dress is now ready for a space-age party!
5. The Edgy Sequin Bustier

A sequin bustier offers a cool, edgy way to wear sparkles. This piece is covered in gunmetal black sequins, giving it a rock-and-roll vibe that is still plenty festive. The structured corset style and central zipper add a touch of toughness to the design.
The best part about this top is how you can style it. For a more casual holiday get-together, layer it over a plain white t-shirt as shown. To dress it up, wear it on its own with high-waisted trousers or a skirt. It’s a versatile item that adds instant glamour to any base layer.
DIY Glam Rock Bustier Instructions
Let’s make a sparkly top that’s a little bit edgy and super cool.
What You’ll Need:
- A plain bustier or a simple fitted tank top
- Lots of black or dark gray sequins
- Fabric glue
- A small paintbrush or popsicle stick
- A piece of cardboard
Step-by-Step Guide:
- Prep Your Top: Place the cardboard inside your bustier or tank top.
- Work in Sections: Pick a small area to start with, like one of the cups of the bustier.
- Apply Glue: Use the paintbrush to spread a thin, even layer of fabric glue on that small section.
- Add Sequins: Sprinkle the sequins all over the glue. Gently pat them down so they stick well.
- Cover Everything: Continue working in small sections, spreading glue and adding sequins, until the entire front of the bustier is covered in sparkles.
- Let it Dry: Let the top lie flat for at least 24 hours to make sure every single sequin is dry and secure.
6. The Rainbow Fringe Shimmer Dress

Get ready to dance the night away in this incredibly fun and festive dress. Layers of beaded fringe create a waterfall of color, starting with silver at the top and flowing through gold, green, blue, and red. The movement of this dress is its main attraction; it shimmies and sways with every step.
The simple, sleeveless shift shape allows the rainbow fringe to be the star of the show. This is the ultimate party dress, full of energy and joy. It’s a fantastic option for a lively holiday party where you want to feel free and have a great time on the dance floor.
DIY Rainbow Waterfall Dress Instructions
This dress is all about movement! Let’s make one that will make you want to twirl all night.
What You’ll Need:
- A simple, plain dress (any color will do!)
- Rolls of sequin fringe trim in different colors (like a rainbow: red, orange, yellow, green, blue)
- Fabric glue or a needle and thread
- Scissors
Step-by-Step Guide:
- Start at the Bottom: Lay your dress flat. Take your first color of fringe trim (let’s say red) and measure it so it goes all the way across the bottom hem of the dress. Cut it.
- Attach the First Layer: Apply a line of fabric glue along the top edge of the fringe trim and press it firmly onto the dress, right above the hem. If you know how to sew, a few simple stitches will make it extra secure.
- Add the Next Layer: Now take your next color (orange!). You’re going to attach this layer right above the first one, making sure it overlaps a little bit, like tiles on a roof.
- Build Your Rainbow: Keep adding new rows of colored fringe, working your way up the dress.
- Finish it Off: Continue until your whole dress is covered in beautiful, colorful, sparkly fringe. Let it dry completely if you used glue.
7. The Peacock Feather Sequin Bolero

This stunning bolero jacket is a true work of art. It features an incredibly detailed sequin pattern that mimics the iridescent beauty of a peacock’s feather. Rich blues, greens, and shimmering golds are expertly arranged to create the eye of each feather.
The jacket’s cropped cut and strong, structured shoulders create a powerful and elegant silhouette. It’s designed to be the centerpiece of an outfit, instantly elevating a simple black top and trousers into a high-fashion ensemble. This is for a sophisticated holiday event where elegance and artistry are appreciated.
DIY Peacock Sparkle Jacket Instructions
We can create a jacket with a beautiful peacock feather look. It’s like painting with sequins!
What You’ll Need:
- A plain black jacket, preferably a short one (a bolero or cropped jacket is great)
- Loose sequins in peacock colors: dark blue, green, and gold
- Fabric glue
- Chalk
- A picture of a peacock feather for inspiration
Step-by-Step Guide:
- Draw Your Feather: Use your chalk to draw a simple feather shape on the shoulder or back of the jacket. It looks like an oval with a little stem.
- Start with the Center: In the middle of your oval shape, make a small circle with glue and fill it with your dark blue sequins.
- Add the Next Color: Make a larger ring of glue around your blue circle and fill that area with green sequins.
- Finish with Gold: Make one more ring of glue around the green sequins and fill it with your gold sequins. You’ve made the “eye” of the feather!
- Create More Feathers: Repeat this process to make more feather patterns on your jacket. You can cluster them on the shoulders or scatter them all over.
- Let It Dry: Once you’re happy with your design, let the jacket lie flat until the glue is completely dry.
8. The Art Deco Flapper Dress

Channel the glamour of the roaring twenties with this exquisite flapper-style dress. The design is rich with the geometric patterns and symmetry of the Art Deco movement, all created with shimmering gold and silver sequins on a black background.
This sleeveless, drop-waist silhouette is classic for the era and creates a fun, free-moving feel. The look is completed with a delicate fringe of silver beads at the hem that adds a playful shimmy. It’s a wonderful choice for a themed holiday party or for anyone who loves vintage-inspired fashion.
DIY 1920s Glam Dress Instructions
Let’s make a dress that looks like it’s from a fancy party a hundred years ago!
What You’ll Need:
- A simple, straight-cut dress with no waist (a “shift” dress) in black or navy
- Gold or silver sequin trim (the kind that looks like a ribbon of sequins)
- Beaded fringe trim
- Fabric glue
- Scissors and a ruler
Step-by-Step Guide:
- Plan Your Lines: Lay the dress flat. The 1920s style had lots of straight lines and angles. You can plan to put lines of sequin trim around the neckline, and then create some V-shapes or fan shapes on the front.
- Cut and Glue: Measure and cut a piece of your sequin trim. Squeeze a thin line of fabric glue on the back of it and press it firmly onto the dress where you want it to go.
- Create Your Pattern: Keep adding more lines of sequin trim to create your geometric design. You can look at pictures of Art Deco patterns online to get ideas.
- Add the Fringe: Once your sequin pattern is done, it’s time for the fringe! Measure the beaded fringe trim along the bottom hem of the dress. Cut it.
- Attach the Fringe: Apply a line of glue to the top band of the fringe and press it onto the inside of the dress’s hem, so the beads hang down.
- Dry Completely: Let the dress lie flat for a full day to make sure everything is stuck on well.
9. The Ethereal Garden Gown

This gown is pure romance and magic. It looks like something from a fairytale, with a soft, flowing silhouette and delicate details. The sheer fabric is lightly scattered with silver sequins that catch the light like dew drops on a flower.
What makes this dress truly special are the sheer, puffy bishop sleeves and the three-dimensional iridescent petals that seem to float near the hem. It’s an incredibly dreamy and feminine look, suited for a winter wedding or a very formal, romantic holiday celebration.
DIY Fairy Tale Dress Instructions
Let’s create a dress that looks like it’s from a magical garden.
What You’ll Need:
- A simple, light-colored dress (white, light blue, or pink would be lovely)
- Fabric glue
- Silver or iridescent loose sequins
- Artificial flower petals from a craft store (in soft, light colors)
- A needle and thread (optional, but helpful)
Step-by-Step Guide:
- Create a Dewdrop Effect: Squeeze tiny, individual dots of fabric glue randomly all over the dress.
- Add Sequins: Place one sequin on each dot of glue. Don’t put them in a pattern; you want them to look like they were naturally scattered by magic.
- Prepare the Petals: Take your artificial petals. You are going to attach them near the bottom of the dress.
- Attach the Petals: Put a single dot of glue at the top of a petal and press it onto the dress. You can also use a needle and thread to make one or two small stitches at the top of each petal to attach it. This lets them flutter a bit when you walk.
- Scatter the Petals: Add more petals around the bottom of the dress, letting them overlap and face different directions.
- Let It Dry: Let your magical creation dry completely before wearing it to a grand ball!
10. The Ornate Peacock Kaftan

This kaftan combines ultimate comfort with opulent style. Its flowing, loose-fitting shape makes it incredibly easy to wear, while the surface is completely covered in a rich tapestry of sequins. The design is intricate, featuring peacock motifs and traditional patterns in deep blues, reds, and golds.
The drawstring waist provides a bit of definition to the relaxed silhouette. This is a glamorous yet comfortable option for a holiday dinner party at home or a festive resort getaway. It’s a statement piece that feels both luxurious and effortlessly chic.
DIY Sparkling Kaftan Instructions
Let’s make a comfy kaftan that looks incredibly fancy and sparkly.
What You’ll Need:
- A plain, simple kaftan or a loose, flowy dress
- Sequin trim in a few different colors, like gold, blue, and red
- Fabric glue
- Chalk
- Scissors
Step-by-Step Guide:
- Decorate the Neckline: The easiest place to start is the neckline. Apply a line of glue along the edge of the V-neck and press your gold sequin trim onto it.
- Draw a Big Pattern: In the center of the kaftan, use your chalk to draw a large, simple design. It could be a big diamond shape or a swirling pattern.
- Outline Your Design: Carefully trace your chalk lines with glue and press your colored sequin trims onto the glue. You can use different colors for different parts of your design.
- Add More Details: You can add more lines of sequin trim flowing down the front or along the sleeves.
- Fill it In (Optional): If you want even more sparkle, you can use loose sequins and glue to fill in some of the shapes you created with the trim.
- Let it Dry: Lay your kaftan flat and let the glue dry completely. Now you have a comfortable and glamorous outfit!
11. The Liquid Silver Slip Gown

This gown epitomizes 90s minimalism with a glamorous update. The simple slip silhouette drapes the body beautifully, covered entirely in tiny silver sequins that create a fluid, liquid-metal effect. Its beauty is in its clean lines and uncomplicated elegance.
A delicate cowl neckline adds a touch of softness to the sleek design. This dress doesn’t need much styling; it shines all on its own. It’s an excellent choice for a sophisticated New Year’s Eve event or a formal holiday dinner, offering timeless appeal.
DIY Silver Slip Dress Instructions
Let’s give a simple slip dress a majorly glamorous makeover.
What You’ll Need:
- A plain slip dress (any color, but silver or gray is a good base)
- Silver sequin fabric
- Fabric glue
- Sharp scissors
- Measuring tape
Step-by-Step Guide:
- Measure the Front: Lay your slip dress flat. Measure the width and the length of the front of the dress.
- Cut Your Fabric: Cut a piece of your silver sequin fabric to match those measurements.
- Apply Glue: Carefully spread an even layer of fabric glue on the front of the slip dress.
- Attach the Fabric: Gently lay the sequin fabric panel on top of the glue, making sure it’s straight and smooth. Press it down firmly all over.
- Repeat for the Back: Once the front is dry, flip the dress over and repeat the process for the back.
- Let It Dry Completely: Let the dress lie flat for at least 24 hours to ensure the glue is fully set before you wear your stunning new gown.
12. The Midnight Blue Velvet Sequin Dress

This dress is the definition of classic holiday elegance. It blends the rich texture of deep blue velvet with the delicate sparkle of matching sequins. The result is a look that is both luxurious and tastefully festive, shimmering beautifully under evening lights.
The wrap dress silhouette is famously flattering for many body types, cinching at the waist with a soft velvet tie. Long sleeves provide warmth and coverage for a winter event. This piece is a wonderful option for a family holiday gathering or a company Christmas party.
DIY Starry Velvet Dress Instructions
Let’s add some sparkle to a cozy velvet dress.
What You’ll Need:
- A plain velvet dress
- Loose sequins that match the color of your dress
- Fabric glue that dries clear
- A small paintbrush
Step-by-Step Guide:
- Plan Your Sparkle: Decide where you want your sequins to go. You can scatter them all over, or concentrate them on the top part of the dress.
- Dot and Stick: Use your paintbrush to apply a very small dot of glue onto the velvet fabric.
- Place a Sequin: Carefully place one sequin onto the dot of glue. Press it gently.
- Scatter the Sparkles: Continue adding tiny dots of glue and placing sequins one by one. Spread them out so they look like a subtle, starry night sky.
- Let It Dry: Once you have as many sequins as you like, lay the dress flat and let it dry completely.
13. The Sheer Sequin Polka Dot Blouse

This blouse is a masterclass in delicate, feminine style. Sheer, floaty fabric creates a soft and romantic silhouette, while a charming pussy-bow at the neck adds a touch of vintage flair. The entire piece is dotted with scattered silver and gold sequins of various sizes.
The effect is like a soft shower of confetti, playful yet sophisticated. This top can be dressed up with a skirt or dressed down with nice jeans. It’s a versatile choice for anything from a holiday brunch to an evening concert.
DIY Confetti Dotted Blouse Instructions
Let’s make a sheer blouse look like it’s been showered in happy confetti!
What You’ll Need:
- A plain sheer or light-fabric blouse
- Loose sequins in different sizes and colors (gold and silver are great!)
- Fabric glue
- Cardboard to fit inside the blouse
Step-by-Step Guide:
- Prep Your Blouse: Place the cardboard inside the blouse to prevent the layers from sticking together.
- Start Dotting: Squeeze a small dot of glue onto the blouse.
- Add a Sequin: Place a sequin on the dot of glue.
- Mix and Match: Continue adding dots of glue and sequins, but this time, mix up the sizes! Use big ones, little ones, gold ones, and silver ones.
- Create a Random Pattern: Scatter them all over the front and the sleeves. You want it to look like confetti was tossed onto the shirt, so don’t make a perfect pattern.
- Dry and Flip: Let the front dry completely, then take out the cardboard and repeat the process on the back if you want.
14. The Emerald Green Sequin Tuxedo

Make a powerful and unforgettable entrance in this stunning emerald green sequin suit. This is a bold, high-fashion take on classic menswear, tailored for a sharp, modern silhouette. The entire suit is covered in brilliant green sequins that catch the light beautifully.
Sleek black satin lapels and a stripe down the trousers provide a sophisticated contrast. This look is for the person who loves to stand out from the crowd. It’s an amazing choice for a formal New Year’s Eve party or any festive event where you want to feel confident and chic.
DIY Dapper Sequin Suit Instructions
Let’s give a regular suit a glamorous, sparkly makeover.
What You’ll Need:
- A blazer and matching pants
- Sequin fabric in your favorite color
- Fabric glue
- Black satin ribbon
- Scissors and a measuring tape
Step-by-Step Guide:
- Cover the Blazer Panels: Measure the front panels of your blazer (the parts on either side of the buttons). Cut pieces of sequin fabric to match and glue them on.
- Cover the Trousers: This is the big part. Measure the front of each pant leg. Cut your sequin fabric to match and carefully glue it on, smoothing it out as you go. Let it dry.
- Add the Tuxedo Stripe: Once the sequin fabric is dry on the pants, measure the length of the outer leg seam. Cut a piece of black satin ribbon to that length.
- Glue the Stripe: Apply a line of glue down the side seam of the pants, over the sequin fabric, and press the ribbon on firmly.
- Final Dry: Let the entire suit dry for at least 24 hours before wearing your incredibly dapper creation.
15. The Under-the-Sea Coral Gown

This gown is a wearable aquarium, an incredible piece of artistry. The sheer blue fabric is covered in a vibrant and dense tapestry of sequins and beads that form a colorful coral reef. Bright pinks, yellows, reds, and greens create a stunning underwater scene.
The simple, sleeveless column silhouette lets the extraordinary embellishment be the focus. This is a museum-quality garment, designed for the most formal of black-tie holiday events or galas. It’s a conversation starter that showcases a love for color and intricate detail.
DIY Coral Reef Dress Instructions
This is like painting with sequins to create an underwater world on a dress.
What You’ll Need:
- A plain, simple dress (light blue is a great base)
- Loose sequins in lots of bright, coral-reef colors (pink, yellow, red, light green, turquoise)
- Fabric glue
- Chalk
- A picture of coral for inspiration
Step-by-Step Guide:
- Draw Your Coral: Use your chalk to draw some wavy, branching coral shapes on your dress. Start from the bottom and have them “grow” upwards.
- Pick a Shape: Choose one of your chalked coral branches to start with.
- Apply Glue: Squeeze a thin line of glue along the chalk line of that branch.
- Add Sequins: Carefully place sequins of one color (like pink) along that glue line.
- Build Your Reef: Move to the next chalk shape, and use a different color of sequins. Keep going, filling in your coral drawings with different bright colors.
- Let It Dry: You’ve created a work of art! Let the dress lie flat until it’s completely dry.
16. The Iridescent Mermaid Skirt

Unleash your inner mermaid with this magical and whimsical skirt. The design features large, iridescent sequins sewn on in an overlapping pattern that perfectly mimics fish scales. The colors shift from pearly white to soft green, blue, and purple, creating a beautiful, ethereal effect.
The classic mermaid silhouette is fitted through the hips and thighs before flaring out at the bottom, enhancing the underwater fantasy. This is a fun and creative piece for a themed holiday party or for anyone who wants to bring a touch of fairytale magic to their celebration.
DIY Magical Mermaid Skirt Instructions
Let’s make a skirt that makes you feel like you just came from the sea!
What You’ll Need:
- A simple, stretchy pencil skirt or a long fitted skirt
- Lots of large, iridescent sequins (the kind shaped like circles or ovals)
- Fabric glue
- A small paintbrush
Step-by-Step Guide:
- Start at the Bottom: Begin at the very bottom hem of the skirt. Use your paintbrush to apply a dot of glue.
- Place the First Scale: Press one sequin onto the dot of glue, letting about half of it hang below the hem.
- Create the First Row: Add another dot of glue right next to the first sequin, but slightly overlapping it. Press another sequin on top. Keep doing this all the way around the bottom of the skirt.
- Start the Next Row: Now, move up a little bit. You will start the second row so that the bottom of the new sequins covers the top of the sequins in the row below, just like shingles on a roof.
- Keep Going Up: Continue making rows of overlapping sequin “scales” until you’ve covered the entire skirt.
- Dry Time: This one has a lot of sequins, so let it dry for a day or two before you wear it.
17. The Pop Art Sequin Suit

This outfit is an explosion of fun, color, and personality. It takes inspiration directly from classic comic books, featuring bold graphics and playful designs made from sequins. The back of the blazer exclaims “POW!” while cherries and a lightning bolt adorn the split-color trousers.
This is fashion that doesn’t take itself too seriously. It’s for the creative soul who loves to express themselves through their clothing. Wearing this to a holiday party is a surefire way to be the life of it, spreading joy and vibrant energy.
DIY Comic Book Hero Outfit Instructions
Let’s make an outfit that looks like it jumped right out of a comic book!
What You’ll Need:
- A plain blazer and pants
- Scraps of felt in different colors (red, green, yellow, black)
- Loose sequins to match your felt colors
- Fabric glue
- Scissors
Step-by-Step Guide:
- Make the Cherry Patch: Cut two red circles and a green leaf shape from your felt. Glue them onto one pant leg.
- Cover with Sequins: Cover the red felt circles with red sequins and the green leaf with green sequins using fabric glue.
- Make the Lightning Bolt: Cut a big lightning bolt shape from your yellow felt. Glue it onto the other pant leg.
- Add Yellow Sparkle: Cover the entire felt lightning bolt with yellow sequins using fabric glue. You can outline it with black sequins if you want!
- Create a “POW!”: On a piece of felt, write “POW!” in big letters. Cut it out, glue it to the back of the blazer, and cover it with colorful sequins.
- Let All Pieces Dry: Let your patches dry completely before you assemble your super-powered outfit.
18. The Volcanic Sequin Pencil Skirt

This skirt combines a classic silhouette with a bold, dramatic pattern. The base is covered in shimmering gunmetal sequins, creating a dark and moody canvas. A fiery red pattern, resembling flowing lava or an abstract network of veins, adds a powerful and edgy contrast.
The sleek pencil skirt shape keeps the look polished, while the high slit adds a touch of allure. This is an excellent piece for a chic city holiday party or a night out. It pairs beautifully with a simple black top, letting the skirt’s dynamic design take center stage.
DIY Lava Flow Skirt Instructions
Let’s make a cool skirt that looks like it has fiery lava flowing on it.
What You’ll Need:
- A plain black or dark gray pencil skirt
- Red sequin trim (the kind that looks like a sparkly string)
- Fabric glue
- Chalk
- Scissors
Step-by-Step Guide:
- Draw Your Lava: Lay the skirt flat. Use your chalk to draw a random, branching, wavy pattern on the front. It should look like liquid flowing from the top.
- Cut Your Trim: Cut a piece of your red sequin trim. It’s easier to work with shorter pieces.
- Trace with Glue: Squeeze a thin line of fabric glue directly on top of one of your chalk lines.
- Press on the Trim: Carefully press the red sequin trim onto the line of glue.
- Follow the Pattern: Keep cutting and gluing pieces of the red sequin trim until you have covered all the chalk lines you drew.
- Let it Set: Let the skirt lie flat for several hours until the glue is completely dry and your lava has “cooled.”
19. The Stained Glass Cathedral Cape

This is a truly magnificent and theatrical piece. A long, flowing black cape becomes the frame for a stunning stained-glass window design, all rendered in shimmering sequins. Rich reds, purples, blues, and greens are separated by black lines, perfectly capturing the look of leaded glass.
This is the ultimate statement piece for a dramatic holiday entrance. Worn over a simple black gown, it is both art and fashion. It’s for a grand, formal event where making a lasting impression is the goal, showcasing a unique and artistic sense of style.
DIY Stained Glass Cape Instructions
Let’s create a cape that looks like a beautiful, sparkly window from a castle.
What You’ll Need:
- A plain black cape
- Black ribbon or black fabric paint in a squeeze bottle
- Fabric glue
- Loose sequins in many different jewel-tone colors (red, blue, green, purple, yellow)
- Chalk
Step-by-Step Guide:
- Draw Your Window Frame: Use chalk to draw the outline of a big church window on the back of your cape. Then, draw lines inside to divide it into smaller sections.
- Create the “Leading”: If you’re using ribbon, glue it down on top of all your chalk lines. If you’re using fabric paint, carefully squeeze the paint over the chalk lines. Let this part dry completely.
- Fill a Section with Glue: Choose one of the small sections you made. Spread a thin layer of fabric glue inside it.
- Add One Color: Fill that entire section with sequins of a single color. Pat them down.
- Fill the Cape: Continue filling each section with a different color of sequins.
- Let Your Masterpiece Dry: This is a big project, so let the cape lie flat for at least a day or two to dry completely.
20. The Sequin-Lined Parka

This coat is the definition of a surprise party. On the outside, it’s a classic, practical navy blue parka with a cozy, fur-trimmed hood. It looks ready for a chilly winter day. But open it up, and a dazzling secret is revealed.
The entire lining is made of a brilliant, multi-colored quilted sequin fabric. This unexpected flash of glamour is both playful and chic. It proves that you can be warm, comfortable, and spectacularly festive all at the same time. It’s a fun way to carry a bit of sparkle with you everywhere you go.
DIY Secret Sparkle Coat Instructions
Let’s give a regular coat a super secret, super sparkly inside!
What You’ll Need:
- Any coat or jacket that has a simple lining
- A large piece of sequin fabric (enough to cover the inside of your coat)
- Fabric glue (a strong one is good for this) or a needle and thread
- Scissors
- Measuring tape
Step-by-Step Guide:
- Measure the Lining: Open your coat and lay it flat. Measure the main parts of the inside lining—the back, and the two front panels.
- Cut the Sequin Fabric: Cut out pieces of your sequin fabric that match the shapes of your lining pieces.
- Glue It In: This is the easiest way. Working one section at a time (like the back), spread fabric glue all over the existing lining.
- Press the New Lining On: Carefully press your matching sequin fabric piece on top of the glue, smoothing it from the center out.
- Repeat for All Sections: Do the same for the two front panels.
- Dry It Open: Let the coat lie open for at least a day to make sure the glue is fully dry before you wear your coat with its amazing secret.
21. The Celestial Velvet Blazer

This blazer is a piece of wearable night sky. Crafted from plush, deep navy velvet, it serves as a luxurious backdrop for an astronomical display. Intricate constellations, crescent moons, and starry clusters are embroidered across the fabric using a mix of glittering silver sequins and delicate beads.
The shoulders are heavily embellished, creating a sparkling epaulette effect that cascades down the sleeves and body. This is a sophisticated and artistic garment, wonderful for an elegant holiday dinner or a chic gallery opening. It blends classic tailoring with magical, celestial charm.
DIY Starry Velvet Blazer Instructions
Let’s make a simple blazer look like it holds the entire galaxy.
What You’ll Need:
- A plain blazer, preferably in a dark color like navy or black
- Silver and gold loose sequins in various small sizes
- Tiny silver or pearl-colored beads
- Fabric glue
- White chalk or a washable fabric pencil
Step-by-Step Guide:
- Draw Your Galaxy: Use your chalk to draw some simple constellations on your blazer. You can look up patterns like the Big Dipper or just draw lines connecting dots. Add a few crescent moon shapes.
- Trace with Glue: Choose one of your constellation lines. Squeeze a very thin line of glue along the chalk mark.
- Add Stars and Sequins: Carefully place your sequins and beads along the glue line. Mix them up to make your constellations look interesting.
- Fill the Sky: Add single dots of glue in the empty spaces and place individual sequins or beads on them to look like scattered stars.
- Let it Dry: Continue until your blazer is as starry as you like. Let it lie flat for a full day to dry completely.
22. The Gilded Turtleneck Sweater

Here is how you do cozy holiday style. This comfortable, cream-colored turtleneck sweater is elevated from a simple staple to a festive piece with a touch of sparkle. A generous sprinkle of gold sequins across the shoulders adds a celebratory feel without sacrificing warmth.
This look is all about balance. The relaxed fit of the sweater keeps it casual and approachable, while the sequins provide just the right amount of glamour. It’s a great choice for a low-key holiday gathering, a festive brunch, or even a day of Christmas shopping.
DIY Golden-Shoulder Sweater Instructions
Let’s add a touch of easy glamour to your favorite cozy sweater.
What You’ll Need:
- A plain turtleneck sweater
- A handful of gold sequins
- Fabric glue
- A piece of cardboard
Step-by-Step Guide:
- Prep Your Sweater: Put the cardboard inside the sweater so the glue doesn’t seep through to the back.
- Plan the Sprinkle: You want the sequins to look like they were casually sprinkled on. They should be closer together at the top of the shoulder and more spread out as they go down.
- Dot and Stick: Squeeze a small dot of glue on the shoulder area and press a sequin onto it.
- Create a Cascade: Keep adding dots of glue and sequins, placing them densely on the shoulder seams and then adding fewer and fewer as you move away from the seam.
- Do Both Sides: Repeat the process on the other shoulder.
- Let It Dry: Let the sweater lie flat for several hours until all the sequins are securely attached.
23. The Gilded Brocade Trousers

These trousers are the definition of opulent eveningwear. The rich, deep red fabric is the base for a stunning, all-over pattern of gold sequins arranged in an intricate brocade or damask style. They shimmer and catch the light with every movement, creating a luxurious effect.
The high-waisted, wide-leg cut is incredibly elegant and flattering, elongating the legs. A thin, glittering stripe down the side adds a final tailored touch. These are a fantastic alternative to a dress for a formal holiday party, offering both glamour and sophistication.
DIY Ornate Sequin Trousers Instructions
This intricate pattern can be simplified for a fun DIY project.
What You’ll Need:
- A pair of plain, wide-leg trousers in a dark color
- Gold sequin trim
- Fabric glue
- Chalk
Step-by-Step Guide:
- Draw Your Pattern: Lay the trousers flat. Use chalk to draw a large, simple, swirling pattern on the front of one leg. Think big “S” shapes and spirals.
- Trace with Glue: Squeeze a thin line of fabric glue over one of the chalk lines you drew.
- Apply the Trim: Carefully press the gold sequin trim onto the glue, following the curve of your drawing. Cut the trim when you reach the end of a line.
- Build Your Design: Continue tracing and gluing the sequin trim until your entire chalk pattern is covered.
- Repeat: Do the same thing on the other pant leg.
- Let It Dry: Let the trousers lie flat for a full 24 hours to ensure the trim is completely secure.
24. The Midnight Sparkle Bomber Jacket

This jacket is the perfect mix of casual cool and party-ready glamour. The body is made from soft, plush black faux fur, making it cozy and comfortable. But the sleeves are completely covered in glittering black sequins, providing an unexpected and edgy dose of sparkle.
The classic bomber jacket silhouette keeps the look modern and easy to wear. This is the kind of piece you can throw on over anything—from a simple t-shirt and jeans to a little black dress—to instantly elevate your outfit. It’s great for a fun night out during the holiday season.
DIY Sparkle-Sleeve Bomber Instructions
Let’s give a comfy jacket some seriously cool, sparkly sleeves.
What You’ll Need:
- A plain bomber jacket (or any jacket with simple sleeves)
- Black sequin fabric
- Fabric glue
- Scissors
- Measuring tape
Step-by-Step Guide:
- Measure a Sleeve: Lay your jacket flat and measure the length and width of one of the sleeves.
- Cut Your Fabric: Cut two pieces of your black sequin fabric to match the measurements of your sleeves.
- Apply Glue to the Sleeve: Carefully spread a thin, even layer of fabric glue all over the outside of one sleeve.
- Wrap the Sleeve: Carefully wrap one of your sequin fabric pieces around the glued sleeve. Smooth it down and press firmly, making sure the edges meet neatly.
- Repeat and Dry: Do the same thing for the other sleeve. You may need some tape or clips to hold the fabric in place while it starts to dry. Then, let the jacket sit for a full day.
25. The Gilded Stripe Bodycon Dress

This dress is a masterclass in sleek, graphic glamour. A form-fitting, long-sleeved midi silhouette is covered in vertical stripes of sequins in a warm, sophisticated palette of gold, bronze, and black. The continuous lines create a very flattering and elongating effect.
Adding a modern, edgy touch is a chunky gold chain detail integrated into the high neckline, which removes the need for a necklace. This is a polished and powerful look, excellent for a chic holiday cocktail party or a festive dinner out.
DIY Golden Stripe Dress Instructions
We can create this flattering striped look with a little bit of patience.
What You’ll Need:
- A plain, long-sleeved bodycon dress
- Rolls of sequin trim in gold, black, and bronze or brown
- Fabric glue
- A ruler or measuring tape and chalk
Step-by-Step Guide:
- Draw Your Lines: Lay the dress flat. Use your ruler and chalk to draw straight vertical lines from the shoulder to the hem, spaced about an inch apart.
- Start the First Stripe: Pick your first color of sequin trim. Apply a thin line of glue down the first chalk line.
- Press the Trim: Carefully press the sequin trim onto the glue line. Cut it when you get to the bottom hem.
- Create the Pattern: Move to the next chalk line. Use a different color of sequin trim and repeat the process.
- Cover the Dress: Keep gluing on the different colored trims until the entire dress is covered in vertical sequin stripes.
- Dry Time: This project uses a lot of glue, so let the dress lie flat for at least 24-48 hours to dry completely.
26. The Bohemian Paisley Sequin Vest

This long vest is for the free-spirited fashion lover. It has a relaxed, bohemian vibe, with intricate paisley and floral patterns created from warm bronze and copper sequins. The designs swirl across the black fabric, creating a rich, textured look.
The open-front, sleeveless style makes it a wonderful layering piece. Tassel fringe along the bottom adds movement and enhances its artsy feel. It can be worn over a simple dress or with a top and jeans to add a touch of handcrafted glamour to a casual holiday look.
DIY Boho Sequin Vest Instructions
Let’s create a beautiful, artsy vest with a bohemian feel.
What You’ll Need:
- A long, plain black vest
- Bronze or copper-colored sequin trim
- Fabric glue
- Black fringe trim
- Chalk
Step-by-Step Guide:
- Draw a Paisley: A paisley shape looks like a big, curved teardrop. Use your chalk to draw a few large paisley shapes on the front panels of the vest.
- Outline with Sequins: Squeeze a thin line of fabric glue along the chalk outline of one paisley. Carefully press your sequin trim onto the glue.
- Decorate the Vest: Repeat this for all the paisley shapes you drew. You can also add some simple swirls and lines to fill in the empty spaces.
- Add the Fringe: Turn the vest over. Apply a line of glue along the inside of the bottom hem.
- Attach the Fringe: Press the top band of your fringe trim firmly onto the glue.
- Let it Dry: Let the vest lie flat until all the glue is fully dry.
27. The Digital Glitch Sequin Dress

This dress is a stunning piece of modern, wearable art. The design mimics the effect of a digital screen glitching, with a sharp split between a black and a white side. Streaks of vibrant rainbow color stretch horizontally across the dress, while a fine sprinkle of sequins adds a pixelated sparkle.
The sleek, high-necked, sleeveless silhouette acts as a clean canvas for the incredible print. It’s a futuristic and high-concept look, certain to be a conversation starter at a contemporary art party or a fashion-forward New Year’s Eve event.
DIY Pixelated Glitch Dress Instructions
The amazing print is hard to recreate, but we can capture its fun, pixelated feeling.
What You’ll Need:
- A simple, plain dress (black or white is a great start)
- Brightly colored fabric paint in squeeze bottles (puffy paint is fun for this)
- Tiny silver sequins or glitter
- Fabric glue
Step-by-Step Guide:
- Create the Glitch Lines: Take one of your colored fabric paints. Squeeze out short, horizontal dashes and lines in a random pattern on the dress.
- Add More Colors: Use your other paint colors to add more glitchy lines, letting them cross over and mix a bit.
- Add the Pixels: While the paint is still wet, sprinkle some of the tiny sequins or glitter onto it. They will stick to the paint as it dries.
- Add More Sparkle: If you want more sparkle after the paint is dry, you can add small dots of fabric glue and place more sequins on them.
- Let It Dry: Let your dress lie flat for a full day so the paint can dry and set completely.
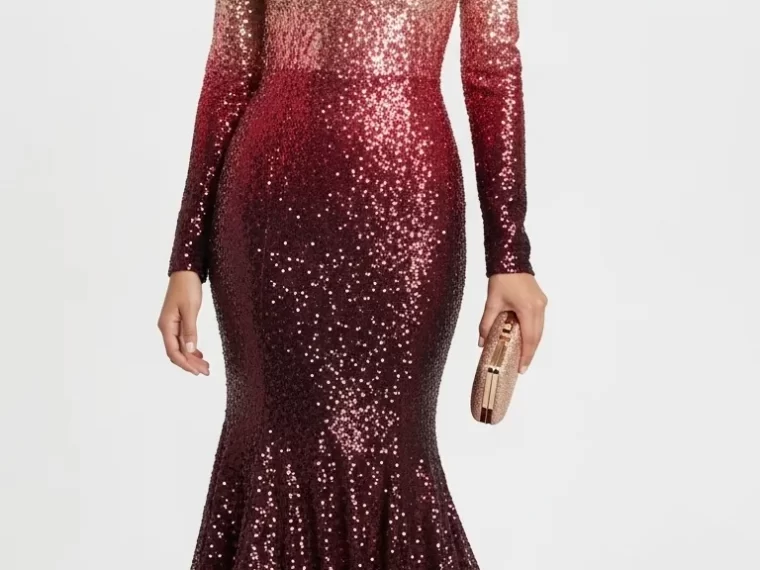
28. The Sunset Ombre Sequin Gown

This gown is pure Hollywood glamour. It features a stunning ombre effect, with sequins that transition seamlessly from a shimmering rose gold at the shoulders, through a vibrant red, down to a deep, rich burgundy at the hem. The effect is reminiscent of a beautiful sunset.
The classic, form-fitting silhouette with long sleeves and a floor-sweeping mermaid tail is timelessly elegant and incredibly flattering. This dress is made for a grand entrance at a black-tie holiday wedding or a very formal New Year’s Eve ball.
DIY Sunset Sparkle Gown Instructions
Creating a smooth ombre effect takes patience, but the result is amazing!
What You’ll Need:
- A long, simple dress
- Loose sequins in 3 similar colors that blend well (e.g., gold, red, and dark red)
- Fabric glue
- A small paintbrush and a few small bowls
Step-by-Step Guide:
- Set Up Your Colors: Put each color of sequins into a separate bowl.
- Start at the Top: Working on the top section of the dress, use your paintbrush to apply a thin layer of glue. Sprinkle your lightest color (gold) over the glue and pat it down.
- Begin the Blend: Move down to the next section. Apply glue. This time, sprinkle a mix of your lightest color and your middle color (gold and red).
- The Middle Section: For the middle of the dress, use only your middle color (red).
- Blend Downwards: For the next section, use a mix of your middle and darkest colors (red and dark red).
- Finish at the Bottom: Cover the bottom section of the dress with only your darkest color (dark red). Let it dry for at least two days.
29. The Starlit Chiffon Cape Gown

This gown is the essence of romance and grace. Made from flowing, layered chiffon in a soft, dreamy grey, it moves beautifully. The design features a flattering V-neckline and a ruched waist, creating an elegant silhouette.
What makes it truly magical are the sheer, cape-like sleeves that drape from the shoulders. Both the sleeves and the bodice are delicately sprinkled with tiny silver sequins, like a dusting of starlight. This is an ethereal and sophisticated choice for a winter formal or an elegant Christmas celebration.
DIY Stardust Gown Instructions
Let’s add a delicate, magical sparkle to a flowing dress.
What You’ll Need:
- A plain, flowy dress, especially one with sheer sleeves
- Fabric glue that dries clear
- Very fine silver craft glitter or very tiny silver sequins
- A small, soft paintbrush
- A piece of paper
Step-by-Step Guide:
- Prepare Your Sparkles: Pour some glitter or tiny sequins onto your piece of paper. This will make them easier to pick up.
- Apply Tiny Glue Dots: Dip the very tip of your paintbrush into the fabric glue. Gently press tiny, random dots of glue onto the bodice and sleeves of the dress.
- Add a Speck of Stardust: Dip the gluey tip of the brush into your sparkles to pick up a few pieces, then touch it to one of the glue dots on the dress.
- Create a Galaxy: Continue adding tiny dots of glue and specks of glitter. You don’t want to cover the dress, just give it a very light, magical shimmer.
- Let It Dry: Let the dress hang or lie flat to dry for several hours.
30. The Mermaid Moto Jacket

This jacket is where edgy street style meets fantasy glamour. It takes the classic black faux leather motorcycle jacket, with all its cool zippers and buckles, and gives it a magical twist. The wide lapels and sleeve cuffs are completely covered in iridescent sequins.
The sequins shimmer with shades of light blue and pale green, like the scales of a mermaid’s tail. This unexpected detail transforms the tough moto jacket into a fun, festive statement piece. It’s a great way to add sparkle to a casual holiday outfit for a night out with friends.
DIY Mermaid Scale Moto Jacket Instructions
Let’s give a tough jacket a touch of mermaid magic.
What You’ll Need:
- A faux leather moto jacket
- A piece of iridescent or light blue sequin fabric
- Strong fabric glue (like E6000 or a specific leather glue)
- Paper and a pencil
- Sharp scissors
Step-by-Step Guide:
- Make a Template: Lay a piece of paper over one of the jacket’s lapels. Trace its shape with a pencil. Do the same for one of the sleeve cuffs. Cut these paper shapes out.
- Cut the Sequin Fabric: Place your paper templates on the back of your sequin fabric. Trace around them and carefully cut the shapes out. You’ll need two for the lapels and two for the cuffs.
- Apply Glue: Squeeze a thin, even layer of your strong glue onto one of the lapels of the jacket.
- Press on the Panel: Carefully place the matching sequin fabric piece onto the glue. Press it down firmly all over.
- Repeat for All Parts: Do the same for the other lapel and for both of the sleeve cuffs.
- Let It Cure: This kind of strong glue needs time to set. Let the jacket sit in a well-ventilated area for at least 24-48 hours before wearing it.
31. The Cherry Blossom Sequin Kimono

This garment exudes an air of quiet, artistic luxury. A beautiful black kimono, crafted from embossed velvet, provides a rich canvas for the exquisite embellishment. Branches of cherry blossoms, rendered in pink, white, and silver sequins, trail gracefully over the shoulders and down the back.
The wide sleeves and relaxed, open-front silhouette are hallmarks of the classic kimono shape. This piece functions as a stunning piece of outerwear over a simple black outfit, making it a sophisticated choice for a holiday art event, a gallery opening, or an elegant dinner party.
DIY Cherry Blossom Robe Instructions
Let’s add some beautiful, sparkling cherry blossoms to a simple robe.
What You’ll Need:
- A plain, simple robe or kimono in a dark color
- Fabric glue
- Chalk or a washable fabric pencil
- Loose sequins: brown or dark silver for branches, and pink and white for flowers
Step-by-Step Guide:
- Draw Your Branches: Lay the robe flat. Use your chalk to draw a few simple, slightly curved branch shapes starting from the shoulders and going down the back.
- Create the Branches: Squeeze a thin line of fabric glue over one of your chalk branch lines. Carefully place your brown or silver sequins along the glue to form the branch.
- Time for Blossoms: At the tips and along the sides of your sequin branches, apply small clusters of glue dots.
- Add the Flowers: Press your pink and white sequins onto these glue dots to create your cherry blossoms. Mix the colors for a more natural look.
- Let It Dry: Repeat the process for all your branches, then let the robe lie flat for a full day to dry completely.
32. The Graffiti Sequin Joggers

These joggers are where high-fashion glamour collides with urban street style. The comfortable, familiar silhouette of a pair of black sweatpants is completely transformed by an explosion of colorful sequin graffiti. Bright blues, yellows, pinks, and greens create overlapping tags and designs that cover the fabric.
This is a bold, youthful, and energetic look. By pairing these statement joggers with simple heels, the outfit creates a fascinating high-low contrast. They are a fun and unexpected choice for a creative holiday party or a festive night out in the city.
DIY Graffiti Art Joggers Instructions
Let’s make some comfy pants look like a cool piece of street art.
What You’ll Need:
- A pair of plain black joggers or sweatpants
- Fabric glue in a squeeze bottle
- Loose sequins in several bright, vibrant colors
- Chalk
Step-by-Step Guide:
- Plan Your “Tag”: Use your chalk to write a short word or your initials in big, bubbly graffiti-style letters on the pant leg.
- Outline with Glue: Squeeze a line of fabric glue, tracing the chalk outline of your first letter.
- Fill with Sequins: While the glue is wet, generously sprinkle one color of sequins over the entire letter, making sure to cover all the glue. Gently pat them down.
- Shake it Off: Carefully lift the pant leg and let the extra sequins fall off onto a piece of paper (you can pour them back into their container).
- Repeat: Continue this process with different words and different colors until your joggers are covered in sparkly art. Let them dry for at least a day.
33. The Regal Baroque Ball Gown

This is a gown fit for royalty. It is a masterpiece of drama and opulence, featuring a structured corset bodice encrusted with intricate gold beadwork and red jewels. The true showstopper is the magnificent ball gown skirt, which flows to the floor in a cascade of glittering ombre sequins.
The skirt transitions from a shimmering champagne hue at the waist, through brilliant gold, to a deep, rich bronze at the hem, with ornate baroque patterns adding texture. This is a breathtaking choice for only the most formal and grand of holiday events, such as a charity ball or a black-tie New Year’s Eve gala.
DIY Royal-Inspired Gown Instructions
This gown is a work of art, but we can capture its royal spirit with a simplified DIY.
What You’ll Need:
- A simple dress with a fitted top and a full skirt
- Gold sequin trim
- Fabric glue
- A few large, flat-backed craft jewels (in red or gold)
- Gold and brown craft glitter
Step-by-Step Guide:
- Decorate the Bodice: Use your gold sequin trim to create simple, elegant swirls on the bodice of the dress. Glue them on securely.
- Add the Jewels: Glue your craft jewels onto the center of the bodice for a touch of royal glamour.
- Create the Ombre Skirt: This part is fun! Starting from the waist, use a paintbrush to apply fabric glue to the top third of the skirt. Sprinkle generously with gold glitter.
- Blend to Brown: Apply glue to the middle third of the skirt and sprinkle it with a mix of gold and brown glitter.
- Finish the Hem: Apply glue to the bottom third of the skirt and cover it completely with brown glitter. Let the whole dress dry for a couple of days.
34. The Winter White Geometric Dress

This look is the epitome of chic, modern elegance. The all-white ensemble is crisp, clean, and incredibly sophisticated. The focus is a stunning one-shoulder sheath dress, featuring a dynamic pattern of matte and shiny white sequins arranged in sharp, geometric shapes.
The monochromatic palette gives the sparkle a subtle, textural quality rather than overt flashiness. Worn with a simple, matching coat, this outfit is perfect for a sophisticated holiday cocktail party, a winter wedding, or an elegant Christmas Eve dinner.
DIY Modern White Sequin Dress Instructions
Let’s create this cool, textural pattern on a simple white dress.
What You’ll Need:
- A plain white dress
- Fabric glue
- Two different types of white sparkle: small, shiny white sequins and fine white craft glitter.
- A ruler and a washable fabric pencil
Step-by-Step Guide:
- Draw Your Grid: Use your ruler and pencil to draw a pattern of triangles, squares, and rectangles on the front of the dress.
- Pick a Shape: Choose one of the shapes you drew to start with.
- Fill with Sequins: Spread a thin layer of fabric glue inside that shape. Cover the glue completely with your shiny white sequins.
- Fill with Glitter: Now, choose a shape right next to the first one. Fill it with glue and cover it with the white glitter.
- Create the Pattern: Continue filling in your geometric shapes, alternating between the shiny sequins and the matte-looking glitter to create your pattern.
- Let It Dry: Let the dress lie flat for a full day to set.
35. The Sculptural Baroque Jumpsuit

This is a masterful blend of classic tailoring and avant-garde art. A simple, elegant black jumpsuit is elevated into a high-fashion statement by incredible, three-dimensional beaded sculptures at the high neck and hips. These pieces are breathtakingly intricate, with swirling patterns of gold, black, and pearl beads.
The design references historical royal attire, like elaborate ruff collars, but reimagines them in a powerful, modern context. This is not just an outfit but a piece of wearable sculpture, suited for a high-concept fashion event or a glamorous masquerade ball.
DIY Ornate Collar and Belt Instructions
Creating the 3D effect is for pros, but we can make stunning 2D accessories to get a similar vibe.
What You’ll Need:
- Two pieces of stiff black felt
- Gold sequin trim
- Loose black sequins and white pearl beads
- Fabric glue
- Scissors and chalk
- Black ribbon
Step-by-Step Guide:
- Create the Collar Shape: Draw and cut a fancy collar shape from one piece of felt.
- Decorate the Collar: Use your gold sequin trim, black sequins, and pearl beads to create a dense, swirling pattern on the felt collar. Let it dry.
- Create the Belt Pieces: From the other piece of felt, cut two identical ornate shapes that will become the front of your belt. Decorate them in the same way as the collar.
- Attach Ribbons to the Belt: Once dry, glue long pieces of black ribbon to the backs of your two decorated belt pieces. These will be used to tie the belt around your waist.
- Wear Your Set: Wear the collar over any simple black top or dress, and tie your new belt around your waist for an instant touch of baroque glamour.
36. The Matrix Sequin Trench Coat

This trench coat is a perfect fusion of classic style and futuristic edge. The timeless, tailored silhouette of a black leather trench provides a sleek, powerful base. This classic design is then disrupted by panels of iridescent, pixelated sequins in shades of electric green and blue.
The sequins adorn the storm flap, collar, and cuffs, creating a look that feels like it stepped out of a sci-fi movie. It’s a cool, unexpected way to wear sequins, great for making a statement on a chilly holiday evening out. This is for the person who loves to mix classic and contemporary styles.
DIY Digital Rain Trench Coat Instructions
Let’s give a classic trench a cool, futuristic update.
What You’ll Need:
- A plain trench coat (faux leather or fabric is fine)
- A piece of iridescent green and blue sequin fabric
- Strong fabric glue
- Paper, a pencil, and scissors
Step-by-Step Guide:
- Make Your Templates: Just like with the moto jacket, trace the shapes of the parts you want to cover—the collar, the sleeve cuffs, and the flap on the back—onto paper and cut them out.
- Cut the Sequin Fabric: Use your paper templates to cut out the matching shapes from your sequin fabric.
- Glue on the Panels: Working one section at a time, apply a thin layer of strong fabric glue directly onto the coat’s collar. Carefully press the matching sequin piece on top.
- Repeat and Secure: Do the same for the sleeve cuffs and the back flap. You may need to use some clips to hold the edges down as the glue begins to set.
- Let It Cure: Let the coat sit in a well-ventilated area for at least a day to make sure the panels are securely attached.
37. The Gilded Cage Masquerade Dress

This dress is pure drama and fantasy. The design features a structured bodice with a sweetheart neckline and a full, flared skirt that creates a classic, feminine silhouette. The magic is in the bold pattern: a glittering gold sequin grid creates a “cage” effect over the black fabric.
Sheer panels and a lace-up corset back add to the theatrical, masquerade-ball feel of the garment. Finished with a delicate black feather trim at the hem, this is a showstopping look for a themed holiday party or a glamorous New Year’s Eve celebration.
DIY Golden Grid Dress Instructions
Let’s create this dramatic caged look on a simple black dress.
What You’ll Need:
- A plain black dress with a flared skirt (an A-line or skater dress is great)
- Rolls of gold sequin trim
- A ruler and chalk
- Fabric glue
- A black feather boa or feather trim (optional)
Step-by-Step Guide:
- Draw Your Grid: Lay the dress flat. Use your ruler and chalk to draw evenly spaced vertical and horizontal lines, creating a grid or checkerboard pattern.
- Start with Vertical Lines: Apply a thin line of fabric glue along one of your vertical chalk lines. Press a piece of gold sequin trim onto the glue. Repeat for all vertical lines.
- Add Horizontal Lines: Once the vertical lines are in place, do the same for all the horizontal lines, creating your cage effect.
- Add the Feathers (Optional): Apply a line of glue along the very bottom hem of the dress and press your feather trim on for extra drama.
- Let It Dry: Let the dress lie flat for at least a day for the glue to set completely.
38. The Punk Rock Plaid Sequin Skirt

This skirt masterfully blends rebellious punk rock attitude with a touch of unexpected glamour. The foundation is a classic tartan plaid wrap skirt, complete with leather straps, buckles, and a large decorative safety pin—all hallmarks of the punk aesthetic.
The twist comes from a subtle, artful scattering of red and silver sequins across the front panel. The sequins are placed in a distressed, random pattern, giving the illusion of a tear or wear that reveals a sparkling layer beneath. It’s a cool, edgy choice for a casual holiday concert or a night out with friends.
DIY Punk Sparkle Skirt Instructions
Let’s give a classic plaid skirt a bit of punk rock sparkle.
What You’ll Need:
- A plain plaid skirt, preferably a kilt or wrap style
- Fabric glue
- A small amount of loose red and silver sequins
- A large decorative safety pin (optional)
Step-by-Step Guide:
- Choose Your “Damage” Spot: Decide where you want your sparkly, distressed patch to be. A spot near the hem or the wrap opening works well.
- Apply Glue Randomly: In your chosen spot, apply small, random dots and smudges of fabric glue. You do not want this to be a neat shape; it should look accidental.
- Sprinkle the Sequins: Mix your red and silver sequins together and sprinkle them over the wet glue. Gently pat them down.
- Shake Off the Excess: Carefully shake the skirt to remove any loose sequins that didn’t stick to the glue.
- Add Punk Hardware (Optional): Add your large safety pin to the wrap edge of the skirt to complete the look. Let the glue dry completely.
From ethereal gowns to punk rock skirts, the world of sequins is vast and varied. As we’ve seen, there is a sequin style for every personality, every occasion, and every comfort level. Sparkle isn’t just for extravagant parties; it can be woven into your daily life for a touch of unexpected joy.
The true beauty of fashion is its power to let us express who we are. We hope this guide has not only inspired you with beautiful ideas but also empowered you to get creative. With a little glue and a handful of sequins, you can transform any simple garment into a personalized piece of art that is uniquely you. So this holiday season, don’t be afraid to shine.
Key Takeaways
- Versatility is Key: Sequins are not just for formal gowns. They can be found on casual sweaters, edgy jackets, and comfortable joggers, making them suitable for a wide range of events.
- Balance Your Sparkle: When wearing a bold sequin piece, keep the rest of your outfit simple. A sequin skirt pairs wonderfully with a plain black top, letting the statement piece do all the talking.
- DIY Empowers You: You don’t need to spend a fortune to get a glamorous look. With basic craft supplies, you can customize your own wardrobe and create one-of-a-kind sequin pieces.
- Think Beyond Silver and Gold: Sequins come in every color of the rainbow. Don’t shy away from vibrant hues, iridescent finishes, and unique patterns to express your personal style.
- Subtlety Can Be Stunning: A small touch of sparkle, like sequins scattered on a shoulder or lining a coat, can have just as much impact as a fully embellished garment.