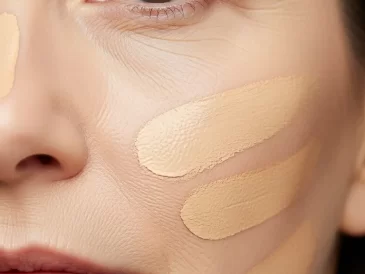
The smoky eye is a timeless makeup staple. It’s the go-to look for a night out, adding instant drama, depth, and mystery.

But “smoky” doesn’t just mean black and gray. This look is incredibly versatile. It can be soft and brown, bright and colorful, or sharp and graphic.
Here, we explore 50 different ways to master the smoky eye. Whether you’re a beginner or a makeup pro, you’ll find a style and a simple guide to recreate it.
1. The Gilded Amber Smoky Eye

This look captures the warmth of a sunset. Rich, earthy browns blend into a fiery gold shimmer. It opens the eye with a bright, metallic pop on the lid. The deep brown in the crease adds dimension, making the gold center truly stand out.
This style brings intense warmth to green or hazel eyes. It also creates a beautiful contrast with blue eyes. The smooth blend from matte brown to shining gold gives a dramatic, yet polished finish.
DIY Instructions:
- Prep Your Lid: Gently tap a small dot of eyeshadow primer or concealer all over your eyelid, from the lash line up to your eyebrow. This helps the colors stick and stops them from creasing. Let it dry for a minute.
- Add a Warm Base: Take a fluffy brush and dip it into a medium-warm brown or terracotta eyeshadow. Tap off any extra powder. Sweep this color into your crease, which is the fold above your main eyelid. Move the brush back and forth like a windshield wiper to create a soft, cloudy effect.
- Define the Outer Corner: Use a smaller, denser brush to pick up a dark chocolate brown shadow. Pat this color onto the outer “V” shape of your eyelid. This is the last third of your lid. Gently blend it slightly into the crease color so there are no harsh lines.
- Apply the Gold: Use your fingertip or a flat, stiff brush (you can spray it with a little setting spray to make the color pop). Press a bright gold shimmer shadow right onto the center of your eyelid. Pat it on instead of swiping.
- Brighten the Inner Corner: Take a tiny pencil brush and dip it in a very light, shimmery gold or champagne color. Dab this right in the inner corner of your eye, near your nose. This makes your eyes look bigger and more awake.
- Smoke Out the Bottom: Use that same small brush with the dark chocolate brown shadow. Lightly smudge it along your bottom lash line, focusing on the outer half.
- Finish Up: Add your favorite black eyeliner to your top lash line and apply a couple of coats of mascara.
2. The Silver Cut Crease Wing

This look is sharp and futuristic. A bright, metallic silver cuts across the lid, creating a bold contrast with the dark, smoked-out wing. The crease is defined with a soft gray, while the brow bone is bright and clean.
It’s a modern take on the smoky eye. This style focuses on clean lines and high-impact shimmer. It makes eyes look wider and more defined.
DIY Instructions:
- Prep: Put primer or concealer on your eyelid. Let it set.
- Crease Color: Use a fluffy brush to sweep a light gray or taupe shadow in your crease (the fold). Move it back and forth.
- Draw the Wing: Take a black eyeliner (liquid or gel is best). Draw a line from the outer corner of your eye, pointing up towards the end of your eyebrow. Then, draw a line from that tip back to your lash line, and fill in the triangle.
- Cut the Crease: Take a small, flat brush with some concealer on it. Draw a clean, curved line just above your natural eyelid fold, following its shape. Stop where your wing begins.
- Add Silver: Pat a bright silver eyeshadow (shimmery or glittery) onto the lid below the concealer line you just drew.
- Darken Outer V: Add a bit of black eyeshadow to the very outer corner, blending it into the wing.
- Inner Corner: Dab a tiny bit of white or silver shimmer in the inner corner of your eye.
- Finish: Add mascara.
3. The Graphic Silver Stripe

This is pure high-fashion drama. It features a bold, black wing on the bottom and a floating black line above the crease. The space between is filled with a blinding metallic silver.
This creates an open, artistic, “negative space” effect. It’s less of a “smoky” blend and more of a structured, graphic statement. This look is for when you want your eyes to be the entire focus.
DIY Instructions:
- Prep: Prime the eyelid so your lines stay clean.
- Base: Apply a neutral, light-colored shadow all over the lid.
- Bottom Wing: Use a black liquid eyeliner. Draw a sharp wing along your top lashes, just like a normal cat eye.
- Top Wing (Floating): Look straight ahead. Use the same black liner to draw another curved line above your crease. It should follow the shape of your bottom wing, like a matching echo.
- Add Silver: Take a silver liquid liner or a flat brush with silver shadow. Carefully fill in the space between the two black lines. Be patient and keep the lines sharp.
- Brighten: Add a white or silver sparkle to the inner corner of your eye.
- Mascara: Apply mascara, focusing on the outer lashes.
4. The Gilded Eye with a Fuchsia Flash

This look is a classic with a twist. It starts with a deep, smoky brown crease that blends into a brilliant gold lid. The real surprise is the sharp black winged liner. It is layered over a vibrant, hot pink line.
This tiny flash of color along the lashes adds an unexpected, playful element. It’s a way to wear a traditional smoky eye while still showing off some personality.
DIY Instructions:
- Prep: Prime your eyelid.
- Crease: Use a fluffy brush to blend a medium brown shadow into your crease.
- Outer Corner: Deepen the outer corner with a dark, espresso-brown shadow. Blend it well.
- Gold Lid: Pat a bright, metallic gold shadow onto the center of your lid with your finger.
- Pink Line: This is key. Take a bright fuchsia or hot pink eyeliner (liquid or pencil). Draw a thin winged line, starting from the middle of your eye and flicking it up at the corner.
- Black Line: Now, take your black liquid eyeliner. Draw another winged line right on top of the pink one, but make it slightly thicker. Let the pink peek out just underneath.
- Lower Lash: Smudge the dark brown shadow along your lower lash line.
- Mascara: Add lots of mascara.
5. The Soft Matte Brown Wing

This is the smoky eye you can wear during the day. It uses all-matte, neutral brown shades. The look is soft, diffused, and elegant.
Instead of a sharp liquid liner, it uses a dark brown shadow applied with an angled brush. This creates a hazy, smoked-out wing. This technique is very forgiving. It gives a gentle lift to the eye without any harsh lines.
DIY Instructions:
- Prep: Prime the eyelid.
- All-Over Color: Pat a light, nude-colored matte shadow all over your lid.
- Crease: Use a fluffy brush to sweep a soft, medium-brown shadow into your crease. Blend it up and out.
- Create the Wing: Take a small, angled brush. Dip it in a dark brown matte eyeshadow. Press this along your top lash line, starting from the inner corner and moving out.
- Flick it Out: When you get to the outer corner, “flick” the angled brush up and out, as if you were drawing a wing with a pencil.
- Smudge: (This is the step in the picture). Take that same brush and gently wiggle it over the line you just drew. This softens the line and makes it look “smoky.”
- Lower Lash: Lightly drag the same dark brown shadow on the angled brush along your bottom lashes.
- Mascara: Finish with a coat of mascara for a natural look.
6. The “Barely-There” Smoky Sheen

This look whispers, it doesn’t shout. It’s about enhancing your natural eye shape with very soft, warm-toned matte shadows. A light brown defines the crease, and a touch of a lighter shade brightens the lid.
There is no heavy liner. The “smoky” effect is subtle, coming from the gentle blend. A bright pop of light in the inner corner makes the eyes look awake and fresh.
DIY Instructions:
- Prep: Prime your lid.
- Crease: With a fluffy brush, use a very light brown or taupe shadow. Sweep it lightly in your crease.
- Lid: Pat a nude or cream-colored shadow on your main eyelid.
- Subtle Definition: Take a small brush with a medium-brown shadow. Lightly tap it along the very outer edge of your top lash line, just to make your lashes look thicker.
- The Highlight: Use your pinky finger or a tiny brush to dab a shimmery, light champagne shadow right in the inner corner of your eye.
- Mascara: Apply one coat of mascara.
7. The Quick Crayon Smoky Eye

This is the busy person’s smoky eye. It relies on creamy eyeshadow sticks instead of powders. A medium brown shimmer stick is applied directly to the lid and a darker brown is used in the crease.
The beauty of this is the speed. You just draw the color on and then use a brush (or your finger) to blend the edges out. It’s a fast way to get a blended, shimmery look.
DIY Instructions:
- Prep: Prime your lids. This stops the crayon from moving.
- Lid Color: Take a shimmery bronze or taupe eyeshadow stick. Scribble it all over your main eyelid, from the lashes up to the crease.
- Crease Color: Take a slightly darker, matte brown eyeshadow stick. Draw a line in your crease, right above the bronze color.
- BLEND!: Immediately, take a stiff blending brush. Make small circles where the two colors meet to blend them. You have to be quick before the crayon sets.
- Smudge Bottom: Use the darker brown stick to draw a thin line under your bottom lashes. Smudge it quickly.
- Inner Corner: Use a light, shimmery crayon or powder to highlight the inner corner.
- Mascara: Add mascara.
8. The Graphic Triangle Wing

This look throws away the blending brush. It’s all about sharp, geometric shapes. A precise black liner creates a dramatic, hollow triangle that extends from the outer corner.
This “negative space” design is artistic and bold. It’s an editorial, high-impact look. It’s for the brave.
DIY Instructions:
- Prep: Prime your lid and apply a simple, neutral shadow all over.
- Top Line: Use a black liquid liner with a fine tip. Draw a standard line along your top lashes.
- Bottom Line: From the outer corner of your eye, draw a straight line going down at an angle. Make it about half an inch long.
- Connect: From the end of that bottom line, draw another straight line connecting it up to the outer corner of your crease (the fold).
- The Triangle: You should now have a hollow, open triangle shape.
- Clean Up: Take a small, flat brush with a tiny bit of concealer. Use it to sharpen the edges of your lines.
- Mascara: Add mascara. Keep the rest of the eye simple.
9. The Cyberpunk Neon Smoky Eye

This is a futuristic smoky eye. It starts with a dark, black smoky base, blended out. Then, electric neon liners in green and pink are drawn on top.
They create a floating, graphic shape. This look combines soft blending with sharp, colorful lines. The contrast between the dark smoke and the bright neon is the key.
DIY Instructions:
- Prep: Prime your lid.
- Black Base: Pat a black eyeshadow all over your lid, staying below the crease.
- Smoke it Out: Take a clean fluffy brush. Gently blend the edge of the black shadow up and out, so it looks like soft, gray smoke.
- Neon Green Line: Take a bright, neon green liquid eyeliner. Draw a “floating” line above your crease, following your eye’s natural curve.
- Neon Pink Line: Take a neon pink liquid eyeliner. Draw a line right along your lower lash line.
- Wing: You can add a black winged liner on top of the black shadow if you want more definition.
- Mascara: Finish with black mascara.
10. The Deep Midnight Blue Smoky Eye

This look is rich and intense. It uses a deep, shimmering navy blue all over the lid, blended out with a soft brown in the crease. The dark blue creates a powerful, sultry effect.
A bright, frosty white highlight in the inner corner keeps the look from feeling too heavy. It makes the deep blue pop. This is a great alternative to a classic black smoky eye.
DIY Instructions:
- Prep: Prime your eyelid.
- Crease: Use a fluffy brush to blend a soft, medium-brown shadow into your crease. This “transition” color will help the blue blend.
- Blue Lid: Take a flat brush and pat a shimmery, dark navy blue shadow all over your main eyelid. Keep packing it on until the color is strong.
- Blend: Use your fluffy brush again. Gently blend the edge where the blue meets the brown. You want a smooth fade.
- Define: Use a black eyeliner pencil on your waterline (the inside rim of your eye) on both the top and bottom.
- Smoke Bottom: Take a small pencil brush with the navy blue shadow. Smudge it along your entire bottom lash line.
- Highlight: Dab a bright, shimmery white or silver shadow in your inner corner.
- Mascara: Apply several coats of black mascara.
11. The Cranberry-Wine Smoky Eye

This is a rich, romantic look. It features a deep, shimmery cranberry color across the lid. The color is blended into a dark, almost-black shadow at the outer corner.
This style is dramatic and warm. It makes brown and hazel eyes look exceptionally bright. The key is blending the red and black tones smoothly so there are no hard edges.
DIY Instructions:
- Prep: Apply primer or concealer to your eyelid.
- Crease Color: Take a fluffy brush and a matte, medium-pink or light-brown shadow. Sweep this in your crease to help the darker colors blend later.
- Lid Color: Use a flat brush to pat the shimmery cranberry or wine-red shadow all over your eyelid.
- Outer Corner: Use a small, dense brush to add a matte black shadow to the outer “V” of your eye. Pat it on gently.
- Blend: Take your fluffy brush (with no new color on it). Make small circles where the red and black meet. Keep blending until it looks like a soft cloud.
- Lower Lash: Use a small pencil brush to smudge the cranberry shadow along your bottom lash line. Add a tiny dot of the black to the very outer corner.
- Inner Corner: Dab a light, shimmery pink or white shadow in your inner corner.
- Finish: Add black eyeliner to your waterline (the inner rim) and apply mascara.
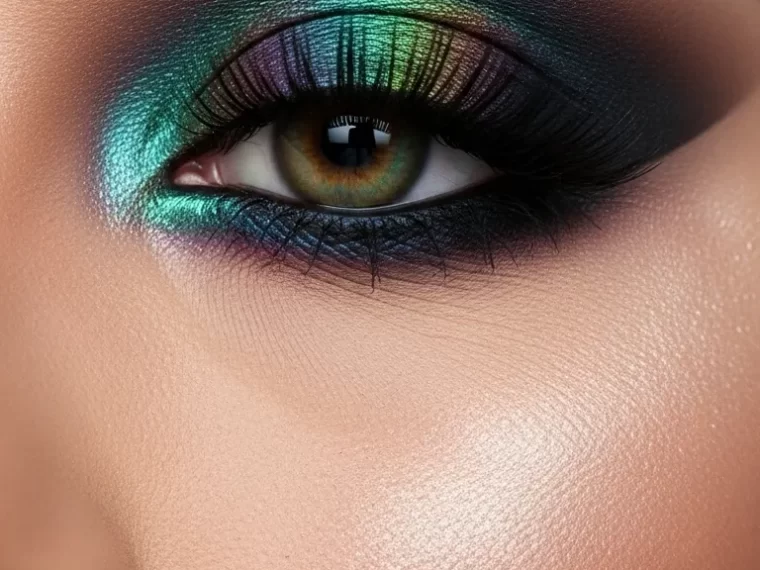
12. The Sparkling Peacock Smoky Eye

This look is magical. It combines shimmering teal, green, and a flash of purple. It’s like a mermaid’s tail, with specs of glitter that catch the light.
The colors are blended dark at the lash line and softer as they go up. A bright, icy blue highlight at the inner corner makes the whole look pop.
DIY Instructions:
- Prep: Prime your eyelid.
- Base: Use a fluffy brush to sweep a light, matte teal or green shadow into your crease.
- Lid Color: Pat a bright, shimmery teal shadow all over your main eyelid.
- Center Pop: Use your finger to press a shimmery purple or blue shadow right in the center of your lid.
- Define: Use a pencil brush to add a dark, matte teal or black shadow along your top and bottom lash lines. Smudge it well.
- Inner Corner: Dab a bright, icy blue or silver shimmer in your inner corner.
- Glitter: (Optional) While the shadow is still a bit tacky, gently tap a cosmetic-grade glitter on top of the lid.
- Finish: Use black eyeliner on your waterline and add lots of mascara.
13. The Matte Pink Winged Look

This is a bold, modern choice. It uses a bright, hot pink matte shadow all over the lid. The color is blended softly up toward the brow.
A sharp, black winged liner cuts across the pink. This creates a strong, graphic contrast. This look is about clean application and one powerful color.
DIY Instructions:
- Prep: Prime your eyelid.
- Pink!: Take a flat brush and pack the hot pink matte shadow all over your eyelid. Keep patting until the color is very bright.
- Blend: Use a clean, fluffy brush. Gently sweep the edges of the pink shadow in your crease. You want to soften the edge so it fades out.
- Liner: Take your favorite black liquid eyeliner. Draw a clean, sharp wing along your top lash line.
- Waterline: Use a black eyeliner pencil on your top and bottom waterlines.
- Lower Lash: (Optional) You can use a small brush to smudge a tiny bit of the pink shadow along your bottom lash line.
- Mascara: Apply mascara.
14. The Classic Silver & Black Smoky Eye

This is the ultimate nighttime look. It’s intense, dramatic, and confident. A bright, metallic silver shines from the center of the lid. This is surrounded by a deep, matte black.
The black is blended out into a sharp wing and a smoky lower lash line. This look pairs with a bold lip. It is a statement.
DIY Instructions:
- Prep: Prime your eyelid.
- Crease: Use a fluffy brush and a light gray shadow to map out your crease.
- Black Out: Use a dense brush to pat matte black shadow on the inner and outer thirds of your eyelid, leaving the center blank.
- Connect: Sweep the black shadow in your crease, connecting the two black sections.
- Silver: Use your finger or a flat brush. Press the metallic silver shadow onto the blank center of your eyelid.
- Blend: Use a clean fluffy brush to lightly tap the edges where the silver and black meet.
- Wing: You can use the black shadow or a gel liner to create a sharp wing.
- Lower Lash: Smudge the black shadow all along your bottom lash line.
- Waterline: Use a black pencil on your top and bottom waterlines.
- Mascara: Add lots of mascara.
15. The Emerald Pop Smoky Eye

This look is a clever surprise. It starts as a simple, soft brown smoky eye. The main lid and crease are all neutral.
The excitement is on the lower lash line. A bright, metallic emerald green liner is smudged along the bottom lashes. This draws attention to the eye and adds a beautiful jewel tone.
DIY Instructions:
- Prep: Prime your eyelid.
- Crease: Use a fluffy brush to sweep a soft, matte brown shadow into your crease.
- Lid: Pat a lighter, shimmery brown or taupe shadow on your main eyelid.
- Top Liner: Use a black or dark brown pencil to draw a thin line on your top lash line. Smudge it so it’s not a hard line.
- The Green: Take a bright, emerald green eyeliner pencil (shimmery is good). Draw this all along your bottom lash line.
- Smudge Green: Use a small pencil brush to gently smudge the green line, smoking it out.
- Waterline: You can use the same green pencil on your bottom waterline.
- Mascara: Apply mascara to your top and bottom lashes.
16. The Icy White Smoky Eye

This is a bright, eye-opening look. It uses shades of shimmery white and light silver. The colors are darkest at the lash line and fade up to the brow.
A black winged liner gives it shape. A white pencil in the lower waterline makes the eyes look huge. This is a frosty, high-shine look.
DIY Instructions:
- Prep: Prime your eyelid.
- Crease: Use a fluffy brush and a very light, matte gray shadow. Sweep this in the crease.
- Lid: Pat a bright, shimmery white or icy silver shadow all over the eyelid.
- Outer Corner: Add a tiny bit of medium-gray shadow to the very outer corner and blend it.
- Liner: Draw a clean, black winged line with liquid eyeliner.
- White Waterline: (This is the key). Take a white eyeliner pencil. Carefully draw it along your bottom waterline (the inside rim). This makes your eyes look bigger.
- Lower Lash: Smudge the light silver shadow along your bottom lash line.
- Inner Corner: Dab the shimmery white shadow in your inner corner.
- Mascara: Add mascara.
17. The Dramatic Mod Cut Crease

This look is pure ’60s-inspired art. It uses a stark white shadow to cut the crease. It also has a thick, dramatic black wing.
The key is the contrast. The matte black shadow is blended out, but the white line is sharp and clean. Spiky lower lashes complete the retro feel.
DIY Instructions:
- Prep: Prime your eyelid.
- Black Wing: Use a black gel or liquid liner. Draw a very thick, dramatic winged line on your top lashes.
- Black Crease: Use a small brush and black shadow. Draw a line in your crease, connecting it to the top of your wing.
- Smoke Up: Use a fluffy brush to blend the black crease line upwards, fading it to gray.
- Cut with White: Take a flat brush and a white eyeshadow (or concealer). Draw a clean, sharp line under the black crease line, separating it from the wing.
- White Lid: Fill in the space on your lid (under the white line) with more white shadow.
- Lower Lashes: This is fun. Use your liquid liner to carefully draw 3-5 small “spikes” pointing down from your lower lash line.
- Mascara: Add mascara to your top lashes.
18. The Matte Navy Smoky Eye

This is a deep, velvety look. It uses all-matte shadows. A dark navy blue is packed onto the lid. It’s blended out with a softer blue or gray in the crease.
This creates a soft, hazy effect. It’s less shimmery and more mysterious. It’s a very grown-up way to wear a blue smoky eye.
DIY Instructions:
- Prep: Prime your eyelid.
- Crease: Use a fluffy brush and a matte, medium-gray or light-blue shadow. Blend this into your crease.
- Navy Lid: Use a dense brush to pat the matte navy blue shadow all over your lid. Keep building the color.
- Blend: Use your fluffy brush to blend where the navy meets the gray. You want a smooth, smoky fade.
- Liner: Use a black pencil liner on your top and bottom waterlines.
- Lower Lash: Take a pencil brush and the navy shadow. Smudge this all along your bottom lash line.
- Mascara: Apply lots of black mascara.
19. The Frosted Pastel Dream

This look is ethereal and magical. It blends a soft, icy blue on the lid with a pastel lavender in the crease. The lashes are coated in white mascara.
A bright white highlight makes the inner corner glow. Tiny gems placed along the outer corner add a touch of fantasy.
DIY Instructions:
- Prep: Prime your eyelid.
- Crease: Use a fluffy brush to sweep the pastel lavender shadow into your crease.
- Lid: Pat the icy blue shadow all over your main eyelid.
- Blend: Use your fluffy brush to gently swirl where the blue and purple meet.
- Lower Lash: Smudge the blue shadow along your bottom lash line.
- Highlight: Use a bright, shimmery white shadow on your inner corner and under your eyebrow.
- White Mascara: Carefully coat your top and bottom lashes with a white mascara primer or a white mascara.
- Gems: (Optional) Use a tiny bit of lash glue to place 3-4 small rhinestones at the outer corner of your eye.
20. The Warm Terracotta Smoky Eye

This look is all about warm, earthy tones. It uses a matte terracotta (like a clay pot) shadow in the crease. A shimmery bronze shadow is on the lid.
It’s a very natural-looking smoky eye. It’s blended and soft. This style makes green and blue eyes look very striking.
DIY Instructions:
- Prep: Prime your eyelid.
- Crease: Use a fluffy brush to sweep the matte terracotta shadow into your crease. Blend it back and forth.
- Lid: Pat the shimmery bronze shadow onto your main eyelid.
- Outer Corner: Add a touch of a darker, matte brown shadow to the very outer corner for depth.
- Lower Lash: Use a small brush to smudge the terracotta shadow along your bottom lash line.
- Highlight: Dab a light, shimmery gold or champagne shadow in your inner corner.
- Mascara: Finish with a coat of brown or black mascara.
21. The Olive & Gold Smoky Eye

This look is earthy and rich. It features a deep, shimmery olive green that is darkest at the lash line. It blends into a warm, metallic gold toward the center of the lid.
The crease is defined with a soft brown. This keeps the look warm. A bright gold highlight in the inner corner ties it all together. This style is beautiful on brown eyes.
DIY Instructions:
- Prep: Prime your eyelid.
- Crease: Use a fluffy brush and a matte, medium-brown shadow. Blend this into your crease as a warm base.
- Olive Lid: Take a dense brush and pat the shimmery olive green shadow on the outer half of your eyelid.
- Gold Lid: Use a flat brush or your finger to press the metallic gold shadow onto the inner half of your lid.
- Blend: Use your fluffy brush to gently tap where the gold and green meet.
- Lower Lash: Smudge the olive green shadow along your entire bottom lash line.
- Highlight: Dab a bright, light gold shadow in your inner corner.
- Mascara: Add black mascara.
22. The Quick Silver Crayon Look

This is a fast and frosty look. It uses a shimmery silver eyeshadow stick for high-impact color. The crayon is applied directly to the lid.
A soft, light gray shadow is buffed into the crease. This creates a gentle blend. A bright white or silver highlight at the inner corner makes the eyes sparkle.
DIY Instructions:
- Prep: Prime your eyelid. This is important for crayons.
- Crease: Use a fluffy brush to sweep a light, matte gray shadow into your crease.
- Silver Stick: Take your silver eyeshadow stick. Draw it all over your main eyelid, from the lashes up to the crease.
- Blend: Quickly, before it dries, use a blending brush (or your finger) to soften the edge of the crayon into the gray shadow.
- Lower Lash: Gently draw the silver stick along your bottom lash line.
- Highlight: Use a bright white shadow or a white pencil in your inner corner.
- Mascara: Apply mascara.
23. The Neon Pink & Navy Cut Crease

This look is electric. A deep, matte navy blue shadow creates a dark, smoky base. A brilliant, neon pink liquid liner cuts right through it.
The pink liner follows the crease and extends into a sharp wing. This creates a bold, graphic contrast between the dark blue smoke and the bright pink line.
DIY Instructions:
- Prep: Prime your eyelid.
- Navy Base: Pat the matte navy blue shadow all over your eyelid.
- Smoke It Out: Use a fluffy brush to blend the edge of the blue shadow up into the crease, fading it out.
- Pink Line: This is the main step. Take your neon pink liquid liner. Look straight ahead. Draw a line that starts at your inner crease, follows the curve above your eyelid, and then flicks out into a wing.
- Lower Lash: Smudge the navy blue shadow along your bottom lash line.
- Waterline: Use a black or navy blue pencil on your waterline.
- Mascara: Apply black mascara.
24. The Shimmering Plum Smoky Eye

This is a soft, romantic smoky eye. It uses a beautiful shimmery plum or purple shadow all over the lid. A lighter, matte lavender is used to blend out the edges.
This creates a hazy, colorful cloud of purple. A bright, frosty pink highlight in the inner corner adds a pop of light. This style is very flattering for green eyes.
DIY Instructions:
- Prep: Prime your eyelid.
- Crease: Use a fluffy brush to sweep the light lavender (or a soft, cool-toned pink) shadow into your crease.
- Lid: Use a flat brush to pat the shimmery plum shadow all over your main eyelid.
- Blend: Use your fluffy brush to gently blend where the plum and lavender shadows meet.
- Lower Lash: Take a pencil brush and smudge the plum shadow along your bottom lash line.
- Highlight: Dab a shimmery light pink or white shadow in your inner corner.
- Mascara: Finish with black mascara.
25. The Warm Burgundy Smoky Eye

This look is deep and velvety. It features a rich, shimmery burgundy or maroon shadow. It is blended with a warm, reddish-brown in the crease.
This creates a very warm, intense look. It has no harsh lines. It’s a fully blended, seamless smoky eye that’s a great alternative to basic brown.
DIY Instructions:
- Prep: Prime your eyelid.
- Crease: Take a fluffy brush and the warm, reddish-brown shadow. Blend this well into your crease.
- Lid: Use a flat brush to pat the shimmery burgundy shadow onto your main eyelid.
- Outer Corner: Add a touch of a dark, matte brown or black shadow to the very outer corner.
- Blend: Use your fluffy brush to blend all the edges together. You want a soft, hazy finish.
- Lower Lash: Smudge the burgundy shadow along the bottom lash line.
- Waterline: Use a black eyeliner pencil on your waterline.
- Mascara: Apply several coats of mascara.
26. The Sunset Flare Smoky Eye

This look is a vibrant explosion of color. It blends from a fiery orange and hot pink into a deep purple. A bright, metallic gold flashes from the inner corner.
A sharp pink wing gives it a graphic edge. This look is not subtle. It’s an artistic, high-fashion statement that mimics a brilliant sunset.
DIY Instructions:
- Prep: Prime your eyelid.
- Crease: Use a fluffy brush to blend the hot pink shadow into your crease.
- Outer Lid: Pat the deep purple shadow onto the outer third of your eyelid.
- Center Lid: Pat the fiery orange shadow onto the center of your eyelid.
- Inner Lid: Press the bright gold shadow onto the inner third of your lid.
- Blend: Use a clean brush to gently tap the edges where the colors meet.
- Pink Wing: Take a hot pink liquid liner. Draw a sharp wing starting from the outer corner.
- Lower Lash: Smudge the purple shadow on the outer half of your lower lash line. Smudge the orange on the inner half.
- Mascara: Add mascara.
27. The Classic Hollywood Smoky Wing

This look is timeless elegance. It’s a soft, gray-and-black smoky eye. It is all blended into a sharp, black winged liner.
The lid is kept bright. The smoke is concentrated in the crease and the outer wing. It’s a polished, sophisticated look that pairs well with a red lip.
DIY Instructions:
- Prep: Prime your eyelid.
- Lid: Pat a light, shimmery white or silver shadow all over your lid.
- Crease: Use a fluffy brush to sweep a light, matte gray shadow into your crease.
- Outer Corner: Add a matte black shadow to the outer “V” of your eye. Pat it on.
- Blend: Use your fluffy brush to blend the black into the gray, creating a soft, smoky fade.
- Liner: Take a black liquid or gel eyeliner. Draw a sharp, clean wing along your top lash line.
- Lower Lash: Lightly smudge the gray shadow on your bottom lash line.
- Mascara: Add mascara.
28. The Glossy Lid Smoky Eye

This look is all about texture. It starts with a very simple, soft brown smoky eye. A light brown is in the crease, and a shimmery champagne is on the lid.
The unique part is the high-shine, wet-looking gloss. A clear eye gloss is tapped on top. This creates a dewy, editorial finish.
DIY Instructions:
- Prep: Prime your eyelid.
- Crease: Use a fluffy brush to blend a soft, matte brown shadow into your crease.
- Lid: Pat a shimmery champagne or light bronze shadow on your lid.
- Define: Add a bit of darker brown to the outer corner.
- Mascara: Apply a waterproof mascara. This is important.
- Gloss: (Do this step last). Take a clear, non-sticky eye gloss. Use your finger to gently tap it onto the center of your eyelid. Do not rub, or it will smear the shadow.
29. The Tape-Trick Smoky Wing

This look is sharp and clean. It uses tape to get a very precise edge. A bright silver lid is blended into a smoky black wing.
The tape creates a foolproof, sharp line from the corner of the eye to the brow. It’s a great trick for beginners.
DIY Instructions:
- Tape: Take a small piece of regular, clear tape. Press it on the back of your hand a few times to make it less sticky.
- Apply Tape: Place the tape from the outer corner of your eye, angling up toward the end of your eyebrow.
- Crease: Use a fluffy brush to blend a gray shadow in your crease.
- Lid: Pat the bright silver shadow on your main eyelid.
- Black Wing: Use a dense brush to add black shadow to your outer corner, blending it onto the tape. Don’t be afraid to be messy on the tape.
- Liner: Add a black liquid liner wing, using the tape as your guide.
- Remove Tape: Gently peel off the tape. You will have a sharp line.
- Lower Lash: Smudge the black shadow along your bottom lash line.
- Mascara: Add mascara.
30. The Crystal-Lined Smoky Eye

This look is pure glamour. It starts with a soft, smoky gray or taupe eyeshadow. A clean black winged liner defines the eye.
The main feature is the sparkle. Tiny rhinestones or crystals are glued along the top of the winged liner and the lower lash line. This is for a special occasion.
DIY Instructions:
- Prep: Prime your eyelid.
- Shadow: Create a very soft, simple smoky eye using light gray and white shadows.
- Liner: Draw a clean, black winged line.
- Lash Glue: Take a clear, brush-on lash glue. Carefully paint a thin line of glue right above your black liner. Also, place tiny dots of glue along your lower lash line.
- Crystals: Use a wax pencil or tweezers. One by one, pick up the small rhinestones and place them on the glue.
- Let it Dry: Keep your eye closed for a minute to let the glue set.
- Mascara: Carefully apply mascara.
31. The Graphic Tear-Stripe Look

This is a high-fashion, artistic statement. It begins with a soft, neutral brown shadow in the crease and a sharp, black winged liner.
The drama comes from below. A brown pencil is used to draw several “drip” or “tear” lines down from the lower lash line. This is a bold, editorial look.
DIY Instructions:
- Prep: Prime your eyelid.
- Crease: Use a fluffy brush to sweep a light, matte brown shadow into your crease.
- Liner: Draw a clean, sharp black wing with liquid eyeliner.
- Waterline: Use a black pencil on your top and bottom waterlines.
- The Drips: Take a soft, brown eyeliner pencil. Carefully draw 4-5 thin lines starting from your lower lash line and going straight down.
- Fade: (Optional) You can gently tap the bottom of the lines with your finger to make them look a little smudged or faded.
- Mascara: Add mascara to your top lashes.
32. The Chunky Glitter Bomb Eye

This look is all about maximum sparkle. It starts with a deep, black smoky base. A dark, matte black shadow is blended all over the lid and crease.
The entire lid is then coated with a chunky, holographic silver glitter. This is an intense, club-ready look.
DIY Instructions:
- Prep: Prime your eyelid.
- Black Base: Pat a matte black eyeshadow all over your eyelid, from the lash line up into the crease.
- Blend: Use a clean, fluffy brush to soften the top edge of the black shadow, blending it out.
- Glitter Glue: (This is the most important step). Pat a clear glitter glue all over your lid, on top of the black shadow.
- Glitter: While the glue is wet, use your finger or a flat brush to press the chunky silver glitter onto your lid. Keep patting, don’t swipe.
- Liner: Use a black pencil on your top and bottom waterlines.
- Mascara: Apply lots of mascara.
33. The Duochrome Teal Smoky Eye

This look is mesmerizing. It uses a special “duochrome” shadow that shifts color. On the lid, a shimmery teal blue fades into a deep purple at the outer corner.
A soft, neutral brown in the crease helps the colors blend. This style looks different from every angle.
DIY Instructions:
- Prep: Prime your eyelid.
- Crease: Use a fluffy brush to blend a soft, matte brown into your crease.
- Outer Corner: Pat a dark, matte purple or navy blue shadow onto the outer “V” of your eye.
- Lid: Use your finger to press the shimmery, duochrome (teal/purple) shadow all over the main part of your lid.
- Blend: Use your fluffy brush to gently tap where the duochrome shadow meets the dark outer corner.
- Lower Lash: Smudge the dark purple shadow along your bottom lash line.
- Highlight: Dab a light, icy blue or teal shadow in your inner corner.
- Mascara: Apply black mascara.
34. The Matte Red & Black Smoky Eye

This is a very dramatic, velvety look. It features a deep, matte red shadow on the lid. This is blended into a pure, matte black on the outer corner.
The blending is key. The transition from red to black is seamless. This is a bold, warm, and intense smoky eye.
DIY Instructions:
- Prep: Prime your eyelid.
- Crease: Use a fluffy brush to sweep a lighter, matte pink or red shadow into your crease. This helps the bright red blend.
- Lid: Pat the deep, matte red shadow all over your main eyelid.
- Outer Corner: Use a dense brush to pat the matte black shadow onto the outer “V” of your eye.
- Blend: Take your fluffy brush. With no new color, make small circles where the red and black meet. This will take time. Be patient.
- Lower Lash: Smudge the black shadow on the outer half of your lower lash line. Smudge the red on the inner half.
- Waterline: Use a black pencil on your top and bottom waterlines.
- Mascara: Add lots of mascara.
35. The Classic Black Pencil Smoky Eye

This look is a “how-to” for a classic. It uses pencil eyeliners for a soft, smudgy finish. A black pencil is used on the lid and in the crease.
A nude or white pencil is used in the waterline. This makes the eye look bigger and brighter, in contrast to the dark shadow.
DIY Instructions:
- Prep: Prime your eyelid.
- Crease: Use a fluffy brush to sweep a light, matte brown shadow into your crease.
- Black Pencil: Take a soft, black kohl pencil. Scribble it all over your outer corner and slightly into the crease.
- Smudge: Immediately, use a dense brush or your finger to smudge and blend the black pencil. You must be quick.
- Liner: Add a black liquid liner wing for a sharp edge.
- Nude Waterline: (This is the key step). Take a nude or white eyeliner pencil. Draw this along your bottom waterline (the inner rim).
- Lower Lash: Smudge the black pencil on your bottom lash line, just below the waterline.
- Mascara: Apply mascara.
36. The All-Matte Black Smoky Eye

This is the original, classic smoky eye. It uses only matte black and brown shadows. There is no shimmer.
The black shadow is packed on the lid. It is then carefully blended out with a warm brown in the crease. This creates a deep, smoky, and timeless look.
DIY Instructions:
- Prep: Prime your eyelid.
- Crease: Use a fluffy brush to blend a medium, matte brown shadow into your crease. Blend it well, like a windshield wiper.
- Black Lid: Use a flat, dense brush. Pat the matte black shadow all over your eyelid, staying below the crease.
- Blend: Take your fluffy brush (with a tiny bit more brown on it). Gently blend the edge of the black shadow into the brown crease.
- Liner: Use a black pencil on your top and bottom waterlines.
- Lower Lash: Take a pencil brush and smudge the black shadow all along your bottom lash line.
- Blend Bottom: Use the fluffy brush to lightly sweep the brown shadow just under the black, to soften it.
- Mascara: Apply many coats of black mascara.
37. The Soft Rose-Plum Smoky Eye

This is a gentle, romantic look. It uses a shimmery, rose-gold shadow on the lid. A soft, matte plum or mauve shadow is blended into the crease.
This style is warm and flattering. It defines the eye without being too dark or heavy. It’s a great way to wear a bit of color.
DIY Instructions:
- Prep: Prime your eyelid.
- Crease: Use a fluffy brush to sweep the matte plum or mauve shadow into your crease.
- Lid: Use your finger or a flat brush to pat the shimmery rose-gold shadow onto your main eyelid.
- Blend: Use your fluffy brush to gently blend where the two colors meet.
- Lower Lash: Smudge the matte plum shadow along your bottom lash line.
- Highlight: Dab a light, shimmery champagne shadow in your inner corner.
- Mascara: Apply mascara.
38. The Natural Bridal Smoky Eye

This is the softest smoky eye. It’s often used for weddings. It uses light, neutral colors to gently shape the eye.
A shimmery champagne shadow is on the lid. A very light, matte brown is in the crease. A thin liner and soft lashes complete the look.
DIY Instructions:
- Prep: Prime your eyelid.
- Crease: Use a fluffy brush and a light, matte taupe or soft brown shadow. Sweep this very lightly into your crease.
- Lid: Pat the shimmery champagne shadow all over your lid.
- Liner: Use a dark brown pencil or shadow. Push it right into your top lash line to make lashes look thick.
- Highlight: Dab a shimmery white or ivory shadow in your inner corner.
- Mascara: Apply one or two coats of mascara for a natural finish.
39. The Glossy Black “Oil Slick” Eye

This look is high-fashion and messy. It’s meant to look wet and smudged. A black cream shadow or pencil is blended all around the eye.
The key is the clear gloss. It is tapped on top of the black shadow. This creates a “patent leather” or “oil slick” texture that catches the light.
DIY Instructions:
- Prep: Prime your eyelid.
- Black Base: Take a black cream shadow or a soft kohl pencil. Apply it all over your lid and smudge it under your eye. Don’t be neat.
- Smudge: Use your finger or a brush to blend the edges out, creating a smoky, “lived-in” shape.
- Waterline: Line your top and bottom waterlines with the black pencil.
- Gloss: (Last step). Take a clear eye gloss. Use your finger to tap it all over the black shadow on your lid. Do not rub.
- Mascara: Add mascara (waterproof is best).
40. The Deep Brown Smoky Wing

This look combines a brown smoky eye with a sharp wing. It uses matte, dark brown shadows. The shadow is blended out in the crease and outer corner.
A sharp, black liquid liner wing cuts through the soft shadow. This gives the look both softness and structure.
DIY Instructions:
- Prep: Prime your eyelid.
- Crease: Use a fluffy brush to blend a medium, matte brown shadow into your crease.
- Outer Corner: Use a dense brush to pat a dark, chocolate-brown shadow onto the outer “V” of your eye.
- Blend: Use your fluffy brush to blend the dark brown into the medium brown.
- Lid: Pat a lighter, shimmery brown on the inner half of your lid.
- Liner: Draw a sharp, black winged line with liquid eyeliner.
- Lower Lash: Smudge the dark brown shadow along your bottom lash line.
- Mascara: Apply mascara.
41. The Iridescent Beetle-Wing Eye

This look is complex and stunning. It uses duochrome shadows that shift from teal to green to purple. It’s layered over a dark, smoky base.
This style mimics the iridescent shell of a beetle. It’s a deep, colorful, and mesmerizing look. The key is layering the shimmers over a dark base.
DIY Instructions:
- Prep: Prime your eyelid.
- Black Base: Pat a matte black shadow all over your lid. Blend the edge with a clean, fluffy brush.
- Lid Color: Use your finger to press a shimmery, duochrome (teal/green) shadow onto the center of your lid.
- Crease Color: Use a smaller brush to add a shimmery purple shadow to the crease and outer corner.
- Blend: Gently tap the edges where the colors meet.
- Lower Lash: Smudge the purple shadow on the outer lower lash line. Add a pop of the teal shadow to the inner half.
- Liner: Use a black pencil on your top and bottom waterlines.
- Mascara: Add black mascara.
42. The Neon Underliner Smoky Eye

This look is a surprise party. It’s a classic, deep black smoky eye on the top lid. The shadow is dark, blended, and matte.
The twist is on the bottom. A vibrant, two-toned neon liner in hot pink and lime green is drawn along the lower lash line. This gives a bright, unexpected flash of color.
DIY Instructions:
- Prep: Prime your eyelid.
- Top Lid: Create a classic matte black smoky eye. Pat black shadow on the lid. Blend the edge with a gray or brown shadow in the crease.
- Top Liner: Add a black winged liner.
- Neon Pink: Take a hot pink liquid eyeliner. Draw it along the inner half of your bottom lash line.
- Neon Green: Take a lime green liquid eyeliner. Draw it along the outer half of your bottom lash line. Let the two colors meet in the middle.
- Waterline: Use a black pencil in your top and bottom waterlines.
- Mascara: Apply mascara to the top lashes.
43. The Matte Terracotta Wing

This look is all about one warm, powerful color. It uses a matte, burnt-orange or terracotta shadow. The shadow is packed on the lid.
It is then blended out into a soft, smoky wing shape. A sharp black liner adds definition. This is a very warm, modern, and bold look.
DIY Instructions:
- Prep: Prime your eyelid.
- Lid Color: Use a flat brush to pat the matte terracotta shadow all over your eyelid.
- Smoky Wing: Take a fluffy, angled brush. Use the same terracotta shadow. Blend it from your outer corner up and out, creating a soft, winged-out shape.
- Liner: Draw a clean, black winged line along your top lashes.
- Lower Lash: Smudge the terracotta shadow along your bottom lash line.
- Waterline: Use a black pencil on your waterlines.
- Mascara: Apply several coats of mascara.
44. The Simple Lash & Liner Look

This look proves that “smoky” can be simple. It’s not about shadow. It’s about a flawless black winged liner and dramatic false lashes.
The lid itself is clean. The “smoky” effect comes from the depth and shadow created by the thick, fluffy lashes. It’s a clean, classic, and high-impact look.
DIY Instructions:
- Prep: Prime your eyelid.
- Base: Apply a simple nude or cream-colored shadow all over your lid.
- Liner: Take your favorite black liquid eyeliner. Patiently draw a clean, sharp winged line. Start thin on the inside and make it thicker on the outside.
- Mascara: Apply one coat of mascara to your natural lashes.
- Lashes: Apply a pair of full, fluffy false eyelashes. This is the most important step for this look.
- Lower Lash: (Optional) You can add a tiny bit of light brown shadow to your lower lash line.
45. The Bronze & Plum Smoky Eye

This is a beautiful, warm-and-cool toned look. It features a bright, metallic bronze on the center of the lid. A deep, matte plum shadow is in the crease and outer corner.
The contrast between the warm bronze and the cool purple is striking. It’s a rich, dimensional look that is very flattering.
DIY Instructions:
- Prep: Prime your eyelid.
- Crease: Use a fluffy brush to blend the matte plum shadow into your crease.
- Outer Corner: Pat more of the plum shadow onto the outer “V” of your eye.
- Bronze Lid: Use your finger or a flat brush. Press the metallic bronze shadow onto the center of your eyelid.
- Blend: Use your fluffy brush to gently tap where the bronze and plum meet.
- Lower Lash: Smudge the plum shadow all along your bottom lash line.
- Mascara: Add black mascara.
46. The Deep Emerald Smoky Eye

This is a rich, jewel-toned look. It uses a deep, shimmery emerald green shadow all over the lid. It’s blended with a soft brown in the crease.
A flash of bright, metallic gold in the inner corner makes the green pop. This look is dramatic and luxurious.
DIY Instructions:
- Prep: Prime your eyelid.
- Crease: Use a fluffy brush to blend a medium, matte brown shadow into your crease.
- Green Lid: Use a flat brush to pack the shimmery emerald green shadow all over your main eyelid.
- Outer Corner: Add a touch of matte black shadow to the very outer corner to make it deeper. Blend it.
- Highlight: Use a small brush to press a bright, metallic gold shadow in your inner corner.
- Lower Lash: Smudge the emerald green shadow along your bottom lash line.
- Waterline: Use a black pencil on your waterlines.
- Mascara: Apply lots of mascara.
47. The Soft Gray-Brown Smoky Eye

This is a very soft, cool-toned smoky eye. It uses all-matte shadows in shades of taupe, gray, and light brown.
The color is blended gently across the lid and into the crease. A thin black liner adds definition. This is a great, understated smoky eye for any occasion.
DIY Instructions:
- Prep: Prime your eyelid.
- Lid: Pat a light, matte gray or taupe shadow all over your lid.
- Crease: Use a fluffy brush to sweep a slightly darker, cool-toned brown shadow into your crease.
- Outer Corner: Add a touch of a dark, charcoal-gray shadow to the outer corner. Blend it.
- Liner: Draw a very thin winged line with black liquid eyeliner.
- Lower Lash: Smudge the gray shadow along your bottom lash line.
- Mascara: Apply one or two coats of mascara.
48. The Antique Gold Smoky Eye

This look is a classic. It features a beautiful, shimmery olive-gold shadow. It is packed on the lid and blended with a deep, matte brown.
A black pencil lines the waterline. This creates a very defined, sultry, and warm look. It’s a smoky eye that never goes out of style.
DIY Instructions:
- Prep: Prime your eyelid.
- Crease: Use a fluffy brush to blend a medium, matte brown shadow into your crease.
- Lid: Use a flat brush to pat the shimmery, antique-gold or olive-gold shadow onto your main eyelid.
- Outer Corner: Use a dense brush to add a dark, matte brown or black shadow to the outer “V”.
- Blend: Use your fluffy brush to blend the edges.
- Liner: Use a black kohl pencil on your top and bottom waterlines.
- Lower Lash: Smudge the dark brown shadow along your bottom lash line.
- Mascara: Add mascara.
49. The Rainbow Cut Crease

This is a bright, colorful, and happy look. It features a full rainbow of matte shadows (red, orange, yellow, green, blue, purple). They are blended across the lid and crease.
A sharp, winged liner gives it shape. This is a technical, artistic look for someone who loves color.
DIY Instructions:
- Prep: Prime your eyelid.
- Map it Out: Use small brushes. Pat the shadows in order.
- Inner Corner: Start with red on the inner crease.
- Lid: Blend from yellow (inner lid) to green (center lid) to blue (outer lid).
- Crease: Blend from red (inner crease) to orange (center crease) to purple (outer crease).
- Blend: This takes time. Use a clean, fluffy brush to gently tap the edges of each color.
- Liner: Draw a sharp, black winged line.
- Lower Lash: Smudge the blue and purple shadows on your lower lash line.
- Mascara: Add mascara.
50. The Pastel Watercolor Drip Eye

This is a soft, artistic look. It uses pastel, watercolor-like shadows. Pink, peach, mint green, and lavender are all blended softly on the lid.
The unique part is the “drip” effect. A purple shadow is used to create a “drip” coming down from the outer corner.
DIY Instructions:
- Prep: Prime your eyelid.
- Lid: Use a flat brush to pat the pastel colors randomly on your lid, like a watercolor painting. Pat mint green on the inner corner, peach on the center, and lavender on the outer corner.
- Blend: Use a fluffy brush to gently swirl the edges together.
- The Drip: Take a small, pointed brush with the lavender shadow. Draw a “drip” shape starting from your outer, lower lash line.
- Lower Lash: Smudge the pink and peach shadows on your lower lash line.
- Mascara: Apply a soft coat of mascara.
The smoky eye is not just one look; it’s a technique. As you’ve seen, it can be adapted with any color, texture, or shape.
From the softest brown for a subtle effect to a high-gloss black for ultimate drama, the power is in the blend. The right smoky eye can transform your entire mood.
Don’t be afraid to experiment. Try a new color. Add a pop of glitter. Play with different liners. Your next night out is the stage.
Key Takeaways
- Primer is Key: Almost every look starts with an eyeshadow primer or concealer. This makes colors brighter and prevents creasing.
- Blending is Everything: The “smoky” effect comes from soft, blended edges. Use a clean, fluffy brush to blend where colors meet.
- Smoky Doesn’t Mean Black: A smoky eye can be created with any color, including browns, plums, navies, and even bright pastels.
- Add Dimension: Using a light shimmer on the lid and a darker matte in the crease is a classic way to create depth.
- Don’t Forget the Lower Lash Line: Smudging shadow along the bottom lashes connects the whole look and adds to the smoky, sultry effect.