
The world of lip gloss is vast. It is easy to find a product that shines. It is harder to find one that also truly cares for your lips.

This collection of 45 products shows you can have it all. Healthy, hydrated lips are the best base for a brilliant shine.
Whether you love a clear serum, a bold lacquer, or a tingly plumper, an option exists. Your lips can feel good and look amazing.
1. Rose Gold Satin Sheen

This gloss comes in a heavy, polished rose gold tube. It feels substantial in your hand. The applicator pulls out smoothly. It reveals a soft, velvety mauve color.
This shade is subtle. It adds a healthy wash of color to your lips. The finish is pure shine. There is no glitter, just a glass-like sheen. It glides on easily. Lips feel coated and protected. This formula is built to hydrate. You get the shine without any sticky feeling.
DIY: Get the Polished Sheen Look
- Start Clean: Make sure your lips are clean and dry. You can gently rub a soft, damp washcloth on them to scrub away any dry flakes. Pat them dry with a towel.
- Outline (Optional): Ask an adult for a lip pencil that is the same color as your lips. Carefully draw a line just around the outside edge of your lips. This helps the gloss stay in place.
- Apply the Gloss: Open the gloss. Wipe a little bit of the extra gloss off the applicator on the inside rim of the tube. You only need a small amount.
- Swipe and Shine: Gently swipe the applicator on your bottom lip first. Start in the middle and slide it to one corner, then go from the middle to the other corner.
- Press Together: Press your lips together gently, like you’re saying “mmm.” This shares the gloss with your top lip.
- Final Touch: Use the tip of the applicator to fill in any spots you missed, especially the little “v” shape (called a Cupid’s bow) on your top lip. Now you have a super shiny, polished look.
2. Fire & Ice Duo Gloss

Experience a dynamic lip duo with these striking glosses. One vibrant red shade promises a fiery look. The cool blue offers a refreshing, icy contrast. Both are presented in chic, frosted tubes. They stand out on any vanity.
These glosses offer more than just bold color. They deliver incredible shine. Your lips will look fuller and feel wonderfully moisturized. Wear them alone for a statement. Layer them for a truly unique effect. This duo invites playful experimentation.
DIY: Create Your Own Hot and Cold Lip Gloss
- Gather Your Stuff: You will need two small, clean containers with lids (like tiny travel jars), clear lip balm or petroleum jelly, red food coloring, blue food coloring, and two stirrers (like popsicle sticks).
- Make “Fire” Gloss: Scoop half of your clear lip balm into one container. Add just one tiny drop of red food coloring. Stir it very, very well with a popsicle stick until the color is even. If you want it a little darker, add one more tiny drop.
- Make “Ice” Gloss: Now, scoop the other half of your clear lip balm into the second container. Add one tiny drop of blue food coloring. Stir it just like you did with the red. Remember, a little bit of color goes a long way!
- Try Them Out: Use a clean finger or a cotton swab to put a little bit of your “Fire” gloss on your lips. Then, try the “Ice” gloss. You can even put a little “Fire” on your bottom lip and “Ice” on your top lip for a fun look!
- Clean Up: Put the lids on your gloss containers. Wash your hands thoroughly.
3. Diamond Shimmer Elixir

This lip gloss truly feels like a treasure. It comes in a clear, faceted bottle. The top looks like a sparkling diamond. Inside, a mesmerizing swirl of gold and purple shimmers. This gloss promises a dazzling finish.
The unique formula blends hydrating oils. It leaves your lips feeling incredibly soft. The intense shimmer catches every light. It gives your pout a luxurious glow. Each application is a moment of pure glamour. It is a stunning addition to any collection.
DIY: Make Your Own Sparkly Lip Gloss
- What You Need: You will need a small, clean pot (like a tiny makeup pot), clear lip balm, a tiny bit of purple eyeshadow, a tiny bit of gold eyeshadow, and a toothpick or small spoon.
- Melt the Base: Ask an adult to help you gently warm up a small amount of clear lip balm. You can do this by putting the pot in a bowl of warm water for a few minutes. You want it just soft, not completely liquid.
- Add the Sparkle: Once the lip balm is soft, use your toothpick to scrape a tiny bit of purple eyeshadow into it. Then, scrape in an equally tiny bit of gold eyeshadow. Remember, less is more to start!
- Swirl the Magic: Use your toothpick to gently swirl the eyeshadow colors into the softened lip balm. Don’t mix it completely! You want to see the pretty swirly patterns, just like in the picture.
- Let It Cool: Put the lid on your pot. Let it sit in a cool place, or even the fridge for a few minutes. It needs to get firm again.
- Shine Bright: Once it’s firm, use a clean finger or a lip brush to put a little on your lips. Watch them sparkle!
4. Broad-Spectrum Lip Protector SPF 50+

Guard your lips with this essential lip care. This product offers robust SPF 50+ protection. It shields against both UVA and UVB rays. The packaging is sleek and minimalist. It reflects its serious skin care purpose.
It is fragrance free, making it gentle for all. Dermatologist tested, it assures quality and safety. Beyond sun defense, it also hydrates. Your lips will feel smooth and cared for. This tube is a must have for daily protection. Keep your lips healthy and happy.
DIY: Create Your Own Sun-Friendly Lip Balm
- Gather Your Items: You will need a small, clean lip balm container, some petroleum jelly (like Vaseline), a small spoon, and a tiny bit of zinc oxide powder (ask an adult to help you find this, it’s a mineral that blocks sun, often found in natural sunscreens).
- Scoop the Jelly: Put about two spoonfuls of petroleum jelly into your container.
- Add Sun Protection: Ask an adult to help you add a very tiny pinch of zinc oxide powder to the petroleum jelly. It’s important not to use too much, as it can make it look white.
- Mix It Up: Use your small spoon or a toothpick to stir the powder into the jelly very, very well. Keep stirring until you cannot see any white specks and the mixture looks smooth.
- Smooth Your Lips: Now you have your own lip protector! Use your finger to gently rub a little onto your lips before you go outside. It will help keep them soft and safe from the sun.
5. Aqua Swirl Hydrating Gloss

This gloss captures the essence of fresh water. It comes in a uniquely twisted, clear tube. A mesmerizing swirl of blue and white liquid lives inside. The design is both playful and elegant. It promises a cooling sensation.
The formula is intensely hydrating. It leaves your lips feeling quenched and refreshed. Expect a brilliant, wet-look shine. It’s like a drink of water for your pout. This gloss is a delightful treat. It brings a calm, serene feeling to your routine.
DIY: Craft Your Own Swirl Lip Oil
- What You’ll Need: Get a clean, empty small bottle (maybe from an old, cleaned lip gloss), some clear lip oil (or jojoba oil), a tiny drop of blue food coloring, and a toothpick.
- Pour the Clear Base: Carefully pour most of your clear lip oil into your empty bottle. Leave a little space at the top.
- Add a Tiny Bit of Color: Dip the very tip of your toothpick into the blue food coloring. Then, carefully dip that toothpick into the lip oil in your bottle. Try to let the color sink to the bottom without mixing too much.
- Create the Swirl: Gently twist the bottle a few times. Don’t shake it! You want the blue to make pretty, wavy lines in the clear oil, just like the picture.
- Seal and Enjoy: Put the top back on your bottle. Now you have a beautiful, swirled lip oil. Gently dab a little on your lips with your finger or a clean brush.
6. Sunset Glow Liquid Lip Treatment

A burst of warmth comes from this vibrant orange bottle. The rich, coral-hued gloss spills out. Its luxurious texture is immediately apparent. This formula feels like a comforting embrace. It is a true treat for your lips.
The gloss provides deep hydration. It also imparts a gorgeous, juicy shine. Your lips will feel soft and plump. The color is inviting and cheerful. It is a fantastic choice for a sunny disposition. Brighten your day with this lovely shade.
DIY: Make Your Own Coral-Tinted Lip Balm
- Gather Supplies: Find a small, clean container (like a mint tin or tiny pot), clear lip balm or petroleum jelly, a tiny piece of an orange or peach crayon (ask an adult first!), and a spoon.
- Melt and Mix: Ask an adult to help you gently melt a spoonful of clear lip balm and the tiny crayon piece in a heat-safe bowl over warm water. Stir them together until the crayon melts into the balm and the color is even.
- Pour and Cool: Carefully pour the warm, colored balm into your small container. Let it sit in a cool place, or in the fridge, until it becomes solid again.
- Apply and Glow: Once firm, your coral-tinted lip balm is ready! Use your finger to smooth a little onto your lips for a pretty, warm glow.
7. Artisan Blend Lip Mask & Spatula

Elevate your lip care ritual with this unique offering. A soft, gray tube contains a rich lip treatment. It comes with a sleek, metallic spatula. This tool ensures hygienic application. The presentation speaks of quality.
This “Artisan Blend” is likely a deep conditioning mask. It aims to soothe and repair dry lips. The spatula helps you spread an even layer. Wake up to remarkably soft, plump lips. This set brings professional care to your home. Give your lips the royal treatment.
DIY: Create a Homemade Lip Mask Kit
- You’ll Need: A small, clean container with a lid, petroleum jelly (Vaseline), a tiny bit of honey, and a small, clean plastic spoon (like a baby spoon or coffee stirrer) to be your “spatula.”
- Mix the Mask: Scoop about two spoonfuls of petroleum jelly into your container. Add one tiny drop of honey. Honey is sticky, so be careful!
- Stir It Up: Use your plastic spoon to mix the petroleum jelly and honey very, very well. Keep stirring until it looks smooth and evenly mixed.
- Apply Like a Pro: Use your clean plastic spoon (your “spatula”) to scoop a small amount of your homemade lip mask. Gently spread a thin layer over your clean lips. You can put this on before bed for super soft lips in the morning!
- Store It: Put the lid on your container. Remember, this is just for your lips!
8. Clinical Hydration Tube

This minimalist tube offers targeted lip care. Its simple white packaging conveys a clinical feel. The clear numbering suggests a specific step or formula. It is designed for serious hydration. The separate applicator ensures precise delivery.
This product delivers essential moisture. It helps soothe and protect delicate lip skin. It has a lightweight texture. This makes it comfortable for all-day wear. It’s a straightforward approach to healthy lips. Trust this for reliable, effective care.
DIY: Simple Lip Hydration Treatment
- What to Get: Find a small, clean squeeze tube (like from an old, cleaned lip balm) or a tiny pot. You’ll also need plain petroleum jelly or a very simple, clear lip balm. For an “applicator,” you can use a clean cotton swab.
- Fill the Tube/Pot: Carefully scoop or squeeze your petroleum jelly/lip balm into your clean tube or pot. Fill it up!
- Use Your “Applicator”: Instead of putting your fingers right into the product, you can use a clean cotton swab. Dip the swab into your homemade lip treatment.
- Hydrate Your Lips: Gently spread the treatment onto your lips using the cotton swab. This keeps everything clean and helps you put it on smoothly. Your lips will feel so soft and happy!
- Keep it Tidy: Put the cap back on your tube or pot when you are done. Use a new, clean cotton swab each time you apply.
9. Line & Define Lip Filler

This sleek, gray tube promises precision. It features a finely pointed brush applicator. It is crafted for expert lip definition. The “Line & Define” name tells its story. This product helps shape and fill.
It works to create a fuller, more sculpted lip look. The small brush allows for intricate detail. You can use it to outline or fill in color. It’s an essential tool for a polished finish. Achieve salon-quality lips at home. This is a secret weapon for a defined pout.
DIY: Make Your Own Lip Line Refiner
- Supplies: You will need a small, empty, clean tube (like from a liquid eyeliner or lip liner, cleaned very well), some clear lip balm, and a tiny bit of brown or pink eyeshadow (whichever looks more natural for lips). You also need a very thin paintbrush (a small art brush, cleaned).
- Melt the Balm: Ask an adult to help you gently warm a small amount of clear lip balm until it’s soft, not totally liquid.
- Add a Hint of Color: Mix in a tiny pinch of your brown or pink eyeshadow. Stir it well with a toothpick until the color is even.
- Fill the Tube: Carefully spoon the colored balm into your clean empty tube. This might be tricky, so go slow!
- Practice Defining: Use your thin paintbrush (your “applicator”) to pick up a tiny bit of your homemade lip refiner. Practice drawing a line just along the edge of your lips. It helps to make your lips look neat and tidy!
- Store and Use: Put the cap on your tube. Clean your brush after each use.
10. Retinoid Advanced Lip Complex

This elegant bottle presents a powerful solution. Its deep bronze color feels sophisticated. The “Retinoid Advanced Complex” suggests scientific backing. An airless pump ensures product freshness. This design protects potent ingredients.
This complex is designed to rejuvenate lips. It promotes smoother, healthier lip skin. The light and air protected technology maintains efficacy. Expect a more youthful and revitalized appearance. It is a serious treatment for lip concerns. Invest in the future of your smile.
DIY: Create a Super Soft Lip Treatment
- What You Need: A small, clean jar or pot with a lid, plain petroleum jelly, a tiny amount of Vitamin E oil (you can get this from a capsule – ask an adult to help you cut it open), and a small spoon.
- Scoop the Base: Put about two spoonfuls of petroleum jelly into your jar.
- Add the Special Oil: Carefully squeeze just one tiny drop of Vitamin E oil into the petroleum jelly. Vitamin E is good for helping skin feel soft.
- Mix It Gently: Use your spoon to mix the petroleum jelly and Vitamin E oil together very gently until they are well combined. Don’t mix too hard!
- Pump-Like Application (Imagine!): Since we don’t have a pump, just use a clean finger or a clean cotton swab to scoop out a tiny bit of your super soft lip treatment.
- Apply and Renew: Gently spread a thin layer over your lips. You can use this every night to help your lips feel extra soft and smooth, like they’re getting a special treatment!
- Cover Up: Put the lid on your jar to keep your treatment fresh.
11. Devv Kiss Ultra Hydrating Gloss

This gloss promises a dewy, fresh look. The bottle is frosted pink. It holds a subtle, rose-colored formula. The image shows plush, hydrated lips. Water droplets suggest intense moisture. This is a gloss for a natural, healthy shine.
The “Ultra Hydrating” name says it all. It is designed to quench thirsty lips. The finish is sheer and luminous. It makes lips appear soft and plump. The silver cap adds a touch of simple elegance. This is a straightforward, beautiful gloss.
DIY: Make Your Own Dewy Lip Gloss
- Get Your Supplies: You will need a small, clean pot, clear lip balm, and a tiny bit of pink or red lipstick (just a sliver!). You also need a small spoon.
- Melt the Balm: Ask an adult to help you gently warm a spoonful of clear lip balm. You can put it in a small bowl over warm water until it gets soft.
- Add a Little Color: Scrape a tiny bit of the pink or red lipstick into the soft balm. You only need a little bit to get a light pink color like the picture.
- Stir It Up: Mix the lipstick and balm together with your spoon. Keep stirring until the color is smooth and even.
- Cool It Down: Let your new pink gloss cool down in the pot until it’s firm again. Putting it in the fridge for a few minutes works fast.
- Get the Dewy Look: Use your finger to apply your gloss. For the extra “dewy” look, fill a small spray bottle with clean water. Close your eyes and mouth, and ask an adult to gently mist the water over your face from far away.
12. Ocean Mist Cooling Gloss

This bottle has a soothing, frosted finish. It fades from a soft green to a calm blue. The unique applicator is a smooth, rounded spoon. This shape suggests a cooling, gentle application. It looks like it would glide over lips.
The product feels refreshing. It likely delivers a wave of hydration. The serum inside is probably clear and light. This design is simple and modern. It feels like a calming spa treatment. A simple swipe would soothe and shine.
DIY: Create a Cooling Lip Soother
- What You Need: You’ll need a clean, empty lip gloss tube or small jar. You also need some aloe vera gel (the clear kind!) and a small spoon applicator (you can use a clean, small plastic spoon, like a baby spoon).
- Chill Your Gel: Put your container of aloe vera gel in the refrigerator for about 10 minutes. You want it to be cool, not frozen.
- Fill Your Jar: Once the gel is cool, carefully scoop it into your clean jar or tube.
- Get Your “Applicator”: Keep your clean plastic spoon in the fridge, too.
- Apply and Soothe: When your lips feel dry or warm, take your cool spoon. Dip it into the cool aloe vera gel.
- Glide It On: Gently glide the spoon over your lips. The cool gel and the smooth spoon will feel very refreshing and soothing, just like a spa day!
13. Vibrant Red Lip Stain

This image shows a bold, beautiful red lip. The color is rich and saturated. It has a soft, velvety texture. It is not overly shiny, but not flat matte either. The color fades gently at the inner part of the lip. This creates a very modern, “blotted” look.
This style makes lips look full and healthy. The freckles on the surrounding skin add to the natural, fresh feeling. This is a confident and timeless lip look. It focuses purely on amazing color and texture. It shows the power of a single, striking shade.
DIY: Get the Blotted Red Lip Look
- Start Smooth: Make sure your lips are clean and dry. You can gently rub them with a damp washcloth to make them smooth.
- Get Some Color: Find a red lipstick. A bright, cherry red works well.
- Dot, Don’t Swipe: Instead of swiping the lipstick all over, just gently tap it onto your lips. Put a few dots in the center of your bottom lip and top lip.
- Use Your Finger: Now, take your clean finger. Gently tap and blot the color from the center of your lips outwards towards the edges.
- Smudge the Edges: Keep blotting with your finger until the color is soft and a little fuzzy at the edges. It shouldn’t be a sharp line.
- Check Your Look: You’re done! It should look like you just ate a red popsicle. This is a soft, pretty way to wear a bold color.
14. Lumière Dual-End Lip Tint

This product offers two options in one. A sleek, modern container holds two formulas. One side is a vibrant red. The other side is a clear, high-shine gloss. This “Lumière” duo is for creating versatile lip looks.
First, use the red tint for a bold stain. The applicator looks soft and precise. It will define your lips well. Then, use the clear gloss. You can put it all over for a wet look. Or just dab it in the center. This pairing lets you choose your finish.
DIY: Make Your Own Two-Step Lip Tint & Gloss
- Gather Supplies: You’ll need two small, clean pots with lids, petroleum jelly, and red food coloring (or a tiny bit of red Jell-O powder). You’ll also need two cotton swabs.
- Make the Clear Gloss: Scoop some petroleum jelly into the first pot. That’s it! This is your clear, high-shine gloss.
- Make the Red Tint: Scoop a little petroleum jelly into the second pot. Add one tiny drop of red food coloring or a tiny pinch of red Jell-O powder.
- Stir the Tint: Use a clean cotton swab to stir the color into the petroleum jelly. Keep stirring until the color is smooth and even.
- Apply Your Look (Step 1): Use your “tint” cotton swab. Dab a little of the red tint onto your lips. Blot it with your finger for a stained look.
- Apply Your Look (Step 2): Use your “gloss” cotton swab. Put the clear gloss on top of the red tint. Now you have a super shiny, red lip!
15. Recyclable Aluminum Matte Duo

This set features sustainable, smart design. The polished aluminum tubes are recyclable. One side is a classic red lipstick. The other is a liquid matte lip color. The dark red velvet applicator looks very soft.
This gives you a choice of textures. Use the lipstick for a creamy, bold look. Use the liquid lipstick for a long-lasting, flat matte finish. This is a powerful red shade. It is a timeless color in modern, earth-friendly packaging.
DIY: Make a Lipstick and “Matte” Gloss
- You Will Need: Two small, clean pots, petroleum jelly, a red crayon (ask an adult first!), and a tiny bit of cornstarch or baby powder. You’ll also need a spoon.
- Make the Lipstick: Ask an adult to help you melt a spoonful of petroleum jelly and a small piece of red crayon in a bowl over warm water. Stir until the color is mixed.
- Pour the Lipstick: Carefully pour this melted mix into your first pot. Let it cool in the fridge until it’s solid, like a real lipstick.
- Make the “Matte” Gloss: Put a spoonful of petroleum jelly in your second pot. Add a small piece of red crayon, just like before.
- Add the “Matte” Magic: Ask an adult to help you melt this mix. Once it’s melted and stirred, add a tiny pinch of cornstarch. Stir it in well. This will make it look less shiny.
- Cool and Try: Let the “matte” gloss cool. Now you have two styles! Try the “lipstick” from pot 1. Then, try the “matte” gloss from pot 2 and see the difference.
16. Fizz & Glow Lip Scrubber

This product is fun and functional. It comes in a bright blue aluminum can. The name “Fizz & Glow” sounds refreshing. The most unique part is the applicator. It is a soft, blue, nubbly brush.
This is likely a lip scrub or exfoliating treatment. The little bristles gently buff the lips. They remove dry, flaky skin. The formula inside probably fizzes. It leaves lips feeling smooth and glowing. This is a great step before applying lip gloss.
DIY: Homemade Lip Scrub & Scrubber
- Get Your “Scrubber”: Find a clean, new, soft-bristled toothbrush. This will be your special lip-scrubbing tool. Make sure it is only for your lips, not for your teeth.
- Make Your Scrub: In a small bowl, put one teaspoon of sugar. Add one tiny drop of honey. Add one tiny drop of olive oil or coconut oil.
- Mix the Scrub: Stir the sugar, honey, and oil together with a spoon. It should look like wet, sandy paste.
- Time to Scrub: Put a little bit of the scrub onto your lips.
- Gently Brush: Take your special, clean, soft-bristled toothbrush. Very, very gently, rub the toothbrush in little circles on your lips. This tickles a little! Do this for about 10 seconds.
- Rinse and Glow: Wipe off the sugar scrub with a warm, damp washcloth. Pat your lips dry. They will feel super smooth and will look glowing!
17. Clinical White Lip Treatment

This product looks clean and professional. The all-white tube has simple, black lettering. “CINICAL” suggests a science-based formula. The applicator is very unique. It is a smooth, teardrop-shaped wand.
This wand is designed to hug the curve of your lips. It delivers a soothing, milky-white treatment. This is likely a healing or plumping serum. The formula works to repair and hydrate. It is a no-fuss, effective lip care solution. It brings a touch of the clinic home.
DIY: Simple Soothing Lip Serum
- Find Your Supplies: Get a small, clean pot with a lid. You will need plain petroleum jelly. You will also need a clean, rounded plastic spoon (like a baby spoon) for your “applicator.”
- Chill Your Spoon: Put your clean plastic spoon in the refrigerator for about 10 minutes.
- Scoop the Jelly: Put a few spoonfuls of plain petroleum jelly into your small pot.
- Get Your Applicator: Take your cold spoon out of the fridge.
- Apply Your Treatment: Dip the rounded back of the cold spoon into your petroleum jelly. You only need a little bit.
- Soothe Your Lips: Gently glide the back of the cold, jelly-coated spoon over your lips. The cool spoon feels very nice and soothing. The shape is just like the special applicator!
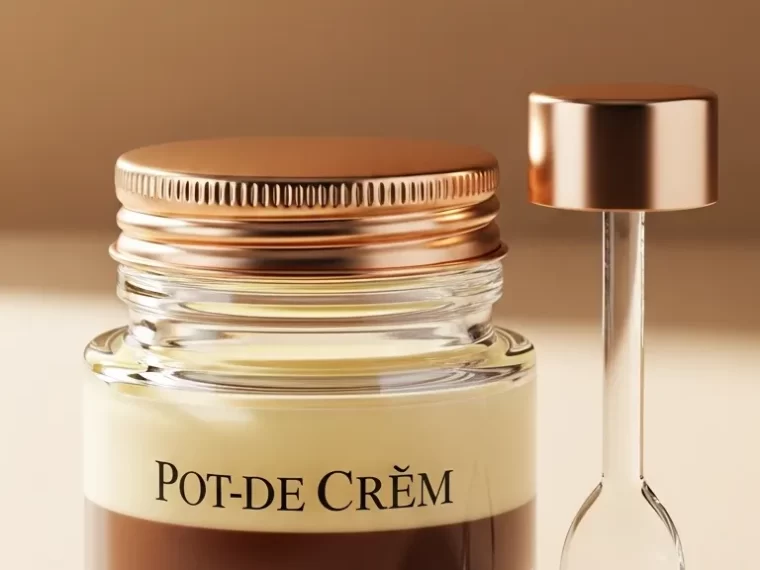
18. Pot-de-Crèm Lip Mask

This looks delicious enough to eat. It is a layered lip mask in a glass jar. “Pot-de-Crèm” means “pot of cream” in French. It has a rich, dark brown layer. Above that is a creamy, pale yellow layer. It comes with a small, clear spoon.
This is a rich, hydrating night treatment. The dark layer might be chocolate or coffee-infused. The light layer could be vanilla or shea butter. You scoop a little out. You wake up to soft, nourished lips. It is a dessert for your pout.
DIY: Make Your Own Two-Layer Lip Mask
- You’ll Need: Two small bowls, a clean, small glass jar, petroleum jelly, a tiny bit of cocoa powder (for baking), and a tiny bit of vanilla extract (ask an adult). You also need a small spoon.
- Make Layer 1 (Chocolate): Put two spoonfuls of petroleum jelly in the first bowl. Add a tiny pinch of cocoa powder. Stir it very, very well until it’s all brown and smooth.
- Pack Layer 1: Carefully spoon the “chocolate” jelly into the bottom of your glass jar. Press it down so it’s flat.
- Make Layer 2 (Vanilla): Clean your bowl. Put two spoonfuls of petroleum jelly in it. Add one tiny drop of vanilla extract. Stir it very, very well.
- Add Layer 2: Carefully spoon the “vanilla” jelly on top of the “chocolate” layer in your jar. Try not to mix them.
- Ready to Use: Now you have your own Pot-de-Crèm! Use your clean spoon to scoop out a little. Put it on your lips before bed for a sweet treat.
19. Petal-Infused Lip Oil

This lip oil is beautiful to look at. A clear, slender bottle holds a crystal-clear oil. Inside, delicate pink and white flower petals float. They are suspended with tiny air bubbles. The bottle has a silver rollerball. This makes it easy to glide on.
The oil is likely infused with rose or other botanicals. It works to hydrate and nourish lips. The rollerball gives a cooling, massaging feel. This is a very elegant and pretty lip treatment. It feels like a small piece of a garden.
DIY: Create Your Own Flower Lip Oil
- Gather Your Items: You will need a clean, empty rollerball bottle (you can buy these at a craft store, or an adult can help you clean an old one). You also need a clear, safe oil like jojoba oil or sweet almond oil. You’ll need a few clean, dry flower petals from your yard (like from a rose or pansy).
- Prepare the Petals: Make sure your flower petals are completely dry. If they are wet, they can spoil the oil.
- Add the Petals: Carefully push one or two small, dry petals into your empty rollerball bottle. Use a toothpick to help.
- Add the Oil: Use a small funnel (or be very careful!) to pour the clear oil into the bottle. Fill it up almost to the top.
- Add the Rollerball: Ask an adult to help you safely snap the plastic rollerball part into the top of the bottle.
- Enjoy: Screw on the cap. You now have a beautiful lip oil with real flowers inside! Roll it onto your lips to make them shiny and soft.
20. Whipped Lip Cream

This product packaging is very clever. A soft, pearly blue tube has a unique cap. The cap is a shiny, silver kitchen whisk. This suggests the product inside is light and airy. The “ICO” logo is modern and simple.
This is likely a “whipped” lip cream or mousse. The texture is probably very light. It glides on smoothly. It likely provides hydration without feeling heavy. This is a fun, creative design. It promises a cloud-like experience for your lips.
DIY: Make Your Own “Whipped” Lip Balm
- What You Need: A small bowl, petroleum jelly, and a small metal whisk (a tiny one from a kitchen set is good). You also need a clean, small pot to put your finished balm in.
- Get Ready to Whisk: Put a few big spoonfuls of petroleum jelly into your bowl.
- Add Air: Now, start stirring the petroleum jelly with your whisk. Stir it fast! Go in circles. You are trying to whip air into it.
- Keep Whisking: Keep stirring and whisking for about 1 or 2 minutes. You will start to see the petroleum jelly get lighter in color. It will look fluffier, like frosting or whipped cream.
- Scoop and Store: Once it looks light and airy, use a spoon to scoop your new “whipped” balm into your clean pot.
- Apply It: Use your finger to put some on your lips. It will feel much lighter and softer than regular petroleum jelly!
21. Luminous Coral Sheen Lipstick

This lipstick brings a cheerful pop of color. The case is a bright, matte coral. It feels modern and playful. The lipstick itself is a beautiful, creamy peach shade. It has a visible, luminous shine.
This formula glides on. It delivers both rich color and deep hydration. The “Luminous Lips” name promises a healthy glow. Your lips will feel soft and look vibrant. This shade is wonderful for a fresh, bright look. It is a simple way to light up your face.
DIY: Make Your Own Creamy Coral Lipstick
- Get Your Supplies: You’ll need a small, clean pot, petroleum jelly, a tiny piece of an orange crayon, and a tiny piece of a pink crayon (ask an adult for help with the crayons). You also need a spoon.
- Melt the Base: Ask an adult to help you put one spoonful of petroleum jelly in a small, heat-safe bowl.
- Add the Color: Add your tiny orange and pink crayon pieces to the petroleum jelly.
- Heat and Stir: Ask an adult to put the bowl over a cup of hot water. This will slowly melt everything together. Stir it with your spoon until the crayon is all melted and the color is one smooth, coral shade.
- Pour and Cool: Carefully pour your melted lipstick into your small, clean pot.
- Set It: Put the pot in the refrigerator for about 10-15 minutes. This will make it firm, just like a real lipstick! Now you can apply your homemade luminous coral color with a clean finger.
22. Ascorbic Radiance Lip Serum

This product looks like a serious skin treatment. It comes in a dark amber bottle. This protects the ingredients inside from light. The label says “Ascorbic Radiance Serum” and “Vitamin C.” It has a precise silver pump.
This serum is made to brighten and protect your lips. Vitamin C is known for making skin look radiant. This light serum likely hydrates deeply. It helps to improve lip texture over time. The pump gives you just the right amount. It is a smart, scientific approach to lip health.
DIY: Simple “Radiance” Lip Oil
- What You Need: A small, clean jar with a lid. You’ll need some petroleum jelly. You also need a Vitamin C capsule (ask an adult to buy this at a pharmacy).
- Scoop the Base: Put about two spoonfuls of petroleum jelly into your jar.
- Add the “Radiance”: Ask an adult to help you. Carefully open one Vitamin C capsule. Pour the powder from inside the capsule into the petroleum jelly. You only need a little bit!
- Stir Very Well: Use a clean toothpick or a small spoon to stir the powder into the jelly. Keep stirring until it’s mixed in as much as possible. You want the Vitamin C to be all through the jelly.
- Apply Your Serum: Before bed, use a clean finger to put a small amount of your “radiance” jelly onto your lips. It will work while you sleep to help your lips feel soft and look bright.
- Keep it Fresh: Put the lid on tightly.
23. 24K Gold Flake Lip Oil

This lip oil is pure luxury. A clear glass tube shows off the contents. Real 24-karat gold flakes are suspended in a clear, rich oil. The bright gold cap and hardware match the flakes inside. It looks incredibly lavish.
The oil deeply hydrates your lips. The gold flakes add a subtle, beautiful shimmer. The applicator wand is also coated in a shimmery gold. This product feels special to use. It gives your lips a high-shine, plump look. It is a true statement of glamour.
DIY: Make Your Own “Gold” Shimmer Lip Oil
- Gather Your Items: You will need a clean, empty lip gloss tube. You’ll also need some clear lip oil (or jojoba oil). For the “gold,” you need some gold cosmetic glitter or a tiny bit of gold eyeshadow (make sure it’s safe for lips!).
- Add the “Gold”: Carefully pour a tiny pinch of the gold glitter or gold eyeshadow powder into your empty tube. A little bit goes a long way.
- Pour the Oil: Use a small funnel (or be very careful!) to pour your clear lip oil into the tube. Leave a little space at the top so you can put the wand back in.
- Mix It Up: Put the applicator wand and cap back on the tube.
- Shake and Shine: Shake the tube gently. Watch your “gold” flakes swirl around in the oil!
- Apply Your Shimmer: Use the wand to apply your new, shimmery lip oil. Your lips will sparkle and shine.
24. Nude Lacquer Drip Gloss

This image captures the rich texture of the gloss. A velvety, nude-pink color drips from the applicator. The applicator itself looks plush and soft. It holds a generous amount of product. This promises a thick, cushioned feel.
The gloss has an intense, vinyl shine. It is a “lacquer.” This means it delivers opaque color and a wet-look finish. The color is a sophisticated, neutral mauve. It would suit many skin tones. This gloss is for a bold, plump, high-shine pout.
DIY: Create a Creamy Nude Gloss
- Find Your Supplies: You’ll need a small, clean pot, petroleum jelly, a tiny bit of brown eyeshadow, and a tiny bit of pink or red lipstick. You also need a spoon.
- Melt the Base: Ask an adult to help you melt one spoonful of petroleum jelly in a bowl over warm water.
- Mix Your Color: Scrape a tiny pinch of brown eyeshadow into the melted jelly. Then, add a tiny speck of your pink or red lipstick.
- Stir and Check: Stir everything together very well. The color should look like a soft, brownish-pink. You can add a little more brown or pink until you like the shade.
- Cool It Down: Pour your new nude-colored gloss into your small pot. Let it cool in the fridge for about 10 minutes until it’s firm.
- Get the Look: Use a clean finger or a cotton swab to scoop up a good amount of your new gloss. Smooth it on your lips for a thick, shiny, nude look.
25. Frosted Soothing Lip Mask

This product looks calm and soothing. It is a simple, frosted glass jar. The metal lid is simple and secure. Next to it is a small, curved spatula. The spatula is a soft, lavender color. Its shape is made to fit your lips.
The jar is empty, but it implies a thick, rich mask. You would use the clean spatula to scoop it out. This keeps the jar free of germs. This is likely a thick, overnight lip mask. It is designed to deeply hydrate and repair lips while you sleep.
DIY: Make Your Own Soothing Lip Mask & Spatula
- Get Your Supplies: You will need a small, clean jar (like an empty baby food jar). You’ll also need petroleum jelly and a few drops of coconut oil. For your “spatula,” you can use a clean, rounded plastic spoon (like a small yogurt spoon).
- Make the Mask: Put three big spoonfuls of petroleum jelly into your jar.
- Add Softness: Add two or three drops of coconut oil to the petroleum jelly.
- Stir It Up: Use your plastic spoon to stir the oil and jelly together. Keep stirring until it’s all smooth and creamy.
- Your Kit is Ready: Now you have your lip mask in its jar, and your clean plastic spoon is your spatula!
- How to Use: Before bed, use your spatula (the spoon) to scoop a small amount of the mask from the jar. Use the spoon to spread it all over your lips. In the morning, your lips will feel very soft. (Remember to wash your spatula!)
26. Firestorm Tingly Lip Plumper

This gloss is all about heat. The clear tube shows a bright red, glittery formula. The name “FIRESTORM” is written in fiery letters. It even says “Tingly Lip Plumper.” This gloss is designed to make your lips look fuller.
The tingling feeling comes from plumping ingredients. They cause a rush of blood to your lips. This makes them swell slightly and look poutier. The red glitter adds intense, fiery shine. This is a bold and dramatic lip gloss.
DIY: Make a Gentle “Tingly” Lip Gloss
- Get Your Stuff: You’ll need a small, clean pot, clear lip gloss, and a tiny drop of peppermint oil (not extract!). You can also add a pinch of red cosmetic glitter if you want.
- Mix Your Gloss: Squeeze some clear lip gloss into your small pot.
- Add the “Tingle”: Ask an adult to help you add one tiny drop of peppermint oil. Peppermint oil is very strong, so one drop is more than enough! It will give a safe, cool, tingly feeling.
- Add Sparkle (Optional): If you want, stir in a tiny pinch of red glitter.
- Stir Well: Use a toothpick to stir everything together very well.
- Try It: Use a clean finger or a cotton swab to apply a small amount of your new “tingly” gloss. You should feel a cool, gentle tingle on your lips. This will make them feel refreshed!
27. Gloss Boss Star Wand

This gloss is pure fun. The tube has a holographic, rainbow design. The name “GLOSSS BOSS” is written in bold, playful letters. The cap is a sparkly, silver star. This is a gloss that wants to be seen.
The gloss inside is a bright, shiny pink. The applicator wand is soft and white, with a pink tip. This product is for someone who loves to sparkle. It delivers a high-shine, sugary-pink finish. It is a cheerful and whimsical gloss.
DIY: Make Your Own “Star” Gloss
- Find Your Supplies: You’ll need a small, clean pot, clear lip gloss, and a tiny bit of pink eyeshadow or blush. For sparkle, you’ll need some silver cosmetic glitter.
- Get Your “Star Wand”: Find a fun pencil or a stick. Ask an adult to help you cut a star shape out of sparkly silver paper. Tape this star to the top of your pencil. This is your magic “star wand” for applying!
- Mix the Gloss: Squeeze some clear lip gloss into your small pot.
- Add Color and Sparkle: Scrape a tiny bit of pink eyeshadow into the gloss. Add a tiny pinch of silver glitter.
- Stir It Up: Use a toothpick to stir it all together until it’s one sparkly, pink color.
- Apply Like a Boss: Dip a clean finger or a cotton swab into your gloss to put it on. (Your star wand is just for decoration, as it’s hard to clean!)
28. Hygiene Applicator Color Gel

This product focuses on cleanliness. It is a clear, soft tube. You can see the bright blue gel inside. The label clearly says “Hygiene Applicator.” This means the tip is designed to be used without your fingers.
This blue gel is likely a lip tint or a treatment. The applicator tip lets you squeeze the gel directly onto your lips. This is a simple, no-mess solution. The bright blue color is very unusual. It might go on clear, or it might be a fun, novelty tint.
DIY: Make a “Hygienic” Squeeze Gel
- Get Your Supplies: You will need a clean, empty, small squeeze tube. (You can buy these at a travel store, or an adult can help you clean out an old, small tube). You also need plain aloe vera gel (the clear kind).
- Add a Little Color: Put some aloe vera gel in a bowl. Add one tiny drop of blue food coloring.
- Stir It Up: Stir it very, very well until the gel is a smooth, even blue color.
- Fill Your Tube: Carefully spoon or squeeze your blue gel into your empty squeeze tube. This can be tricky, so go slow!
- Apply Cleanly: Put the cap on. Now, you can use your gel without your fingers! Just take the cap off and gently squeeze a tiny bit of the blue gel right onto your lips.
- Smooth It: You can rub your lips together to spread it. The aloe vera will feel cool and soothing. (The blue color will look very light or clear on your lips).
29. Lceyeyram Cooling Lip Roller

This is a very sleek and modern product. The tube is a metallic, brushed silver. It looks very high-tech. The applicator is not a brush. It is a metal rollerball.
This design is for a cooling lip treatment. The metal ball will feel cold and soothing on your lips. It is great for calming dry or irritated skin. The product inside is likely a clear, thin serum. It rolls on easily. This is an elegant way to apply a hydrating treatment.
DIY: Create Your Own Cooling Roller
- Find Your Bottle: You’ll need a clean, empty rollerball bottle. (An adult can help you find one at a craft or health store).
- Choose Your Oil: You need a clear, safe oil. Jojoba oil or sweet almond oil are great choices.
- Add a Cooling Feel: Ask an adult to help you add one single drop of peppermint oil to your main oil. This will give it a safe, cool, tingly feeling just like the metal ball.
- Fill the Bottle: Carefully pour your oil mix into the rollerball bottle. Leave a little space at the top.
- Snap on the Top: Ask an adult to help you snap the rollerball part into the top of the bottle.
- Chill and Roll: For an extra cooling feel, put your new lip roller in the fridge for 10 minutes before you use it. Then, roll the cool, minty oil all over your lips. It will feel amazing!
30. Luminosity Crystal Lip Serum

This bottle is incredibly elegant. It is made of heavy, faceted crystal. It looks like a classic perfume bottle. The gold cap and pump are labeled “LUMINOSITY.” This product feels very precious.
Inside is a clear, bright liquid. This is likely a very special lip serum. It probably has ingredients to make lips look bright and plump. The pump dispenses a small, controlled amount. This is a beautiful item for a dresser. It promises a radiant, high-end lip treatment.
DIY: Make a “Crystal” Lip Nectar
- Find Your “Crystal” Bottle: Find a very pretty, clean, small glass jar. A tiny jam jar or a small, clear spice jar would work. Make sure it’s clean and dry.
- Get Your Nectar: You will need some clear aloe vera gel.
- Add a Little Shine: Add one or two drops of a clear, safe oil (like jojoba oil or coconut oil) to about two spoonfuls of aloe vera gel.
- Stir Gently: Use a spoon to gently stir the oil into the gel. Don’t stir too fast! You want it to mix, but still look clear and bright, like liquid in a crystal bottle.
- Store Your Serum: Carefully scoop your new “nectar” into your pretty glass jar.
- Apply It: Use a clean finger to scoop out a tiny bit. Dab it onto your lips. The aloe vera will hydrate, and the oil will add a beautiful, luminous shine.
31. Latte Buffing Lip Gloss

This gloss comes in a clever package. It looks like a miniature coffee cup. The rich, terracotta-colored base has vertical ridges. The applicator is a soft, fuzzy, dome-shaped tip. It looks like it would gently buff the product.
The formula inside is a warm, nude shade. It likely has a creamy, comfortable texture. This design is both cute and functional. It promises to smooth and coat your lips. It delivers a soft, subtle color. This is a very comforting and stylish gloss.
DIY: Make Your Own “Morning Coffee” Lip Balm
- Get Your Supplies: You’ll need a clean, small pot with a lid, petroleum jelly, and a tiny pinch of instant coffee grounds. You also need a spoon.
- Melt the Base: Ask an adult to help you gently melt one spoonful of petroleum jelly in a bowl over warm water.
- Add the Coffee: Add your tiny pinch of instant coffee grounds to the melted jelly.
- Stir It Up: Stir it very, very well. The coffee grounds will give your balm a nice, light brown color and a faint coffee smell.
- Cool It Down: Pour your coffee-colored balm into your clean pot. Let it sit in the fridge for 10-15 minutes until it’s firm.
- Apply Your Balm: Use a clean finger or a cotton swab to apply your new balm. It will give your lips a soft shine and a hint of a coffee scent!
32. Flake Away Exfoliating Wand

This tool is bright and cheerful. The packaging uses bold blocks of teal, yellow, and coral. The name “FLAKE AWAY” clearly states its purpose. It is a lip exfoliator. A small window shows the shimmery formula inside.
The top is a soft, nubbly silicone brush. You twist the bottom. The shimmery, peach-colored scrub comes out. You use the brush to gently massage your lips. This removes all the dry, flaky skin. It leaves your lips feeling soft and smooth.
DIY: Make a Two-Step Lip Scrub
- You’ll Need: A small bowl, one teaspoon of sugar, a tiny drop of honey, and a clean, soft toothbrush.
- Mix Your Scrub: Put the sugar and the drop of honey in your small bowl. Stir them together with a spoon. It should be a thick, gritty paste.
- Apply the Scrub: Use your finger to put a little bit of the sugar scrub onto your lips.
- Get Your “Wand”: Take your clean, soft toothbrush. This is your “Flake Away” wand.
- Gently Scrub: Very gently, rub the toothbrush in small circles all over your lips. This will scrub away any dry skin. Do this for about 10 seconds.
- Wipe and Glow: Use a warm, damp washcloth to wipe away all the sugar. Pat your lips dry. They will feel incredibly soft and smooth.
33. Sunny Day Cooling Lip Tube

This product is ready for a day by the pool. The bright, sunny yellow tube feels cheerful. It has a unique built-in applicator. The tip is a smooth, polished metal.
This design is for a cooling, soothing lip gel. The metal tip will feel very cold and refreshing on warm lips. It is a great way to apply a sunscreen or aloe vera gel. This is a smart, simple tool for summer lip care. It protects and soothes in one step.
DIY: Make a “Poolside” Lip Soother
- Get Your Supplies: You’ll need some plain aloe vera gel (the clear kind) and a regular metal spoon from your kitchen.
- Chill Your Tools: Put the aloe vera gel and the metal spoon in the refrigerator for at least 15 minutes. You want them both to be nice and cold.
- Time to Soothe: Take your cold spoon and your cold aloe vera gel out of the fridge.
- Apply Your Gel: Dip the back of the cold spoon into the cold aloe vera gel. You only need a little bit.
- Glide It On: Gently glide the back of the cold, gel-coated spoon all over your lips.
- Feel the Relief: The cold metal and the cold gel will feel amazing on a warm day. It’s a great way to help your lips feel refreshed and hydrated!
34. Élixir des Sens Lip Oil

This bottle looks classic and sophisticated. It is a clear glass rollerball. It is filled with a rich, golden-amber oil. The simple white label says “Élixir.” This suggests a precious, potent formula.
This is a roll-on apothecary oil. The metal rollerball glides smoothly. It applies a thin, even layer of nourishing oil. This oil is likely infused with botanicals. It works to hydrate and heal dry lips. It is an elegant, timeless lip treatment.
DIY: Make Your Own “Golden” Lip Oil
- Find Your Bottle: You’ll need a clean, empty rollerball bottle. (An adult can help you find one).
- Choose Your Oil: You need a clear, safe oil. Jojoba oil or sweet almond oil are great choices.
- Add a Scent (Optional): Ask an adult for help. If you have vanilla extract, you can add one single drop into your oil. This will give it a warm, sweet smell.
- Fill the Bottle: Carefully pour your oil (and the vanilla, if you used it) into the rollerball bottle. Leave a little space at the top.
- Snap on the Top: Ask an adult to help you snap the rollerball part into the top of the bottle.
- Roll on the Hydration: Screw on the cap. Your new “golden” elixir is ready! Roll it onto your lips anytime they feel dry.
35. Éclatant Precision Lip Pen

This product looks sleek and professional. It is a matte black pen. The name “ÉCLATANT” means “dazzling” or “brilliant.” The applicator is not a brush. It is a fine, metal rollerball.
This pen is designed for precise application. You can easily trace the line of your lips. The formula inside is likely a clear, high-shine serum. It delivers a brilliant, glossy finish. This is a modern, minimalist tool. It is for a sharp, defined, glossy lip.
DIY: Create a “Precision” Gloss Pot
- You’ll Need: A small, clean pot, some clear lip gloss, and a clean cotton swab (like a Q-tip).
- Fill Your Pot: Squeeze or scoop some of your clear lip gloss into your small pot.
- Get Your “Pen”: Your cotton swab will be your “precision pen.”
- Apply with Precision: Dip the very tip of the cotton swab into your lip gloss.
- Trace Your Lips: Look in a mirror. Carefully use the tip of the cotton swab to draw a shiny line right on the edge of your lips. Go all the way around your top lip and your bottom lip.
- Fill It In: After you have traced the outline, you can use the side of the cotton swab to fill in the rest of your lips. This will give you a very neat, “precise” look.
36. Black Ombré Velvet Lip

This gloss is chic and dramatic. The square bottle fades from solid black to clear. The cap is a sharp, modern white. This high-contrast design is very striking.
The applicator pulls out to reveal a deep, velvety red. The wand is a soft, pointed doe-foot. It is made for a precise application. This is a liquid lipstick. It likely dries to a rich, matte, or velvet finish. It is a bold color in a very sophisticated package.
DIY: Make Your Own “Velvet” Red Lip Tint
- Gather Your Items: You will need a small, clean pot, petroleum jelly, and some red food coloring (or a tiny pinch of red Jell-O powder).
- Make Your Tint: Put one spoonful of petroleum jelly in your pot.
- Add the Color: Add one tiny drop of red food coloring or a tiny pinch of the red Jell-O powder.
- Stir Well: Use a toothpick to stir it all together. Keep stirring until the color is a deep, smooth red. If you want it darker, add one more tiny drop of color.
- Apply Your Tint: Use a clean finger or a cotton swab to apply your new “velvet” red tint.
- Blot for “Velvet”: After you put it on, take a tissue. Gently press the tissue against your lips one time. This removes the extra shine and leaves a soft, velvety color.
37. Eoglow Compostable Lip Balm

This product is all about nature. The tube is made of simple, brown cardboard. It is “Compostable Skincare.” This means the packaging is safe for the earth. The balm inside is a soft, pale green.
The formula is likely all-natural. It might contain ingredients like matcha, avocado, or mint. The “Eoglow” name suggests a healthy, natural glow. A small cardboard tool helps push up the balm. This is a kind, gentle product for both your lips and the planet.
DIY: Make Your Own “Earth-Friendly” Lip Balm
- You’ll Need: A clean, empty cardboard chapstick tube (ask an adult to help you find one) or a clean, empty toilet paper roll. You also need petroleum jelly and a spoon.
- Prepare Your “Tube”: If using a toilet paper roll, ask an adult to help you cut a 2-inch-tall section. Use tape to close off one end of the roll, making a little cup.
- Melt the Balm: Ask an adult to help you gently melt two or three spoonfuls of petroleum jelly in a bowl over warm water.
- Pour Your Balm: Carefully pour the melted jelly into your cardboard tube.
- Let It Cool: Let it sit in the fridge for about 30 minutes. It needs to get completely solid.
- Use Your Balm: If you used a chapstick tube, you can twist it up. If you used the paper roll, you can tear the paper away. Or, you can just dip your finger into your new, eco-style balm!
38. Velvet Blur Lip Mattifier

This product looks incredibly soft. The bottle is frosted and has a velvety texture. The name “VELVET BLUR” suggests a soft-focus, matte finish. The applicator is very special. It is a long, flat, flexible paddle.
This wand is designed to smooth the product over your lips. It applies a thin, even layer. The formula is a light, nude liquid. It likely blurs lip lines. It gives a shine-free, “blotted” look. This is a very modern and sophisticated lip product.
DIY: Make a “VelVelvet Blur” Lip Balm
- Get Your Supplies: You’ll need a small, clean pot, petroleum jelly, and a tiny bit of cornstarch.
- Scoop Your Base: Put one spoonful of petroleum jelly into your pot.
- Add the “Blur”: Add a tiny pinch of cornstarch to the petroleum jelly. The cornstarch is what takes away the shine.
- Stir and Stir: Use a toothpick or a small spoon to stir the cornstarch into the petroleum jelly. Keep stirring until it’s all mixed in. The jelly will start to look less shiny and more “blurry.”
- Add a Little More: If it still looks too shiny, add one more tiny pinch of cornstarch. Be careful not to add too much, or it will get clumpy.
- Try It On: Once it’s smooth, use your finger to pat your new “velvet blur” balm onto your lips. You will see that it gives moisture without all the high shine.
39. Natural Nude Lip Gloss

This gloss has a natural, earthy feel. The bottle is frosted glass. The cap is made of light, natural bamboo. The logo has a small green leaf. This suggests the ingredients are natural.
The formula is a soft, beige-nude color. It is a very gentle and wearable shade. The soft doe-foot applicator makes it easy to apply. This gloss would give a healthy, moisturized shine. It is a great choice for an everyday, “your lips but better” look.
DIY: Make a Simple Natural Lip Balm
- You’ll Need: A clean, small jar. You also need petroleum jelly. (For a more natural version, an adult can help you buy shea butter or beeswax).
- Scoop Your Base: Put two or three spoonfuls of petroleum jelly (or shea butter) into your jar.
- Add a Little Oil: Add two or three drops of a natural oil, like olive oil or coconut oil.
- Stir It Up: Use a clean spoon to stir the petroleum jelly and the oil together. Keep stirring until it’s smooth and creamy.
- Your Balm is Ready: That’s it! You have made a simple, natural-style lip balm.
- Apply and Hydrate: Use your clean finger to put your new balm on your lips. It will protect them and give them a soft, healthy shine.
40. Silicone Spatula Lip Mask

This product is sleek and hygienic. It comes in a soft, matte taupe tube. A clear silicone spatula stands next to it. The spatula is smooth and flexible. It is designed to scoop and spread the product.
This is a lip mask. You squeeze the rich cream onto the spatula. Then, you use the spatula to apply it to your lips. This “wipe-clean” tool means you never have to use your fingers. It keeps the product clean. This is a smart, modern way to care for your lips.
DIY: Make a Lip Mask & Spatula Kit
- Get Your Supplies: You’ll need a small, clean pot, petroleum jelly, and a tiny bit of honey. For your “spatula,” you will need a clean, flexible plastic spoon (like a yogurt spoon).
- Make the Mask: Put two big spoonfuls of petroleum jelly in your pot.
- Add a Drop of Honey: Add one tiny drop of honey. Honey is a great moisturizer.
- Stir It Up: Use a regular spoon to stir the honey and petroleum jelly together. Mix them very, very well.
- Your Kit is Ready: Now you have your lip mask in its pot, and your clean plastic spoon is your new “silicone spatula.”
- Apply Your Mask: Use your plastic spoon “spatula” to scoop up a small amount of your mask. Use the back of the spoon to spread it all over your lips. When you’re done, you can just wash the spoon!
41. Trippy Swirl Multi-Chrome Gloss

This gloss is mesmerizing. The packaging features a liquid, psychedelic swirl. Colors shift from blue and green to gold and purple. The applicator cap matches this iridescent finish.
The gloss on the wand is a stunning multi-chrome. It shifts as it catches the light. This is a high-impact, futuristic gloss. It delivers a unique, duochrome shine. This is for a bold, otherworldly look. Your lips will catch every light. It is a true statement piece.
DIY: Make Your Own “Galaxy” Shimmer Gloss
- Get Your Supplies: You will need a small, clean pot, some clear lip gloss, and two different colors of shimmery eyeshadow (like a blue and a purple). You also need a toothpick.
- Squeeze Your Gloss: Squeeze some of your clear lip gloss into the small pot.
- Add the Colors: Scrape a tiny bit of the blue eyeshadow into one side of the gloss. Then, scrape a tiny bit of the purple eyeshadow into the other side of the gloss.
- Gently Swirl: Use your toothpick to gently swirl the two colors together. Do not mix them all the way! You want to see the separate streaks of blue and purple, just like a galaxy.
- Apply Your Gloss: Use a clean finger or a cotton swab to scoop up some of your new “galaxy” gloss. When you put it on, move your head in the light to see the colors change.
42. Cooling Aqua Serum Pen

This is a sleek, clinical-looking pen. The all-white tube is labeled “COOLIIING AQUA SERIUM.” The applicator is the star. It is a sculpted, metal rollerball. This shape is designed to hug your lips.
The metal tip provides an instant cooling sensation. This is a targeted lip treatment. The aqua serum inside likely delivers intense, watery hydration. It’s a refreshing way to soothe and plump dry lips. It feels like a high-tech spa tool.
DIY: Make Your Own “Ice Roller” Lip Soother
- Get Your Tools: You will need a metal spoon (a small teaspoon is best) and your favorite simple lip balm (like petroleum jelly).
- Chill the Spoon: Put your metal spoon in the freezer for 10 to 15 minutes. You want it to get very cold!
- Get the Balm: Take your cold spoon out of the freezer. Scoop a tiny bit of your lip balm onto the back of the cold spoon.
- Apply and Soothe: Gently glide the back of the spoon all over your lips.
- Feel the “Cooliiing”: The cold metal feels amazing and refreshing, just like the special “cooling” pen. It will help your lips feel soothed and smooth.
43. LuxeGloss Frosted Veil

This gloss is minimalist and chic. It comes in a frosted, semi-transparent bottle. The “LuxeGloss” name is written in simple, elegant black text. The cap and applicator are a clean, crisp white.
The gloss inside appears to be a clear or milky-white formula. It promises a pure, high-end shine. This is an understated and sophisticated gloss. It is for a clean, polished, “quiet luxury” look. It adds moisture and shine without any fuss.
DIY: Make a Simple “High Shine” Lip Topper
- You’ll Need: A small, clean pot, petroleum jelly, and a tiny drop of coconut oil.
- Get Your Base: Put one big spoonful of petroleum jelly into your small pot.
- Add the Shine: Add one single drop of coconut oil. This will make the petroleum jelly extra shiny and glossy.
- Stir It Up: Use a clean toothpick or a small spoon to stir the oil into the petroleum jelly.
- Mix It Well: Keep stirring until it’s all smooth and mixed together.
- Your Topper is Ready: Use a clean finger to tap it onto your lips. You can wear it by itself, or put it on top of your favorite lipstick to make it look super glossy.
44. Cloud Cream Lip Mousse

This product looks soft as a pillow. The “CLOUD CREAM” name is printed on a frosted square bottle. The applicator is very unique. It is a large, rounded, pink sponge. It looks cushiony and soft.
The formula inside is a light, beige-nude cream. This is likely a whipped lip mousse. The texture is probably very light and airy. It blends easily. This product gives a soft, blurred, matte finish. It is like a comfortable, dreamy cloud for your lips.
DIY: Make Your Own “Whipped” Lip Cream
- Gather Your Tools: You’ll need a small bowl, petroleum jelly, a tiny bit of cornstarch, and a small metal whisk (a fork will also work).
- Scoop the Jelly: Put two spoonfuls of petroleum jelly in your small bowl.
- Add the “Cloud” Feel: Add a tiny pinch of cornstarch. This will make it feel less greasy and more “matte.”
- Start Whipping: Now, use your whisk or fork to whip the petroleum jelly. Stir it very, very fast, in circles.
- Keep Going: Keep whipping for about 1 minute. You are whipping air into it. You will see the jelly get fluffy, lighter in color, and look just like whipped cream!
- Try It On: Use a clean finger to gently pat your new “whipped” cream onto your lips for a soft, cloudy look.
45. Coral Crescent High Shine

This gloss is all about the applicator. The clear, modern bottle holds a vibrant, creamy coral gloss. The wand itself is a unique, curved shape. It looks like a crescent moon.
This design is built to hug your lips. It holds a lot of product in its curve. This means you get full color in one single swipe. The formula looks rich and opaque. It promises a juicy, vinyl shine. This is a smart design for a bold, glossy finish.
DIY: Create a “Full Color” Coral Gloss
- You’ll Need: A small pot, petroleum jelly, a tiny piece of an orange crayon, and a tiny piece of a pink crayon (ask an adult for help!).
- Melt the Base: Ask an adult to help you melt one big spoonful of petroleum jelly in a small bowl over warm water.
- Add the Color: Add your tiny pieces of orange and pink crayon to the melted jelly.
- Stir It: Use a toothpick to stir everything together until the crayons are completely melted and the color is a bright, solid coral.
- Pour and Cool: Carefully pour your new gloss into your small pot.
- Set It: Let it cool in the fridge for 10 minutes until it’s firm. The crayon will make the color bold and bright, just like the one in the bottle!
The world of lip gloss is vast. It is easy to find a product that shines. It is harder to find one that also truly cares for your lips.
This collection of 45 products shows you can have it all. Healthy, hydrated lips are the best base for a brilliant shine.
Whether you love a clear serum, a bold lacquer, or a tingly plumper, an option exists. Your lips can feel good and look amazing.
Key Takeaways
- Hydration Comes First. The best glosses are packed with hydrating ingredients. They act like lip care and makeup in one.
- Applicators Matter. Modern glosses use many tools. Spatulas, rollers, and curved wands help you apply the product cleanly and precisely.
- Options Are Endless. You can find everything. This includes natural, compostable balms and high-tech plumping serums.
- DIY is Simple. You can create your own moisturizing, shiny glosses at home. Use simple kitchen ingredients for a fun, custom look.


