The holiday season is filled with warm gatherings. It is a time for making memories with family and friends. This often means taking many photos.

Finding an outfit can be a challenge. You want to look elegant for the pictures. You also want to feel comfortable and cozy while visiting.
This guide is here to help. We have gathered 55 different outfit ideas. These looks balance style and comfort. You can find inspiration for your next dinner party, casual get-together, or family portrait.
1. The Rich Plum Corduroy Shirtdress

This outfit provides wonderful warmth and style. A corduroy shirtdress in a deep plum or magenta shade creates a strong focal point. The fabric itself is soft and adds texture, which looks great in photographs. This dress features a button-front design and a self-tie belt. These details help define your waist and create a flattering shape.
It’s a comfortable choice for a long evening of sharing stories and meals. The long sleeves keep you cozy by the fireplace. You can pair it easily with brown leather boots for a classic, grounded look.
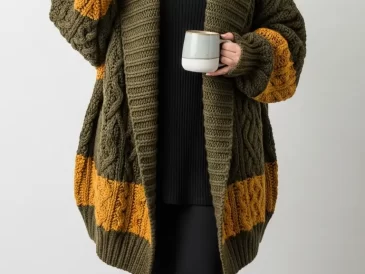
This style is also very flexible. As the image shows, a similar-colored sleeveless jumper or pinafore offers another route. You can layer this over a simple beige knit sweater. Add a thick, patterned scarf to complete the layered, cozy feel.
DIY Style: The Cozy Layered Jumper
(This guide helps you recreate the layered look shown in the bottom-right corner.)
- Find Your Base Shirt: Start with a simple, long-sleeved shirt. A color like beige, white, or light gray works best. This will be your “under-layer,” so make sure it’s comfortable and fits you well. Put this shirt on first.
- Add the Jumper: Find a sleeveless dress. This is often called a “jumper” or a “pinafore.” It should be a solid color, like the dark purple one in the picture. Carefully put this dress on over your long-sleeved shirt. Smooth it out so it hangs nicely.
- Get Your Scarf: Pick out a long, cozy scarf. A scarf with a winter pattern (like the one shown) makes it look extra festive. Hold the scarf so the middle is at the front of your neck.
- Wrap the Scarf: Toss both ends of the scarf over your shoulders so they hang down your back. Then, take the right end and bring it back to the front, laying it over your left shoulder. Take the left end and bring it to the front, laying it over your right shoulder. Let them hang down.
- Put on Your Boots: Finish the look with boots. Ankle boots or tall boots in a color like brown or black look great. They make the outfit feel complete and keep your feet warm.
2. The Mint Pointelle Cardigan

A short-sleeve cardigan adds a touch of light, vintage charm. This soft mint green piece uses pointelle knitting. This technique creates a delicate, lace-like pattern. The small pearl buttons provide a classic finish.
It’s a great layering item for gatherings that are warm but not too hot. You can button it up and wear it as a top. Pair it with white or cream trousers for a fresh, clean look. This top is understated yet refined. It works well for a daytime holiday brunch or a spring family photo.
DIY Style: How to Create a Sweet Cardigan Look
- Find Your Cardigan: Look for a short-sleeve cardigan. A light color like green, pink, or baby blue is nice. One with little buttons, like pretend pearls, looks very sweet.
- Choose Your Pants: Find a pair of pants in a very light color. White, cream, or light tan pants are a good choice. Make sure they are clean and not wrinkly.
- Put it Together: Put on your pants. Now, put on the cardigan. Button up all the little buttons, right to the top. This makes the cardigan look like a fancy shirt.
- Tuck it In (Optional): If you want, you can gently tuck the very bottom of the cardigan into the front of your pants. This makes your outfit look neat.
- Add Simple Jewelry: Ask a grown-up for a simple pair of earrings. Small hoops or simple studs are all you need. This keeps the look simple and pretty.
3. The Cozy Ribbed Wrap Top

This top is both comfortable and stylish. It’s made from a soft, ribbed knit fabric in a warm rust or terracotta color. The wrap design creates a V-neck, which is flattering. A long tie cinches at the waist, letting you adjust the fit. This detail highlights your shape and adds interest.
Long sleeves with a slight flare at the cuff keep you warm. This top pairs wonderfully with classic blue jeans. It’s a great outfit for casual family get-togethers or decorating the tree.
DIY Style: How to Style a Wrap Shirt
- Put on Your Jeans: Start with your favorite pair of blue jeans. Make sure they fit well.
- Get Your Wrap Shirt: Find a long-sleeve shirt that crosses in the front, like a robe. This one should have long ties attached to the sides.
- Put it On: Put the shirt on. Take the tie from the left side and pull it across your tummy to the right. Take the tie from the right side and pull it across your tummy to the left.
- Wrap and Tie: Keep wrapping the ties around your waist until they meet. You can tie them in a bow or a simple knot at your side or in the front. Pull it just tight enough to feel snug.
- Add a Necklace: The shirt makes a “V” shape at your neck. This is a good spot for a necklace. Find one or two simple gold-colored chains. A small pendant or charm looks nice.
4. The Celestial Velvet Maxi Dress

This gown is pure holiday magic. A floor-length dress made of deep navy velvet feels luxurious and warm. The real standout is the exquisite silver beading. Constellation and star patterns are embroidered across the shoulders and down the long sleeves.
This detail will catch the light beautifully in photos. The back features a row of elegant, fabric-covered buttons. This dress is a statement piece for a formal holiday dinner or a New Year’s Eve celebration. It combines winter elegance with a touch of wonder.
DIY Style: How to Make a Starry Night Dress
- Find Your Dress: Start with a simple, long-sleeve dress in a dark color like navy blue or black. A soft fabric like velvet is great, but any dark, plain dress will work.
- Get Your “Stars”: Ask a grown-up for help with this part. You will need a silver fabric pen, silver glitter glue, or some small, shiny star stickers from a craft store.
- Plan Your Constellations: Look at a picture of simple star constellations, like the Big Dipper or Orion’s Belt. Decide where you want to put them. The shoulders and sleeves are good spots.
- Draw Your Stars: Carefully use your silver pen or glitter glue to make small dots and star shapes on the dress. Connect some dots to make your constellations. If you are using stickers, just press them on firmly.
- Add Extra Sparkle: Put your hair up in a simple bun. Ask an adult for some shiny earrings, like pretend diamonds, to match your starry dress.
5. The Icy Blue Layered Look

This outfit creates a stunning “ice queen” effect. It is all about smart, elegant layering. A long-sleeve white lace top serves as the base. Over this, a silky camisole in a pale, icy blue is worn. The lace peeks out at the neckline and sleeves, adding delicate texture.
The look is anchored by a matching metallic-silver pleated midi skirt. This skirt will swish and catch the light as you move. A pearl headband and metallic pumps complete this frosty, formal look. It’s a striking choice for a winter-themed party.
DIY Style: How to Layer for a “Winter Princess” Look
- The Base Layer: First, put on a simple long-sleeve shirt. A white shirt is best. If you have one with a lace (holey) pattern, that’s even better!
- The Silky Top: Next, find a sleeveless shirt, like a camisole or tank top. A shiny, silky one in a light blue, silver, or white color is what you need. Put this on over your long-sleeve shirt.
- The Swishy Skirt: Find a skirt that goes down past your knees. A “pleated” skirt (one with many folds) in a shiny silver or light blue color is great. Tuck your shirts into the skirt.
- Fancy Headband: Get a headband. If you have one with pretend pearls or shiny rhinestones, put it on. This makes it look like a little crown.
- Shiny Shoes: Finish with your fanciest shoes. Shoes that are silver, white, or black will all work.
6. The Soft Lilac Midi Dress

This outfit is the definition of soft and comfortable. A tiered midi dress in a gentle lilac purple is easy to wear. The top features a “smocked” texture, which is stretchy and fits closely. This adds visual interest and comfort. Puff sleeves give it a slightly romantic feel.
The tiered skirt is flowy and relaxed. To make it ready for a cooler day, just drape a chunky knit cardigan over your shoulders. This contrast in textures—the soft dress and the heavy knit—is very appealing. Brown ankle boots ground the light colors.
DIY Style: How to Wear a Dress with a Cardigan
- Start with Your Dress: Put on a long, flowing dress. Any light, solid color like purple, light blue, or pink works. A dress with “tiers” (layers like a cake) is very fun.
- Find a Cozy Sweater: Get a big, warm cardigan sweater. A chunky knit (one that looks thick and bumpy) in a simple color like gray or white is a good match.
- Drape, Don’t Wear: Instead of putting your arms in the sleeves, just drape the sweater over your shoulders. Let it hang down your back and over your arms like a cozy cape.
- Add Your Boots: This look needs boots. Ankle boots in a neutral color like brown or gray are a great choice. They make the light-colored dress feel ready for fall or winter.
- Simple Necklace: Add one or two simple necklaces to finish the look.
7. The Classic Black Turtleneck

You can never go wrong with sharp, classic pieces. This outfit builds on a simple black turtleneck. The top is ribbed and fitted, creating a sleek silhouette. It’s paired with crisp, high-waisted trousers in a bright winter white or cream.
This high-contrast black and white combination is timeless. It photographs beautifully. Tucking the turtleneck into the trousers makes your legs look longer. Black ankle boots complete the streamlined effect. This is a polished, sophisticated look for any family gathering.
DIY Style: How to Get the Classic Black and White Look
- Find Your Dark Top: Start with a simple, long-sleeve shirt in a dark color. Black is best. A “turtleneck” (a shirt with a high, warm neck) is what’s shown, but any plain black shirt works.
- Find Your Light Pants: Now, find a pair of pants in a very light color. White or cream-colored pants are the goal.
- Tuck it In: Put on your pants and your shirt. Take the bottom of your black shirt and tuck it all the way into your pants, all the way around. This should look neat and tidy.
- Check Your Pockets: Make sure your pockets are flat. You can even put your hands in your pockets to look relaxed for a picture.
- Add Dark Shoes: Finish the outfit with dark shoes. Black boots or black sneakers will match your black shirt and look very sharp.
8. The Polished Tweed Dress

This tweed dress is sharp and sophisticated. The thick, woven fabric in shades of brown and gray has a classic, academic feel. It is tailored like a double-breasted coat, with two rows of statement buttons. This structure gives the dress a very polished shape.
The mini-length is balanced by long sleeves. A slight fringe at the hem adds a modern touch of texture. Layering it over a cream turtleneck makes it warm and ready for winter. Paired with sheer black tights and ankle boots, this look is smart and confident.
DIY Style: How to Layer a Fancy Dress
- The Under-Shirt: Start with a plain, thin turtleneck shirt. A color like white, cream, or beige is a good base. Put this shirt on first.
- The “Top” Dress: Find a dress that is made of thick, warm fabric (like a woolly coat). A “jumper” (sleeveless dress) or a dress with long sleeves works. It should look like a fancy coat. Put this dress on over your turtleneck.
- Add Your Tights: For a winter look, put on a pair of dark-colored tights. Black or dark gray tights are a good choice.
- Finish with Boots: Put on a pair of dark ankle boots. Black boots will match your tights and make the outfit look very put-together.
- Carry a Bag: Grab a small purse or bag with a shoulder strap. A brown or black bag will match the outfit.
9. The Turtleneck Sweater Dress

This outfit is a single piece that does all the work. A long sweater dress in a soft, neutral color like oatmeal or light gray is the ultimate cozy item. This one features a high, chunky turtleneck to keep you warm. The knit is soft and has a relaxed fit through the body.
A simple tie-belt cinches the waist to add shape. Long, ribbed cuffs and a ribbed hem add classic sweater details. Paired with tall brown boots, it’s a simple, elegant outfit. Layered gold necklaces add a small point of light.
DIY Style: How to Style a Sweater Dress
- One-Piece Outfit: Start with your main piece: a long sweater dress. This is a dress that is made of the same stuff as a warm sweater. One with a high “turtleneck” neck is extra cozy.
- Find a Belt: Find a belt. The best kind is one made of the same fabric as the dress (it might come with it). If not, a simple cloth or leather belt in a matching color works.
- Tie the Belt: Put the belt around your waist (the part of your body right above your belly button). Tie it in a simple knot or a small bow. Let the ends hang down.
- Add Necklaces: Find two or three simple, gold-colored necklaces. Try to find ones that are different lengths. Put them on over the turtleneck part of your dress.
- Pull on Your Boots: Finish by putting on tall boots. Brown or tan boots look very nice with a gray or beige dress.
10. The Chunky Knit Turtleneck

This is a timeless winter uniform. A chunky, oversized turtleneck sweater in a warm color like camel or toffee is essential. The thick ribbing adds great texture, making it look and feel extra warm. This sweater has a relaxed fit and balloon sleeves, which gather at the cuffs.
It’s the kind of piece you can wear all day. Tucking just the front of the sweater into a pair of high-waisted blue jeans gives the outfit shape. It stops the big sweater from hiding your waist. A few simple gold necklaces look great against the high neck.
DIY Style: How to Do the “Front Tuck”
- Get Dressed: Put on your favorite pair of blue jeans. Then, put on your coziest, thickest sweater. A big turtleneck is a great choice.
- Find the Front: Stand in front of a mirror. Find the very bottom edge of your sweater, right in the middle (in front of your belly button).
- Do the Tuck: Take just that small, middle part of the sweater (about as wide as your two thumbs). Gently poke it down into the front of your jeans, just behind the button.
- Fluff the Sides: Let the sides of the sweater hang loose. You can even pull them down a little. The sweater should look tucked in only at the very front.
- Add Jewelry: Put on a simple necklace that can be seen above the sweater’s neckline or right at the top of it. Gold-colored rings or earrings also look nice.
11. The Emerald Art Deco Dress

This dress brings drama and elegance. A deep, forest green wrap dress creates a rich holiday feel. The fluttery cape-like sleeves add a soft, flowing movement. Its most striking feature is the gold beadwork. Art deco fan patterns adorn the cuffs and the asymmetrical hemline.
A self-tie belt with tassels defines the waist. This piece is a complete outfit on its own. It is a wonderful choice for a dressy holiday dinner or a festive party. Pair it with simple gold heels and a clutch.
DIY Style: How to Accessorize a “Wow” Dress
- Start with the Dress: Put on your main dress. This is your “wow” piece, like the green one with gold designs. It’s already very fancy, so we don’t need to add too much.
- Pick Your Shoes: Look at the special details on your dress. This dress has gold designs. Shiny gold shoes would match! If your dress has silver sparkles, silver shoes would work.
- Choose Earrings: Since the dress has a V-neck, long, dangly earrings look very nice. Again, match the metal. Find some gold-colored earrings that hang down a little.
- Grab a Small Bag: You don’t want a big, clunky bag. Find a small, fancy purse. This is called a “clutch.” You just hold it in your hand. A simple gold or black one is a good choice.
- Check in the Mirror: Look at your whole outfit. The dress is the star, and your shoes, earrings, and bag are the “helpers.” It looks great.
12. The Jewel-Toned Velvet Leggings

Velvet adds instant luxury to any outfit. These high-waisted leggings in a deep emerald green are soft and comfortable. The fabric has a slight sheen that catches the light. This makes them much dressier than regular leggings.
They are a great base for a cozy-chic look. You can pair them with an oversized, chunky black sweater. Black ankle boots complete the simple, elegant silhouette. As the other images suggest, this style also works in navy blue or even a patterned black lace.
DIY Style: How to Dress Up Velvet Leggings
- Start with the Leggings: Put on your fancy velvet leggings. The dark green or dark blue ones are a great choice.
- Find a Big Sweater: Look for a big, cozy sweater. A dark color like black or charcoal gray looks very nice with the colorful leggings. The sweater should be a little long, covering your hips.
- Put on Your Boots: This outfit looks best with boots. Ankle boots (the ones that stop at your ankle) in a black color are a good match.
- Try a “Half-Tuck”: To make it look stylish, take just the front, middle part of your big sweater. Tuck it just a little bit into the front of your leggings. Let the back and sides hang long.
- Add One Accessory: You can add a simple long necklace that hangs down over the sweater. Or, you could wear some simple hoop earrings. Just pick one.
13. The Feather-Trimmed Crop Top

This outfit is for a chic and modern celebration. A simple, long-sleeve black top is transformed by playful trim. Soft, light gray feathers line the cuffs and the cropped hem. This adds a touch of glamour and texture.
The top is paired with matching high-waisted black trousers. This creates a sleek, unbroken line. The look is minimal but has a strong impact. It’s a sophisticated choice for a New Year’s Eve get-together or a stylish holiday photo.
DIY Style: How to Make a Faux-Feather Top
(Ask a grown-up for help with this craft!)
- Find Your Shirt: Start with a plain, long-sleeve shirt. A black one is great. An old one is fine, as you’ll be adding things to it.
- Get Your “Feathers”: Go to a craft store with an adult. Look for a “feather boa” or “feather trim.” This is a long string of feathers. Get one in a fun color like white, gray, or pink.
- Measure Your Shirt: Lay the shirt flat. Use a measuring tape to see how long the bottom edge (the hem) is. Then, measure around the end of each sleeve (the cuff).
- Cut the Trim: Ask the adult to help you cut the feather trim to match the lengths you measured. You will have three pieces: one for the bottom, and one for each sleeve.
- Attach the Feathers: The adult can use a hot glue gun or a needle and thread to carefully attach the feather trim to the edges of your shirt. Let it dry completely. Now you have a fancy top!
14. The Bronze Pleated Midi Skirt

This skirt brings warmth and shine. A metallic midi skirt in a coppery bronze shade is the star of this outfit. The accordion pleats create beautiful movement and catch the light. It’s a festive piece that isn’t covered in glitter.
The shine is balanced with a simple, fitted black turtleneck. Tucking the top into the high-waisted skirt creates a classic, flattering shape. Black boots keep the look grounded. This is a great way to be dressy and comfortable at the same time.
DIY Style: How to Style a Shiny Skirt
- Put on the Star: Start with your shiniest skirt. The “pleated” kind (with all the folds) in a color like gold, silver, or bronze is your main piece.
- Find a Simple Top: Because your skirt is so fancy, you need a very simple top. A plain, black, long-sleeve shirt or turtleneck is the best choice.
- Tuck it in Tight: Put on the shirt and skirt. Tuck your shirt all the way into the skirt. Make sure it’s smooth and flat. This makes your shiny skirt stand out more.
- Add Dark Tights (Optional): If it’s cold, you can wear black tights under your skirt.
- Choose Your Shoes: You can wear fancy black shoes or simple black boots. Both will look great and match your simple black top.
15. The Faux Leather Wrap Skirt

This look combines soft and structured textures. A faux-leather skirt in a deep burgundy shade adds a bit of edge. It’s not just a simple skirt. It has a wrap design with a tie belt and a cool, pleated panel on one side.
This modern skirt is softened by a cozy, gray knit sweater. The contrast between the sleek “leather” and the chunky knit is very stylish. Black tights and boots complete the outfit. It’s a confident choice for a family dinner.
DIY Style: How to Mix Textures (Soft & Sleek)
- Find a “Sleek” Piece: Look for a skirt or pants made of a smooth, shiny-ish material. “Faux leather” (which is like pretend leather) is a great example. Put this on.
- Find a “Soft” Piece: Now, find a top that is the opposite. Look for your fuzziest, softest, or “bumpiest” knit sweater. A gray or cream-colored sweater is a good, simple choice.
- Put Them Together: Put on the sweater with the sleek skirt. You can leave the sweater untucked for a cozy look. Or, you can tuck just the front part in (the “front tuck”).
- Add Tights: Since it’s a skirt, add a pair of tights. Simple black tights work with almost everything.
- Finish with Boots: Ankle boots or tall boots will finish this “mixed texture” look.
16. The Romantic Ruffled Blouse

A white blouse is a timeless piece. This version adds a touch of romance with ruffles. One style shows delicate ruffles framing the button placket. Another features a bold, wide ruffle that drapes over the shoulders.
This top is very versatile. You can tuck it into smart black trousers for a polished, classic look. Or, as the other image shows, you can pair it with blue jeans for a more casual, yet refined, outfit. It’s a great piece for photos because it’s bright and has texture.
DIY Style: How to Style a Fancy White Shirt
- Start with the Shirt: Put on your fancy white shirt. This could be one with ruffles, lace, or just nice buttons.
- Option 1: Dressy: Find a pair of dark pants. Black or navy blue “trousers” (the nice kind, not jeans) are a good choice. Tuck your white shirt neatly into the pants. This looks very sharp and clean.
- Option 2: Casual-Cool: Find your favorite pair of blue jeans. Tuck your white shirt into the jeans. You can even roll up the sleeves a little bit. This is a more relaxed look.
- Add a Simple Necklace: The “V” neck on many blouses is a good spot for a small, simple necklace.
- Choose Your Shoes: For the dressy look, wear nice black shoes. For the casual-cool look, you can wear ankle boots or even clean white sneakers.
17. The Black Sequin Peplum Top

This top is ready for a celebration. It’s covered in sparkling black sequins that will shimmer in holiday photos. A unique silver sequin design in the center adds a focal point. It’s not just a simple shirt.
It has structured puff shoulders and a “peplum” waist. The peplum is a little ruffle at the bottom that flares out. This shape is fun and flattering. Paired with simple black velvet pants, this top does all the talking. It’s a great piece for a New Year’s Eve party.
DIY Style: How to Balance a Sparkly Top
- Put on the Sparkles: Start with your fanciest, sparkliest shirt. This is your “look at me” piece.
- Find Plain Pants: Because your top is so sparkly and busy, your pants need to be very simple. Find a pair of plain black pants. Velvet pants are nice, but any plain black pants will work.
- Keep Jewelry Simple: Your shirt is already like jewelry. You don’t need much more. A very simple, thin necklace or small stud earrings is all you need.
- Simple Shoes: Don’t wear sparkly shoes. This will be too much. Simple black shoes or boots will look best.
- Check Your Look: The goal is to make your sparkly top the “star.” Everything else (pants, shoes, jewelry) is quiet and simple to help the top shine.
18. The Floral Embroidered Sweater

This sweater is pure, whimsical charm. A chunky knit sweater in a soft, neutral gray acts as a canvas. It is covered in large, colorful embroidered flowers. You can see daisies, bluebells, and other wildflowers. This gives it a handmade, vintage feel.
The sweater has a slightly cropped fit. It pairs easily with classic, straight-leg blue jeans. Sturdy brown hiking-style boots add a rustic, outdoorsy touch. This is a warm and cheerful outfit for a casual gathering or a family outing.
DIY Style: How to Get a “Cozy & Cute” Look
- Find a Fun Sweater: Start with a cozy sweater. The most fun kind is one with a bright pattern, like the flowers shown. But any sweater with a picture or colorful design works.
- Add Your Jeans: Put on a simple pair of blue jeans. Any style you like is fine.
- Choose “Sturdy” Shoes: Instead of sneakers, try a pair of boots. Brown or black boots that look like you could go for a walk in the woods (like “hiking boots”) make the outfit look extra cozy.
- Keep it Simple: The sweater is the main attraction. You don’t need to add any necklaces or scarves.
- Roll Your Cuffs: For an extra touch of style, you can roll the bottom of your jeans up just one or two small folds, so they sit right on top of your boots.
19. The Quilted Patchwork Coat

This coat is like wearing a warm hug. It’s designed to look like a traditional patchwork quilt. Dozens of small fabric squares in different colors and floral patterns are stitched together. This creates a look that is full of history and personality.
The coat has a simple, open-front design with dark floral trim. It’s the perfect top layer. You can wear it over a simple base, like the olive green knit shown. It instantly makes a plain outfit special and is a wonderful, cozy piece for photos.
DIY Style: How to Wear a Big Statement Coat
- Start with a Simple Base: A big, busy coat (like this patchwork one) needs a very simple outfit underneath. Put on a plain, solid-colored shirt and a simple pair of jeans.
- Choose Your “Base” Color: Look at your coat. Find one of the simple colors in it. The person in the picture chose a green shirt to match some of the green squares in the coat. This looks very smart.
- Put on the Coat: Put your statement coat on over your simple shirt and jeans. Leave it open in the front so people can see your matching shirt.
- Push Up Your Sleeves: For a relaxed look, push the sleeves of your coat up your forearms just a little bit.
- Keep Everything Else Simple: Don’t wear a scarf or a big necklace. The coat is the only “wow” piece you need.
20. The Plaid Blanket Poncho

This is the ultimate cozy-weather accessory. A large, soft poncho drapes over the shoulders like a stylish blanket. This one features a classic tartan plaid pattern in navy, green, and red. The fringe at the bottom adds a nice, tactile finish.
A poncho is a great layering piece. You can wear it over almost anything. Here, it’s shown over a simple black top and light-colored pants. It adds warmth and a big visual impact with no effort. It’s a wonderful item for a chilly evening or a family photo outdoors.
DIY Style: How to Wear a Poncho or Big Scarf
- Get Your Base Outfit: Put on a simple, plain outfit. A black shirt and any color pants (like white or black) is a great, simple start.
- Find Your Poncho: Get your poncho. (A poncho is like a blanket with a hole for your head). If you don’t have a poncho, a very, very big scarf will also work.
- Put it On: Pop your head through the hole of the poncho. Let it drape over your shoulders. One point will hang down the front and one down the back.
- If You’re Using a Scarf: If you have a big scarf, fold it into a triangle. Then, hold the two far-apart corners and drape the triangle over your shoulders like a cape, with the point hanging down your back.
- Wrap it Up: You can also take a big scarf, wrap it around your neck once, and let the long ends hang down in front. This looks just as cozy.
21. The Festive Red and Green Knit Dress

This dress is the holiday season in a single piece. It features a bold, festive color-block design. The top is a fitted, ribbed red knit. The bottom is a flowing, pleated A-line skirt in deep forest green. This combination is classic.
White stripes at the neck, waist, cuffs, and hem add a crisp, sporty detail. They break up the strong colors nicely. This dress is comfortable and warm. Pair it with a simple white coat and clutch for a striking holiday party look.
DIY Style: How to Style a Colorful Holiday Dress
- Start with the Dress: Put on your festive dress. Since it’s already red and green, it’s the “star” of the show.
- Add a Neutral Coat: When your dress is this colorful, your coat should be very simple. Find a coat in a plain, light color like white, cream, or light gray. Drape it over your shoulders or wear it normally.
- Choose a Light Bag: Match your light-colored coat with a light-colored purse. A small white or beige clutch (a bag with no straps) looks very clean.
- Pick Simple Shoes: Don’t wear red or green shoes. That’s too much. Simple shoes in a “nude” (skin) color, white, or silver will look best.
- Simple Jewelry: The dress is already busy. A few small, simple necklaces and small earrings are all you need.
22. The Versatile Corduroy Skirt

This corduroy skirt is a fantastic and flexible piece. Shown in a beautiful deep teal, its A-line shape is flattering for many. The fabric itself adds a soft texture that’s great for fall and winter photos. Details like the button-front and patch pockets give it a classic, slightly retro feel.
This skirt’s strength is its versatility. You can dress it down with a chunky gray sweater and ankle boots. Or, create a sleeker look by pairing it with a fitted black turtleneck and tall boots.
DIY Style: How to Style a Corduroy Skirt (Two Ways)
- Get Your Skirt: Start with your corduroy skirt.
- Look 1: The Cozy Look
- Find a comfy, chunky knit sweater. A simple color like gray or cream is great.
- Put on the sweater and skirt. You can leave the sweater untucked.
- Add thick, dark-colored tights (like black or navy).
- Finish with flat ankle boots. This is a nice, casual look.
- Look 2: The Sleek Look
- Find a thin, fitted turtleneck shirt. A black one works very well.
- Put on the turtleneck and tuck it neatly into your skirt.
- Add sheer (a little see-through) black tights.
- Finish with tall black boots that go up to your knees. This is a sharper, dressier look.
23. The Tri-Color Velvet Bow Blouse

This outfit is all about polished, festive details. A crisp white, long-sleeve blouse acts as a clean canvas. The main feature is the large, dramatic bow at the neck. This bow is made of plush velvet in three holiday-ready colors: deep green, black, and rich burgundy.
This single accessory transforms the simple shirt. It adds texture and a formal, vintage charm. Tucked into dark plaid trousers, the look is sharp and sophisticated. It is a great choice for a dressy family dinner.
DIY Style: How to Add a Festive Bow to Any Shirt
- Find Your Shirt: Start with a plain, button-up shirt. White is a great choice. Button it all the way to the very top button.
- Get Your Ribbon: Find a long piece of ribbon. A velvet ribbon will look extra fancy. You can even use two or three shorter ribbons in different colors (like red, green, and black).
- Tie the Ribbons (If Needed): If you have three short ribbons, ask a grown-up to help you tie them together at one end. Now you have one long, multi-colored ribbon.
- Place the Ribbon: Tuck the ribbon under your shirt collar. The middle of the ribbon should be at the back of your neck.
- Tie the Bow: Pull the two ends of the ribbon to the front. Make sure they are the same length. Tie a big, floppy bow right at your neck, just like tying your shoelaces.
- Finish the Look: Tuck your shirt into a nice pair of dark pants or a skirt.
24. The Nautical Stripe Sweater

This sweater offers a touch of timeless, nautical style. A classic knit with navy and white stripes is always a clean look. This version adds special details. A wide boat-neck collar and anchor-stamped buttons on the shoulder make it unique.
The image shows how easily it can be styled. Pair it with simple blue jeans and white loafers for a casual, preppy look. Or, create a festive version. The other sweater adds bold red and sequin stripes. Tucked into a navy skirt, it’s ready for a holiday get-together.
DIY Style: How to Wear a Striped Sweater (Two Ways)
- Get Your Sweater: Start with your favorite striped sweater.
- Look 1: Casual & Easy
- Put the sweater on with a simple pair of blue jeans.
- You can leave the sweater untucked for a relaxed feel.
- Wear simple, comfortable shoes like white sneakers or loafers (the shoes in the picture). This is a great, easy daytime outfit.
- Look 2: Neat & Put-Together
- Find a simple, solid-colored skirt. A navy blue skirt (like the one shown) will match the sweater’s stripes.
- Tuck your striped sweater all the way into the skirt. Make sure it’s smooth.
- Wear the same white loafers or simple flats. This looks very neat for a photo.
25. The Snow Leopard Faux Fur Set

This accessory set brings instant glamour and warmth. A plush, faux fur scarf and a matching hat (called a beanie or toque) add a dash of drama. The striking snow leopard print is bold. Its black and white pattern creates a sophisticated, high-contrast look.
These pieces can elevate a simple outfit. Worn with a basic black sweater and white pants, the accessories become the main focus. The scarf has a clever pull-through slot to keep it neatly crossed.
DIY Style: How to Wear Bold Winter Accessories
- Start with a Simple Outfit: Your hat and scarf are the “stars.” Your clothes need to be simple. Put on a plain, solid-black sweater and solid-white (or black) pants.
- Put on Your Hat: Find your bold, patterned beanie hat. Put it on and pull it down so it’s snug and covers your ears.
- Wrap Your Scarf: Take your matching fuzzy scarf. Many like this have a little slit or hole on one side.
- Do the “Pull-Through”: Wrap the scarf around your neck. Find the little slit. Pull the other end of the scarf through the slit.
- Adjust the “X”: This makes a neat “X” shape at your neck that stays in place. If your scarf has no slit, just wrap it around your neck and cross the ends in front.
26. The Cozy Chenille Sweater

This sweater is all about touchable, plush texture. Chenille fabric is incredibly soft, almost like a fuzzy blanket. It’s shown in a warm, burnt-orange or rust color. This is a wonderful, cozy choice for a cool-weather gathering.
The images show how many ways you can find this style. A simple crewneck is classic. A V-neck is great for showing off a necklace. A hoodie version is more casual. All of them pair easily with simple blue jeans for a relaxed, comfortable look.
DIY Style: How to Do the “Front Tuck” with a Cozy Sweater
- Get Dressed: Put on your favorite pair of blue jeans. Then, put on your big, cozy sweater (like the chenille one).
- Find the Front: Stand in front of a mirror. Find the very bottom edge of your sweater, right in the middle (in front of your belly button).
- Do the Tuck: Take just that small, middle part of the sweater. It should only be about as wide as your two thumbs.
- Poke it In: Gently poke that small part down into the front of your jeans, just behind the button.
- Fluff the Sides: Let the sides and back of the sweater hang loose and baggy. You can even pull them down a little. This simple trick shows your waist and makes the big sweater look stylish.
27. The Whimsical Tulle Skirt

This skirt is made for celebration. It’s light, airy, and full of fun. Layers of soft tulle (a fine, net-like fabric) are tiered to create ruffles and lots of volume. It has a definite ballerina feel.
This piece can be styled in different ways. The soft blush-pink version is romantic and sweet, paired with a simple cream top. The black version is more dramatic and edgy. It looks sharp with a simple top and a bold, sparkly statement necklace.
DIY Style: How to Style a Big “Ballerina” Skirt
- Put on the Skirt: Start with your big, poofy tulle skirt. This is your main “party” piece.
- Find a Simple Top: The skirt is big, so your top needs to be simple and small. Find a fitted (close-to-your-body) long-sleeve shirt. A plain color like cream, white, or black is best.
- Tuck it In: Carefully tuck your simple shirt into the waistband of the skirt. Smooth it out so there are no bunches.
- Add Jewelry (Two Ways):
- For a sweet look (like the pink skirt), wear no necklace or just a very tiny one.
- For a dramatic look (like the black skirt), add a “statement” necklace. This is a big, chunky, sparkly necklace.
- Wear Fancy Shoes: Don’t wear sneakers. Wear your nice shoes, like simple heels or fancy flats, to complete the party look.
28. The Classic Fair Isle Cardigan
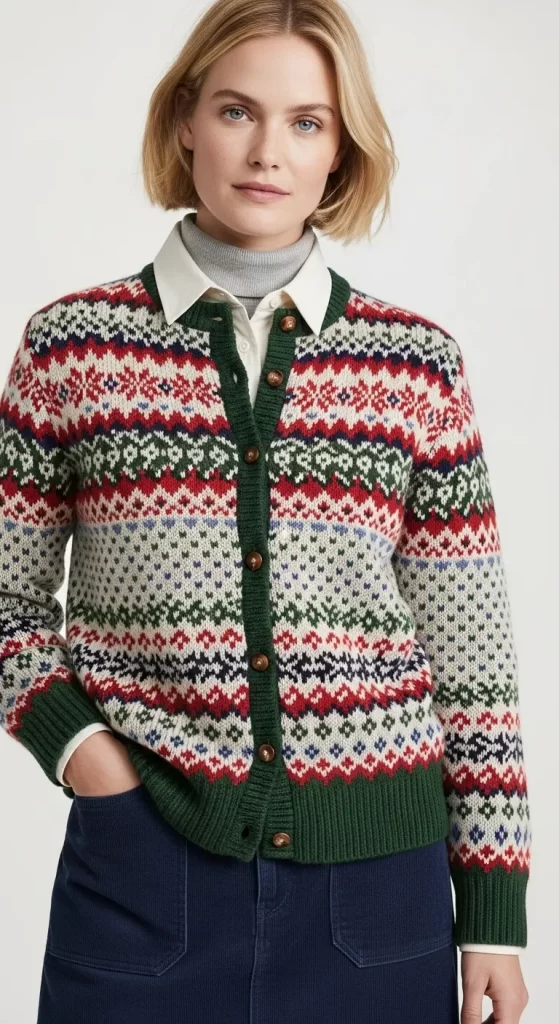
Nothing says “cozy winter” like a Fair Isle sweater. This classic cardigan is covered in the traditional geometric patterns. It uses festive colors like red, green, and blue on a cream background. The solid green trim and brown buttons add a lovely, earthy finish.
This is a great layering piece. It looks sharp worn over a collared shirt. You can even layer it over a thin turtleneck. Pair it with simple navy or black pants to let the colorful pattern be the star.
DIY Style: How to Layer a Festive Cardigan
- Find Your Base Shirt: Start with a simple “base” shirt. A thin turtleneck in a solid color (like light gray) is a great, warm choice.
- Or, Use a Collared Shirt: You can also use a button-up shirt with a collar (like white or light blue). Put this on first.
- Add the Cardigan: Put your fancy Fair Isle cardigan on over your base shirt. You can button up all the buttons, or just a few in the middle.
- Pop the Collar (If You Have One): If you wore a collared shirt, pull the collar points out. They should sit neatly on top of the cardigan’s neckline.
- Simple Pants: Wear this with simple, dark-colored pants. Navy blue pants, dark jeans, or black pants will all look good.
29. The Emerald Satin Trousers

These trousers bring a dose of luxury to a holiday gathering. They are made from a high-shine satin fabric in a stunning, deep emerald green. The wide-leg cut and high-waisted fit create a long, flowing silhouette. They will catch the light beautifully as you move.
This is a strong statement piece. To balance the shine, pair them with a simple, matte-textured top. A fitted black cashmere or fine-knit sweater is a great choice. Add metallic heels for a very elegant evening outfit.
DIY Style: How to Style Shiny “Fancy” Pants
- Let the Pants Be the Star: Put on your shiny, colorful satin pants. These are the most important part of your outfit.
- Find a Simple, Non-Shiny Top: You need a top that is the opposite of your pants. Find a simple, plain, not-shiny top. A soft black sweater or a plain black long-sleeve shirt is a good choice.
- Tuck it In: Tuck your simple black top into the high-waisted pants. This looks very neat and shows off the fancy pants.
- Pick Your Shoes: This look is great with “pointy-toed” shoes. Shiny silver or gold shoes (like in the picture) look very dressy. Plain black pointy shoes also work.
- Grab a Small Bag: Hold a simple, small black purse (this is called a “clutch”). It keeps the whole look looking sleek and fancy.
30. The Modern Plaid Set

A matching set is a smart and easy way to look polished. This outfit features a dark, moody plaid pattern with hints of burgundy and green. The top is a modern, slightly cropped shape with full balloon sleeves. The matching high-waisted, wide-leg trousers create a long, unbroken line.
Worn together, it’s a complete, confident look. The image on the right shows another option. You can layer a long, cream-colored cardigan over the set. This breaks up the pattern and adds a layer of cozy warmth.
DIY Style: How to Wear a Matching Pant Set
- Put on Your Set: Start by putting on your matching top and pants. This is the easiest outfit, since it’s already matched for you!
- Add a “Third Piece”: The picture on the right shows a great trick. Add a “third piece.” This is just a long, plain-colored cardigan sweater (like the cream one) or a simple jacket. Wear it open over your matching set.
- Tuck or Untuck: Look at the top. If it’s a little short (cropped), leave it untucked. If it’s long, tuck it into your pants for a neat look.
- Choose Your Shoes: Simple, dark shoes work best. Black ankle boots or black pointy-toed flats are a good choice.
- Add a Long Necklace: A long, simple necklace with one pendant (charm) looks nice hanging down in the middle.
31. The Silver Sequin Skirt

This outfit shows how to wear sparkles for a relaxed party. A silver sequin pencil skirt provides all the shimmer. It’s a very festive piece that catches the light. The key to this look is the balance.
The fancy skirt is paired with a simple, chunky knit sweater in a soft gray. This “high-low” mix makes the outfit feel modern and comfortable. You get all the party shine without feeling overdressed. Gray ankle boots complete the toned-down, stylish look.
DIY Style: How to Dress Down a Sparkly Skirt
- Put on Your Sparkles: Start by putting on your fanciest, most sparkly skirt. This is your “party” piece.
- Find a Cozy Sweater: Now, find a very simple, non-sparkly sweater. A big, “chunky” knit one in a plain color like gray or cream is a good choice.
- Put the Sweater On: Put the cozy sweater on. Do not tuck it in. Let it hang loosely over the top of your skirt. This makes it look more relaxed.
- Add Simple Shoes: Don’t wear sparkly shoes. Find simple ankle boots in a color that matches your sweater, like the gray ones in the picture.
- Skip the Jewelry: Your skirt is so sparkly, it acts like jewelry. You don’t need to add a necklace or big earrings.
32. The Preppy Cable-Knit Vest

This look is all about smart, cozy layers. A long, V-neck sweater vest in a warm camel brown is the main piece. The thick cable-knit texture adds a classic, preppy feel. It’s roomy and comfortable.
The vest is layered over a thin, long-sleeve T-shirt with navy and white stripes. This pattern mixing is simple but effective. Paired with dark jeans or trousers, it’s a great outfit for a casual family gathering or a day out.
DIY Style: How to Layer a Sweater Vest
- Find Your Base Shirt: Start with a simple, thin, long-sleeve shirt. A shirt with a pattern, like stripes, is a fun choice. Put this shirt on first.
- Add the Vest: Find a sweater vest. This is a sweater with no sleeves. A “V-neck” one is a good choice. Put the sweater vest on over your long-sleeve shirt.
- Smooth it Out: Make sure your shirt collar (if it has one) is neat. Pull the sleeves of your shirt so they stick out nicely from the vest’s armholes.
- Add Pants: Put on a simple pair of pants, like blue jeans or dark trousers.
- Grab a Bag: A “crossbody” bag (one with a long strap that goes across your body) looks very nice with this outfit.
33. The Sheer Polka Dot Sleeve Top

This top adds a touch of playful drama to a simple outfit. The main part of the shirt is a simple, solid black. All the fun is in the sleeves. They are made of sheer, see-through fabric with a classic polka dot pattern.
The sleeves are full and “billowy,” gathering at a tight cuff. This creates a striking silhouette. This top is shown in two ways: a simple crewneck, or a fancier version with a bow-tie neck. It’s a great way to dress up dark jeans or black velvet pants for an evening event.
DIY Style: How to Style a “Fancy Sleeve” Top
- Put on Your Special Top: Start with your top that has the fun, fancy sleeves.
- Find Simple Dark Pants: Because your sleeves are so special, your pants should be simple. Put on a pair of plain black pants or dark-wash jeans.
- Tuck it In: Tuck your shirt neatly into the top of your pants. This makes your outfit look tidy and shows off your waist.
- Add Big Earrings: This top looks great with big, sparkly earrings. Ask a grown-up for some “statement” (big and dangly) earrings.
- Show Them Off: If you have long hair, try pulling it back into a ponytail or a bun. This lets everyone see your fancy earrings and the cool shoulders of your shirt.
34. The Color-Block Faux Fur Vest

This vest is a bold and luxurious layering piece. It’s made from very soft, plush faux fur. The design is a “color-block” chevron, with big, angled stripes of dark brown, winter white, and black. This is a strong, graphic pattern.
The vest is long, adding a lot of warmth and drama. It’s worn over a simple, quiet base: a fitted cream-colored turtleneck and slim black pants. This allows the vest to be the one and only focus of the outfit.
DIY Style: How to Wear a Big Fuzzy Vest
- Start with a “Quiet” Outfit: Your vest is the “loud” piece. Your clothes underneath need to be “quiet.” Put on a plain, solid-colored shirt (like white or cream) and plain, solid-colored pants (like black).
- Add Your Vest: Put your big, fuzzy vest on over your shirt. Leave it open in the front.
- Add Simple Boots: Put on a pair of simple black ankle boots.
- Add Gloves (Optional): If it’s extra cold, a pair of simple black gloves will look very sharp and match your pants and boots.
- Let the Vest Shine: Don’t wear a necklace or a scarf. The vest is so big and fun, it’s the only accessory you need.
35. The Metallic Brocade Trousers

These pants are made for a party. The fabric is a rich, textured brocade. It features an intricate floral or paisley pattern woven in metallic gold and silver threads on a black background. This material is heavy and feels very luxurious.
The image shows two great ways to wear them. One is a slim, tailored trouser. The other is a more relaxed, wide-leg pant. Both are paired with a simple, solid-colored top, like a cream sweater. This lets the opulent pants remain the focus.
DIY Style: How to Wear “Fancy Party” Pants
- Put on Your Fancy Pants: Start with your special, patterned pants. These are the “star” of your outfit.
- Find a Very Simple Top: Because your pants are so busy and shiny, your top must be very simple. Find a plain, solid-colored sweater or shirt. White, cream, or black are good choices.
- Tuck it In: Put on your simple top and tuck it neatly into your fancy pants. This looks very tidy and polished.
- Wear Simple Shoes: Don’t wear patterned or colorful shoes. Simple black shoes (flats or heels) are the best choice.
- Keep Jewelry Small: You don’t need a big necklace. Small earrings are all you need.
36. The Classic Fair Isle Sweater

This is a true holiday classic. A soft, light-gray knit sweater provides a cozy base. The main feature is the traditional “Fair Isle” pattern around the yoke (the shoulder and chest area). The geometric design uses festive colors like dark red, green, and blue.
This sweater is the definition of “cozy.” It’s shown with a matching knit beanie. You can pair it with anything, from simple blue jeans to sleek faux-leather leggings. It’s a great choice for matching family photos.
DIY Style: How to Style Your Holiday Sweater
- Put on Your Sweater: Start with your favorite holiday sweater, like this Fair Isle one.
- Add a Matching Hat: If you have a knit hat (a beanie) that matches, put it on. This makes the look extra cozy and great for a photo.
- Choose Your Pants (Two Ways):
- For a casual look, put on a simple pair of blue jeans.
- For a “dressier” cozy look, put on plain black leggings.
- Pull on Your Boots: This outfit is all about being warm. Put on your coziest, warmest boots. The soft, furry kind (like Ugg-style boots) are a good choice.
- You’re Ready: This is a simple, warm, and festive outfit.
37. The Warm-Tone Suede Skirt

This skirt is a great, versatile piece for fall and winter. It’s made from a soft, faux-suede material in a warm, cognac-tan color. This texture is a nice change from denim or cotton. The images show a few styles: an A-line skirt with bold white stitching, a tiered ruffle skirt, and a longer pencil skirt.
All of them are great for layering. You can pair this skirt with a simple black turtleneck and a cream cardigan. Or, wear it with a festive plaid top. It’s a strong base for many cozy outfits.
DIY Style: How to Layer with a Simple Skirt
- Start with the Skirt: Put on your tan-colored skirt.
- Add Tights: Since it’s a skirt, you’ll want tights if it’s cool. Simple black tights work well.
- Choose a Base Shirt: Put on a simple shirt. A plain black turtleneck is a great, warm choice. A patterned shirt, like the plaid one, is also fun.
- Add a Top Layer: Find a cozy cardigan sweater. A light color, like white or cream, looks nice with the tan skirt and dark top. Put this on over your shirt.
- Finish with Boots: This look is great with boots. You can wear tall black boots or simple ankle boots.
38. The Shimmering Gold Knit Set

This outfit is the definition of comfortable glamour. It’s a matching two-piece set, with a V-neck sweater and a simple knit skirt. The magic is in the fabric. It’s a soft knit that has metallic gold “Lurex” thread woven all the way through.
This gives the entire outfit a soft, all-over shimmer. It’s not as bright as sequins, but it catches the light beautifully. It’s a wonderful choice for a holiday dinner where you want to be both dressy and completely comfortable.
DIY Style: How to Wear a Shimmery Sweater Set
- Put on Your Set: Get your matching shimmery sweater and shimmery skirt. Put them both on. This is the easiest outfit because it’s already matched for you.
- Keep it Simple: The outfit itself is the main statement. You don’t need to add much.
- Tuck or Untuck: You can leave the sweater untucked for a very relaxed feel. Or, you can tuck just the very front of the sweater into the skirt (the “front tuck”).
- Add Small Earrings: The shimmery fabric is near your face, so you don’t need a necklace. Just add a pair of small, simple gold hoop earrings.
- Simple Shoes: Wear simple shoes. Nude (skin-colored) shoes or simple flats will look nice.
39. The Floral Dress with an Edge

This look is a great mix of two different styles. The base is a long, romantic midi dress. It’s made of a dark, flowy fabric with a soft pink and green floral print. The smocked (stretchy, gathered) top and tiered skirt are very pretty.
To give this sweet dress a “tough” edge, a black leather moto jacket is thrown over the top. This contrast between the soft, floral dress and the structured, edgy jacket is very stylish. Black boots complete the look.
DIY Style: How to Give a “Tough” Edge to a Pretty Dress
- Start with “Pretty”: Put on your favorite long, flowy dress. A dress with a flower pattern is a good choice.
- Add “Tough”: Find a “tough” jacket. This could be a black (or dark) “moto” jacket. A jean jacket also works.
- Drape Your Jacket: Instead of putting your arms all the way in the sleeves, try just draping the jacket over your shoulders. Let it hang like a cape. This looks very cool in photos.
- Add “Tough” Boots: Don’t wear pretty, dainty shoes. Wear a pair of “tough” boots. Black boots, or even combat boots, are a good choice.
- You’re Done: You have now mixed two styles, “pretty” and “tough,” for a really cool look.
40. The Deep Red Bow Blouse

This blouse is pure, simple elegance. The power comes from its stunning, deep red or burgundy color. This rich, jewel tone is very festive and looks warm. The fabric is silky and drapes beautifully.
The main detail is the “pussy-bow” at the neck. This is a built-in scarf that you tie into a large, floppy bow. It’s a classic, sophisticated feature. Tucked into simple, high-waisted black jeans, this top is the entire statement.
DIY Style: How to Tie a Floppy Blouse Bow
- Put on Your Blouse: Put on your shirt that has the two long ties at the neck. Don’t tie them yet.
- The First Knot: Take the right tie and cross it over the left tie. Then, loop the right tie under the left tie and pull it up tight. This is the first knot, just like starting to tie your shoes.
- Make a Loop: Take the tie that is now on the left (the one hanging down). Make a single loop with it, just like making a “bunny ear” for your shoelace.
- Wrap and Pull: Take the other tie (the one on the right). Wrap it over the front of the bunny ear.
- Finish the Bow: Poke that same tie through the hole you just made. This creates a second bunny ear. Pull both bunny ears to make a big, floppy, beautiful bow.
41. The Ultimate Cozy Knit Loungewear

This is comfort at its most elegant. A matching knit set in a deep charcoal gray is a great choice for a relaxed family morning, like opening presents. The soft, fine-knit fabric looks much more put-together than simple sweatpants.
The image shows two wonderful options. One is a classic hoodie paired with ribbed knit joggers. The other is a simple crewneck sweater with matching wide-leg knit pants. Both are stylish and incredibly comfortable. You can wear them with fuzzy slippers indoors for a complete, cozy look.
DIY Style: How to Create a Cozy Matching Set
- Find Your “Comfy” Color: Look for a top and bottom that are the same, simple color. Gray, black, or navy blue are good choices.
- Get Your Top: Find a cozy top in that color. This can be a hoodie (a sweater with a hood) or a plain, long-sleeve sweater.
- Get Your Bottoms: Find pants in the exact same color. This is the most important part. They should also be made of a soft, comfy, “stretchy” material.
- Put Them On: Wear your matching top and pants.
- Add Cozy Feet: Finish the look with your fuzziest, softest, warmest slippers. This is the best outfit for a lazy holiday morning.
42. The Velvet Burnout Dress

This dress offers texture and a touch of romance. “Burnout” is a special fabric where a velvet pattern sits on top of a sheer, see-through layer. The red dress shows a floral velvet pattern. It has a V-neck and soft, fluttery sleeves.
The black versions show how this style can be more formal. Worn over a simple slip, the pattern stands out. It’s a dress that feels special and light, not heavy. It’s a beautiful piece for a holiday dinner or party.
DIY Style: How to Style a “See-Through” Patterned Dress
- Find Your “Under-Dress”: A dress like this is often see-through in some spots. First, you need a simple, plain “slip” dress. This is a thin, spaghetti-strap dress. A black or nude (skin-color) one is best. Put this on first.
- Add the “Wow” Dress: Carefully put your fancy, patterned dress on over the slip dress. Make sure the slip is straight and hidden underneath.
- Choose Simple Shoes: The dress has a very busy, pretty pattern. Your shoes should be very simple. Plain black or silver high heels or flats are a good choice.
- Grab a Small Bag: Get a small, fancy purse (a clutch). A color that matches your shoes or a simple gold/silver one works well.
- Add a Simple Necklace: The V-neck is a good spot for one or two simple, thin necklaces.
43. The Rainbow Shimmer Sweater

This sweater brings a fun, iridescent sparkle. It’s a chunky knit, but it’s woven with metallic threads that create a rainbow-like shimmer. The colors look like an oil slick, with green, blue, and purple hues.
This is a great way to be festive and casual at the same time. The sweater is the statement. You can balance its sparkle by pairing it with a “matte” (not shiny) material. Simple black leather pants or dark-wash jeans are a great choice.
DIY Style: How to Wear a Sparkly “Rainbow” Sweater
- Start with Your Sweater: Put on your fun, shimmery, colorful sweater.
- Find “Quiet” Pants: Your sweater is very “loud” and shimmery. Your pants need to be “quiet” and not shiny.
- Choose Your Pants: Simple black pants are the best choice. “Faux leather” pants (like in the picture) look cool. Plain black jeans also work great.
- Tuck it In (Optional): You can do a “front tuck.” Take just the very middle of the sweater’s bottom edge. Tuck it into the front of your pants. This shows your waist.
- Simple Shoes: Wear simple black boots or black sneakers. Let the sweater be the only colorful, shiny thing.
44. The Ribbed Mock-Neck Top

This is a fantastic, hard-working base layer. A simple, fitted top in a rich burgundy or wine color is a holiday staple. The “ribbed” knit gives it a subtle, vertical-line texture. This helps it look more expensive than a plain t-shirt.
The “mock neck” is a small, high collar that isn’t as big as a full turtleneck. It’s a great piece for layering. You can tuck it into plaid trousers, as shown. Or, wear it under a jumper, a blazer, or a cozy cardigan.
DIY Style: How to Style a Simple Ribbed Top
- Put on Your Top: Start with your simple, fitted, ribbed shirt.
- Find Patterned Pants: This simple top looks great with “busy” pants. Find a pair of pants with a pattern, like the plaid (checkered) ones in the picture.
- Tuck it in Neat: Tuck your shirt all the way into your pants. Make sure it’s flat and smooth.
- Add a Simple Belt (Optional): If your pants have belt loops, you can add a simple black or brown belt.
- This is Your Base: This outfit is now a great “base.” If you get cold, you can add a cardigan, a jacket, or a vest on top.
45. The Long Teddy Vest

This vest is like wearing a warm, stylish blanket. It’s made from a fuzzy “teddy” or “sherpa” material in a lovely camel-brown color. The long length and big, open collar make it a statement piece.
It’s a wonderful item for layering and adding texture to a simple outfit. As the image shows, it looks great over a plaid flannel shirt. This creates a cozy, rustic look. You can also wear it over a simple cream sweater and jeans.
DIY Style: How to Layer with a Big Teddy Vest
- Start with Your Base Layers: This look is all about layers. First, put on a simple, thin shirt. A “waffle” knit (one with little squares) is a good choice.
- Add a Pattern: Next, put on a button-up shirt with a pattern. A plaid flannel shirt is a great choice. You can leave this shirt unbuttoned, like a little jacket.
- Add the Vest: Now, put your big, fuzzy teddy vest on over both shirts. Leave the vest open.
- Put on Your Jeans: Finish the look with a simple pair of blue jeans.
- Roll Your Sleeves: For a cool, relaxed look, roll the sleeves of your plaid shirt up a little bit, so they are over the sleeves of your bottom shirt.
46. The Two-Tone “Paperbag” Trousers

These pants are a bold, modern choice. They feature a striking “two-tone” design. One leg is a warm, coppery brown, and the other is a classic black. This creates a unique, head-turning look.
The “paperbag” waist is high and gathered, with a thick tie-belt that makes a big bow. This is very flattering. To wear these, you need a very simple, fitted top. A plain black or brown long-sleeve top, tucked in, will let the pants be the star.
DIY Style: How to Wear “Two-Color” Pants
- Put on the “Star” Pants: Put on your cool, two-color pants.
- Find a Matching Top: Look at the colors in your pants (like brown and black). Find a simple, plain, fitted shirt that matches one of those colors. A plain brown shirt, like in the picture, is a good choice. A plain black shirt would also work.
- Tuck it in: You must tuck your shirt into these pants. This shows off the cool, high-waisted bow.
- Tie the Bow: Tie the belt that came with the pants into a big, neat bow right in the front.
- Match Your Shoes: Wear shoes that match one of the colors. Black ankle boots are a good choice to match the black leg.
47. The Champagne Satin Lounge Set

This is how you do “cozy” for a party. A two-piece set made of silky satin in a pale champagne or beige color looks very luxurious. The set can be a camisole and wide-leg pants. It can also be a button-up shirt and pants.
The fabric is light and reflects light beautifully. To make it cozy, add a third piece. A long, chunky-knit cardigan in a contrasting color, like the tan one shown, adds warmth. This mix of silky satin and a heavy knit is very chic.
DIY Style: How to Mix Silky and Cozy
- Find Your “Silky” Set: Put on your matching silky “pajama-style” outfit. This could be a camisole (tank top) and matching silky pants.
- Find Your “Cozy” Piece: Now, find a big, thick, warm sweater. A long cardigan (one that opens in the front) is a great choice.
- Put Them Together: Put the big, cozy cardigan on over your silky set. Let it hang open.
- Add Jewelry: This look is great with layered necklaces. Find two or three simple, gold-colored necklaces of different lengths.
- Choose Shoes: You can wear comfy heels (like in the picture) or simple, nice flats.
48. The Statement Red Jumpsuit

A jumpsuit in a bold, festive red is a complete outfit. It’s a powerful and confident choice. This one features long sleeves and wide-leg trousers. This creates a long, unbroken line that is very flattering.
The interesting detail is the asymmetrical, folded neckline with statement buttons. This adds a unique touch. A jumpsuit is an easy “one-and-done” piece for a holiday party. Just add elegant earrings and a simple clutch.
DIY Style: How to Accessorize a Bright Red Jumpsuit
- Put on Your Jumpsuit: Zip up or button up your red jumpsuit. This is your whole outfit in one piece!
- Add “Wow” Earrings: Since the jumpsuit is so bold, you need bold earrings. Find a pair of big, sparkly, or shiny earrings. Silver or “rhinestone” (like pretend diamonds) earrings look great.
- Find a “Non-Red” Bag: Do not use a red bag. Find a small, fancy purse (a clutch) in a different color. A sparkly silver or gold one, or a simple black one, is a good choice.
- Choose Your Shoes: Simple black or metallic (silver/gold) shoes will look best.
- Check the Mirror: The red jumpsuit is the star. Your earrings, bag, and shoes are the “helpers” that make it look even better.
49. The Winter Woods Tunic Dress

This tunic dress is full of rustic, wintery charm. The main body is a soft, light-brown or taupe color. The sleeves are a contrasting dark charcoal gray. The best details are the beautiful embroidery.
Pinecones, evergreen boughs, and red holly berries are stitched around the neckline and on the cuffs. This is a very festive, nature-inspired look. It’s a comfortable, A-line shape. You can wear it over simple black leggings and tall boots for a cozy gathering.
DIY Style: How to Wear a Tunic Dress
- Start with the Dress: A “tunic” is a short dress. Put on your tunic dress.
- Add Leggings: Because a tunic is short, you need to wear something on your legs. Plain, solid-black leggings are the best and most comfortable choice.
- Pull on Tall Boots: This look is great with tall boots. Find a pair of black or brown boots that go up to your knees. Pull them on over your leggings.
- Keep it Simple: The dress in the picture has a lot of pretty embroidery. If your dress has a pattern, you don’t need a necklace.
- Use Pockets: If your tunic has pockets, put one hand in a pocket for a relaxed, casual look in your photo.
50. The Pearl-Embellished Sweater

This sweater is a beautiful mix of cozy and elegant. It’s a soft knit in a lovely, pale ice-blue color. What makes it special are the pearl embellishments. Small and large pearls are scattered across the shoulders and down the full, “bishop” sleeves.
This adds a delicate, dressy touch. This top is great for a “dressed-up casual” look. You can pair it with simple, light-wash blue jeans. The contrast between the fancy pearls and the casual denim is very stylish.
DIY Style: How to Style a “Fancy” Sweater
- Put on Your Fancy Sweater: Start with your special sweater, like the one with the pearls.
- Add “Casual” Pants: To make this a “dressed-down” look, don’t wear fancy pants. Put on a simple pair of blue jeans.
- Do the “Front Tuck”: Take just the very middle of the sweater’s bottom. Tuck it into the front of your jeans. Let the sides hang out. This is a very popular style.
- Add Simple Earrings: Your sweater has “jewelry” (the pearls) on it already. You don’t need a necklace. Just add a small, simple pair of earrings.
- Simple Shoes: You can wear simple white sneakers, flats, or ankle boots. This keeps the look casual and cool.
51. The Metallic Silver Trousers

This outfit is a great mix of party-ready and comfortable. The pants are the main event. They are a straight-leg cut in a high-shine, metallic silver “liquid” fabric. These trousers catch the light and have a futuristic, celebratory feel.
The key to this look is balance. The flashy, high-shine pants are paired with a simple, chunky black sweater. This non-shiny, matte texture of the knit top tones down the pants. It makes the outfit feel modern and relaxed. Black sock-style ankle boots create a seamless, long line.
DIY Style: How to Style “Liquid Metal” Pants
- Put on Your Shiny Pants: Start with your “liquid metal” pants. These are the star of the show.
- Find a “Matte” Top: Your pants are very shiny. You need a top that is not shiny. Find a simple, plain black sweater. A chunky knit one is a great choice.
- Do the “Front Tuck”: Put on the sweater. Take just the very middle of the bottom edge. Gently tuck this small part into the front of your shiny pants. Let the sides and back hang loose.
- Add “Sock” Boots: Find a pair of black ankle boots that are tight at the ankle, almost like a sock. This makes your leg look very long and sleek.
- Add Hoop Earrings: A simple pair of silver or gold hoop earrings is all the jewelry you need.
52. The Rich Red Velvet Dress

This dress is a holiday classic. A deep, rich red velvet fabric is both festive and warm. The material has a soft shine that looks beautiful in photos. The dress features a flattering wrap-style top. This “surplice” V-neckline is very elegant.
Long sleeves provide warmth for a winter evening. The skirt flows out in a graceful A-line, hitting just below the knees. This is a timeless silhouette. You can see other versions too, like an off-the-shoulder style. Pair it with a sparkly clutch and metallic heels for a formal party.
DIY Style: How to Accessorize a Velvet Dress
- Put on Your “Star” Dress: Start by putting on your beautiful velvet dress.
- Add Sparkly Earrings: This dress has a “V” neck, which looks great with dangly earrings. Find a pair that sparkles, like pretend diamonds or shiny silver.
- Grab a Sparkly Bag: Find a small purse (a “clutch”) that you can hold. A very sparkly one, in silver or gold, will look great against the dark red dress.
- Find Matching Shoes: Wear shoes that match your bag. If you have a silver bag, silver shoes are a good choice.
- Add a Bracelet: Since the sleeves are long, a sparkly bracelet worn on one wrist is a nice finishing touch.
53. The Statement Shearling Coat

This is a very warm and stylish coat for a cold-weather event. “Shearling” (or “Sherpa”) is a material with a smooth, leathery outside and a soft, fuzzy, wool-like inside. This coat uses the fuzzy part as a bold trim on the large collar, cuffs, and pockets.
The main coat is a smooth tan or black. The dark trim outlines the coat’s seams, creating a cool, graphic look. It’s a heavy, structured coat. You can wear it over a simple, all-black outfit (like a black turtleneck and black pants) to let the coat be the star.
DIY Style: How to Wear a Big Statement Coat
- Start with an “All-Black” Base: Your coat is big and has a pattern. The easiest way to style it is to wear all one color underneath. Put on a simple black turtleneck shirt and simple black pants.
- Put on Your “Base” Shoes: Put on a pair of simple black boots. Now you are a “canvas” of all black.
- Add the Coat: Put your big, statement shearling coat on over your all-black outfit.
- Leave it Open: Don’t zip or button the coat. Leave it open in the front. This looks very stylish and shows off your sleek all-black outfit underneath.
- You’re Done: The coat is the whole outfit. You don’t need to add any scarves or big jewelry.
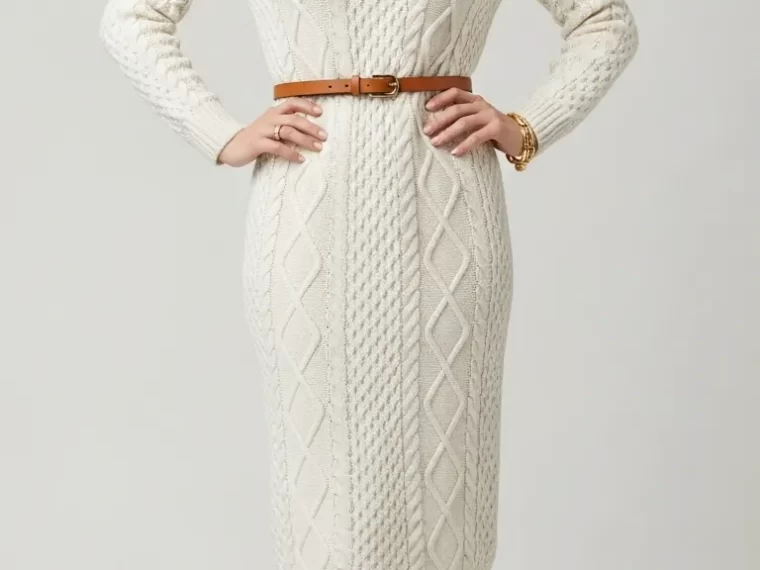
54. The Cable-Knit Sweater Dress

This dress is like wearing your favorite cozy sweater, but longer. It’s made from a thick, warm cable-knit fabric in a soft winter white or cream color. The intricate, “cabled” (braided) patterns add a lot of beautiful texture. This is a great choice for a cozy family photo.
The dress has a simple, long-sleeve, crewneck design. To give this cozy dress some shape, you can add a belt. A thin, brown leather belt at the waist breaks up the knit and highlights your figure. Tall brown leather boots are a classic match.
DIY Style: How to Belt a Sweater Dress
- Put on Your Dress: Start by putting on your long, cozy sweater dress.
- Find Your Belt: Get a simple, thin belt. A brown leather one is a great choice for a cream-colored dress.
- Find Your Waist: Stand in front of a mirror. Find the smallest part of your middle, right above your belly button. This is your “natural waist.”
- Put on the Belt: Wrap the belt around your natural waist. Put the end through the buckle and pull it so it’s snug, but not too tight.
- Add Tall Boots: This look is made for tall boots. Pull on a pair of tall brown boots that match your brown belt.
- Add a Necklace: A simple gold-colored necklace looks very nice at the neckline.
55. The Pearl and Star Cardigan

This cardigan is a lovely, dressed-up version of a cozy classic. It’s a simple black knit cardigan. What makes it special are the embellishments. It is scattered with shiny white pearls and small, sparkly star or snowflake shapes.
This turns a basic sweater into a festive, starry-night piece. It’s great for layering. As shown, you can wear it over a simple white V-neck and a black base layer. Paired with blue jeans, it’s a great “dressed-up casual” look for a low-key get-together.
DIY Style: How to Layer a “Fancy” Cardigan
- Start with Your Base: Put on a simple, plain base shirt. A plain white t-shirt or tank top is a good first layer.
- Add the “Fancy” Cardigan: Put your special, embellished cardigan on over the white shirt. You can leave the cardigan unbuttoned.
- Put on Your Jeans: Add a simple pair of classic blue jeans.
- This is “Dressed-Up Casual”: This look is a mix. The jeans are “casual.” The sparkly cardigan is “dressed-up.” Together, they look stylish but feel relaxed.
- Simple Shoes: You can wear simple sneakers, flats, or ankle boots with this.
Finding a great outfit for your holiday events does not need to be hard. This list shows that style and comfort can exist together.
You can choose a soft sweater dress. A velvet jumpsuit is another strong choice. Even a simple top with festive pants can create a memorable look.
The most important part is how an outfit makes you feel. Choose the look that gives you confidence. Mix these ideas. Try new combinations. Have a wonderful, warm, and stylish season.
Key Takeaways
- Embrace Texture: Soft knits, plush velvet, corduroy, and faux fur add warmth and look great in photos.
- Balance is Key: Pair a “fancy” piece (like a sequin skirt) with a “cozy” piece (like a chunky sweater) for a modern look.
- Layering Adds Style: A simple vest, cardigan, or blazer over a simple top creates a polished and warm outfit.
- A Statement Piece Works: A single item, like a bold red dress or metallic pants, can be a complete, elegant outfit with minimal effort.
- Don’t Forget Details: A velvet bow, a set of pearls, or a festive scarf can transform a simple base.
- Comfort is Chic: Matching loungewear sets in materials like cashmere or satin are a very stylish choice for a relaxed morning.